Table of Contents
Advertisement
Quick Links
Advertisement
Table of Contents

Related Manuals for Triplett AM320


Summary of Contents for Triplett AM320
- Page 1 User Manual AM320 CFM/CMM Thermo- Anemometer + InfraRed Thermometer...
- Page 2 Introduction Congratulations on your purchase of the Triplett AM320 CFM/CMM Thermo Anemometer with InfraRed Thermometer. This instrument measures Air Velocity, Air Flow (volume), Air Temperature (with probe) and Surface Temperature (with the InfraRed function). The large, easy- to-read backlit LCD includes primary and secondary displays plus numerous status indicators.
- Page 3 Do not leave batteries and packing material lying around unattended; they can be dangerous for children if they use them as toys In case the device is going to be unused for an extended period of time, remove the batteries to prevent them from draining Expired or damaged batteries can cause cauterization on contact with the skin.
-
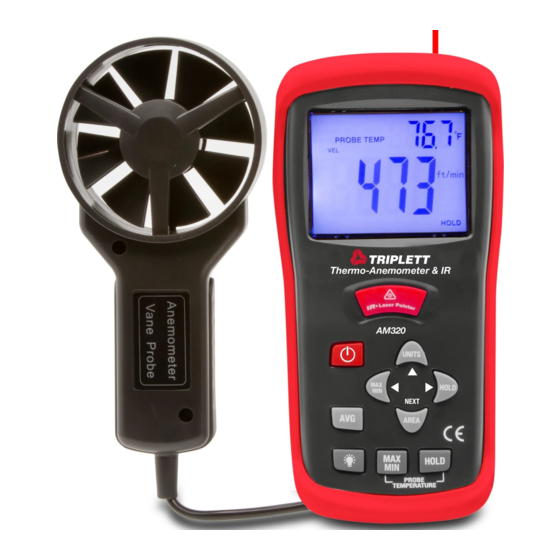
Page 4: Meter Description
Meter Description Power ON/OFF button Probe input jack Laser pointer IR Sensor Rubber holster LCD Display IR thermometer measurement button Airflow buttons (4) Air Temperature function buttons (2) 10. Vane 11. Airflow Average button 12. Backlight button 13. MAX‐MIN button for TEMPERATURE mode HOLD for TEMPERTAURE functions 15. - Page 5 Keypad Press to turn the meter ON or OFF IR + Laser Pointer Press and hold to measure. MAX/MIN (Airflow) Record and store the highest and lowest airflow or velocity readings. ◄ (LEFT) also serves as change decimal point button in AREA mode ...
-
Page 6: Display Layout
Display Layout MAX (top of LCD): Max Hold function engaged for the Air Temperature function HOLD (top of LCD): Data Hold function engaged for the Air Temperature function PROBE TEMP: Reminder that the top LCD digits represent Air (Vane) Temperature : Indicates that the laser pointer is on. -
Page 7: Operation
Operation Connecting the Vane 1. The vane plug is inserted in the meter’s sensor jack at the top of the meter. The plug and jack are keyed so that the plug can only fit in the jack one way. 2. Turn the plug carefully until it lines up with the jack and then firmly push the plug in place. - Page 8 Air Velocity Measurements (Up to 20 Point averaging) 1. To enter 20 Point Averaging Mode, press and hold the AVG button until it beeps twice. The AVG icon will be displayed. 2. Take a measurement and press the AVG button. A single beep will sound and the HOLD icon will appear in the display.
- Page 9 Place the sensor in the air stream. Ensure that the air enters the vane as indicated by the arrow sticker placed inside the vane. Refer to the diagram. The large main LCD display shows the Air Velocity reading. The upper right LCD sub-display shows the temperature reading.
- Page 10 After 5 seconds, the display will return to the current reading. (IMPORTANT: Please note that the average readings are only held for 5 seconds and cannot be recalled.) 4. Repeat steps 2 - 3 until all desired points have been measured. 5.
- Page 11 2. Replace the protective jacket and connect the sensor to the sensor input jack on top of the meter. Data Hold (Air Temperature) 1. While taking measurements, press the PROBE TEMPERATURE HOLD button to freeze the air temperature reading. 2. The HOLD indicator will appear in the bottom of the LCD display. 3.
- Page 12 InfraRed (Non-Contact) Temperature Measurements 1. The IR sensor is located at the top of the meter. 2. Point the sensor toward the surface to be measured. 3. Press and hold the red IR button to begin measuring the surface temperature of a desired target. IR TEMP will appear on the display.
-
Page 13: Battery Replacement
Battery Replacement When appears on the LCD, the 9V battery must be replaced. 1. Disconnect the vane. 2. Remove the meter’s rubber protective jacket 3. Use a Phillips screwdriver to open the rear battery compartment 4. Replace the 9V battery 5. - Page 14 Air Flow Range Resolution Area CMM (cubic 0-999999 m /min 0 to 999.9m meters/min) CFM (cubic 0-999999 ft /min 0 to 999.9ft ft/min) Temperature Range Resolution Accuracy 14 - 140 F (-10 - F (2.0 InfraRed Temperature Range Resolution Accuracy -58 to -4 F (-50 to - ±9.0...
- Page 15 -10 to 60 C (14 to Storage Temperature Operating Humidity <80% RH Storage Humidity <80% RH Operating Altitude 2000 meters (7000ft) maximum Battery One 9 volt (NEDA 1604) battery 80 hours approx. (if Backlight and Laser are used Battery life continuously the battery life is reduced to 2 to 3 hours approx.) Battery current...
- Page 16 IR Theory IR thermometers measure the surface temperature of an object. The meter’s optics sense emitted, reflected, & transmitted energy that is collected and focused onto the meter’s detector. The meter’s circuitry translates this information into an LCD reading. IR Field of View Ensure that the desired target is larger than the spot size as shown in the diagram below.
-
Page 17: Useful Equations And Conversions
Thermal Emissivity Table for Common Materials Material Emissivity Material Emissivity Asphalt 0.90 to 0.98 Cloth (black) 0.98 Concrete 0.94 Human skin 0.98 Cement 0.96 Leather 0.75 to 0.80 Charcoal Sand 0.90 (powder) 0.96 Earth 0.92 to 0.96 Lacquer 0.80 to 0.95 Water 0.67 Lacquer (matt) - Page 18 Area equation for circular ducts Area (A) = x r Radius Where = 3.14 and r = radius x radius Cubic equations CFM (ft /min) = Air Velocity (ft/min) x Area (ft CMM (m /min) = Air Velocity (m/sec) x Area (m ) x 60 NOTE: Measurements made in inches must be converted to feet or meters before using the above...
-
Page 19: Warranty
Triplett / Jewell Instruments extends the following warranty to the original purchaser of these goods for use. Triplett warrants to the original purchaser for use that the products sold by it will be free from defects in workmanship and material for a period of (1) one year from the date of purchase.
Need help?
Do you have a question about the AM320 and is the answer not in the manual?
Questions and answers