
Related Manuals for Iluv TimeShaker BOOM


Summary of Contents for Iluv TimeShaker BOOM
- Page 1 English Jumbo LED Display Dual Alarm Clock with Wireless Bed Shaker TimeShaker® BOOM User Manual (Ver 1.1)
-
Page 2: What's Included
WHAT’S INCLUDED Micro USB Cable For charging only. Does not sync. Main Unit Power Charge Reset Wireless Shaker Power Adaptor... -
Page 3: Product Overview
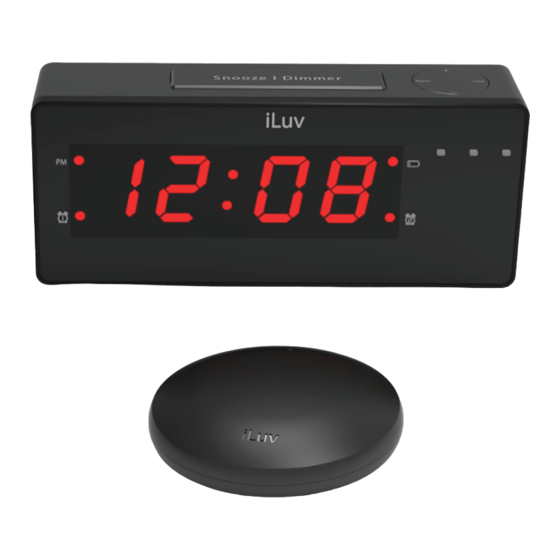
PRODUCT OVERVIEW 1. SNOOZE/DIMMER 2. ALARM SETUP/STOP Sn o oze I Di m m e r Alarm Time 3. TIME SETUP 4. TIME/ALARM INCREASE 5. TIME/ALARM DECREASE Front 6. DISPLAY 7. PM INDICATOR 8. ALARM 1 INDICATOR 9. ALARM 2 INDICATOR 10. - Page 4 Left 11. ALARM ON/OFF & SET: ALARM1+2, ALARM 1/SET, ALARM 2/SET 12. WAKE TO: PANIC SOUND+VIBRATION, VIBRATION, PANIC SOUND Right 13. PANIC SOUND VOLUME CONTROL Charge 14. VIBRATION STRENGTH: EARTHQUAKE, Shaker & Phone STRONG, NORMAL, OFF 15. USB CHARGING PORT Bottom 21.
- Page 5 POWERING ON Connecting to Power (Back) Designed by iLuv in New York Connect the included power adaptor to the Power Port located on the back of the unit and connect the wall plug to a working wall outlet Power DC 5V...
-
Page 6: Time Setup
TIME SET UP (Top) Default Time is set at 12:00PM 1. Press and HOLD the D Time Button for 3 Seconds Sno oze I D immer Time Alarm or until the clock Display Time begins blinking. Alarm 2. Press the E “+” or “-”... - Page 7 Time Alarm (Back) Select Time Format (12/24 hr) Designed by iLuv in New York • To select your preferred time format, use the R “Time Format ” switch located on the back of the device and ip the switch to 12hr...
- Page 8 PM time. The indicator will not appear during the 24hr format. (Back) Daylight Saving Mode* Designed by iLuv in New York To adjust your clock’s time -1/+1 hr VIA DST, use the “Daylight Savings Time” switch located on the back of the device to adjust accordingly.
-
Page 9: Alarm Setup
ALARM SET UP The device is equipped with 2 separate alarm (Left) clocks and will need to be set individually. Ensure your alarms are engaged by checking the placement of the switch control after alarm setup is done. (see images) Alarm setup will only work with AL1 or AL2 Setup is not available on the placement of AL1+ AL2... - Page 10 2. Press and HOLD the Alarm button to enter set-up S nooze I D i mm e r Alarm Time mode. Alarm Time (Front) 3. The LED display will blink if done correctly.
- Page 11 4. Press the “+” or “-” button to adjust the time. S nooze I D i m me r Time Alarm For faster adjustment, press and HOLD the “+” or “-” button. Alarm Time 5. When the desired time is set, press the Alarm S nooze I D im me r...
- Page 12 Entering ALARM 2 SET-UP Mode 1. Adjust the side switch to Alarm 2 Then repeat steps Alarm 1 Set Up steps 2 -5 for Alarm 2...
- Page 13 Setting up the Alarm Source The alarm source selected will activate with the alarm(s). You can change the alarm alert source by using the switch controls located on the left side of the device. • Panic Sound + Vibration • Vibration •...
- Page 14 Setting up Shaker Alarm To include the Wireless Shaker into your alarm routine, follow these steps: Power Charge Reset 1. Slide the power switch to “ON” by using the switch located on the shaker...
- Page 15 2. The Wireless shaker alarm will activate ONLY on Vibration or Panic Sound + Vibration Alarm settings. • Panic Sound + Vibration • Vibration • Panic Sound (X) 3.Vibration Strength Setting: Choose the strength level of vibration by using the switch located on the right side of the device.
- Page 16 Setting up Alarm Light Designed by iLuv in New York You can also add on the Alarm Light to your scheduled alarm by using the switch controls located on the back of the device. Alarm Light will work with all three alarm sources.
- Page 17 Setting up Panic Volume Adjust the volume of the N Panic Alarm Sound by using the volume control located on the right side of the device. Panic Alarm sound will not Charge Shaker & Phone work with Vibration alarm source. •...
- Page 18 ENABLE/DISABLE ALARM (Left) Please remember to activate/de-activate your alarm accordingly. If your turn off the alarm, you must enable it again for the alarm system to be activated. To activate/de-activate your alarm, use the switch controls located on the left side of the device Switch setting •...
- Page 19 SNOOZE • When the alarm is activated, the following (Top) options are available • Snoozing your alarm: Sn ooze I Di mmer Alarm Time Press the “SNOOZE” button located on the top of the device temporarily snooze your alarm. S n o oze I D i m m e r The snooze will silence your alarm in increments of 9 minutes.
-
Page 20: Turning Off The Alarm
TURNING OFF THE ALARM • Stopping your alarm: To S nooze I D i mm e r Alarm Time stop the alarm until the next scheduled time, press (Left) “Alarm” button located on the top of the Alarm Time device. -
Page 21: Display Dimmer
DISPLAY DIMMER • The TimeShaker BOOM is (Top) equipped with a display dimmer. You can select the Sn o oze I D i mm er brightness level by Alarm Time pressing the B SNOOZE/DIMMER button during stand-by mode. S nooze I D imm er 5 level brightness setting (OFF >... - Page 22 CHARGING WIRELESS SHAKER USB CHARGING PORT • LED indicator on the wireless shaker. Refer to the light status indicators below: 1. Flashing red LED: Battery low Power Charge Reset 2. Solid red LED: Charging 3. LED o : Fully charged •...
- Page 23 USB Charging port Charge located on the right side of the device. Shaker & Phone • The TimeShaker BOOM Charge cannot access the content Phone of the connected device. • The USB Charging port is compatible to most smartphones, tablets,...
-
Page 24: Backup Battery
BACK UP BATTERY BACK-UP BATTERY WILL NOT OPERATE THE CLOCK • The TimeShaker BOOM is equipped with a timekeeping system that can be powered with (2) AAA batteries (not included). The power failure protection circuit will not operate unless battery is installed. -
Page 25: Installing Back Up Battery
INSTALLING BACK UP BATTERY The Back-up Battery is NOT a secondary source of power. The function acts as a memory saver for your settings in case of a disconnection of power. It is recommended to replace the battery at least once a year. 1. - Page 26 Q: How do I replace the backup batteries without losing your settings? (If old batteries are dead your setting will not be saved) A: • Remove the power cord and shaker cord. • Locate the backup battery compartment on the bottom of the unit nd open it with a Philips screwdriver then remove the cover.
- Page 27 Thank you for purchasing your new iLuv product. We are fully committed providing our customers the utmost satisfaction through the use of our products. For warranty service, please visit us at www.support.iluv.com and submit a ticket with your date of purchase, product model number and a brief summary of your issue. In the event of any issues with your product(s), please review the troubleshooting section provided in the user manual.
- Page 28 8. Unplug TimeShaker BOOM during lightning storms or when unused for long periods of time. 9. When main plug is connected, TimeShaker BOOM is readily operatable. In order to disconnect TimeShaker BOOM completely, the main plug should be disconnected from the main socket outlet.
Need help?
Do you have a question about the TimeShaker BOOM and is the answer not in the manual?
Questions and answers