Table of Contents
Advertisement
Quick Links
OPERATOR'S
MANUAL
PLANER
MODEL: IP-2511-HD
Baileigh Industrial, Inc.
P.O. Box 531
Manitowoc, WI 54221-0531
Phone: 920.684.4990
Fax: 920.684.3944
sales@baileighindustrial.com
REPRODUCTION OF THIS MANUAL IN ANY FORM WITHOUT WRITTEN APPROVAL OF BAILEIGH INDUSTRIAL, INC.
IS PROHIBITED. Baileigh Industrial, Inc. does not assume and hereby disclaims any liability for any damage or loss
caused by an omission or error in this Operator's Manual, resulting from accident, negligence, or other occurrence.
Rev. 3/2015
© 2015 Baileigh Industrial, Inc.
Advertisement
Table of Contents

Subscribe to Our Youtube Channel
Related Manuals for Baileigh IP-2511-HD

Summary of Contents for Baileigh IP-2511-HD
- Page 1 REPRODUCTION OF THIS MANUAL IN ANY FORM WITHOUT WRITTEN APPROVAL OF BAILEIGH INDUSTRIAL, INC. IS PROHIBITED. Baileigh Industrial, Inc. does not assume and hereby disclaims any liability for any damage or loss caused by an omission or error in this Operator’s Manual, resulting from accident, negligence, or other occurrence.
-
Page 2: Table Of Contents
Table of Contents THANK YOU & WARRANTY ..................1 INTRODUCTION ......................3 GENERAL NOTES......................3 SAFETY INSTRUCTIONS ....................4 SAFETY PRECAUTIONS ....................6 SPECIFICATIONS ......................9 TECHNICAL SUPPORT ....................9 UNPACKING AND CLEANING ..................10 Cleaning ........................10 CONTROLS IDENTIFICATION ..................11 INTERNAL COMPONENT IDENTIFICATION ............... - Page 3 Cutterhead Parts List ....................42 TABLE PARTS DIAGRAM .................... 43 Table Parts List ......................44 TABLE ROLLER PARTS DIAGRAM ................45 Table Roller Parts List ....................46 INFEED PARTS DIAGRAM ..................47 Infeed Parts List ......................48 STAND PARTS DIAGRAM ................... 49 Stand Parts List ......................
-
Page 4: Thank You & Warranty
THANK YOU & WARRANTY Thank you for your purchase of a machine from Baileigh Industrial. We hope that you find it productive and useful to you for a long time to come. Inspection & Acceptance. Buyer shall inspect all Goods within ten (10) days after receipt thereof. Buyer’s payment shall constitute final acceptance of the Goods and shall act as a waiver of the Buyer’s rights to inspect or... - Page 5 Baileigh Industrial makes every effort to ensure that our posted specifications, images, pricing and product availability are as correct and timely as possible. We apologize for any discrepancies that may occur. Baileigh Industrial reserves the right to make any and all changes deemed necessary in the course of business including but not limited to pricing, product specifications, quantities, and product availability.
-
Page 6: Introduction
After receiving your equipment remove the protective container. Do a complete visual inspection, and if damage is noted, photograph it for insurance claims and contact your carrier at once, requesting inspection. Also contact Baileigh Industrial and inform them of the unexpected occurrence. Temporarily suspend installation. -
Page 7: Safety Instructions
IMPORTANT PLEASE READ THIS OPERATORS MANUAL CAREFULLY It contains important safety information, instructions, and necessary operating procedures. The continual observance of these procedures will help increase your production and extend the life of the equipment. SAFETY INSTRUCTIONS LEARN TO RECOGNIZE SAFETY INFORMATION This is the safety alert symbol. - Page 8 SAVE THESE INSTRUCTIONS. Refer to them often and use them to instruct others. PROTECT EYES Wear safety glasses or suitable eye protection when working on or around machinery. BLADE HAZARD Keep hands and fingers away from the rotating knife blades. These rotating knives can be extremely dangerous if you do not follow proper safety procedures.
-
Page 9: Safety Precautions
HIGH VOLTAGE USE CAUTION IN HIGH VOLTAGE AREAS. DO NOT assume the power to be off. (FOLLOW PROPER LOCKOUT PROCEDURES) SAFETY PRECAUTIONS Wood working can be dangerous if safe and proper operating procedures are not followed. As with all machinery, there are certain hazards involved with the operation of the product. Using the machine with respect and caution will considerably lessen the possibility of personal injury. - Page 10 SAFETY PRECAUTIONS (cont.) 6. Clearing Jams. To avoid serious personal injury from rotating knives, ALWAYS STOP the planer and disconnect power before removing a jammed piece part. Always follow proper lockout/tagout procedures. 7. Using Quality Stock. Inspect the stock over carefully that you intend to plane. NEVER plane a board that has loose knots, staples, or nails in it.
- Page 11 SAFETY PRECAUTIONS (cont.) 22. In-feed Roller Clearance. The in-feed roller is designed to pull material into the rotating cutterhead. To avoid serious personal injury, keep hands, jewelry, clothing, and long hair away from the in-feed roller while operating the machine. 23.
-
Page 12: Specifications
SPECIFICATIONS Cutting Capacity (W x H) 25" x 11.5" (635 x 292mm) 5/16” (7.9mm) Maximum Depth of Cut 13” (330mm) Maximum Material Thickness 1/2” (12.7mm) Minimum Material Thickness 10” (254mm) Minimum Material Length Feed Rate Variable 0-39ft/min. (0-10m/min.) Cutterhead Speed 4500 RPM Number Of Knives 3.85”... -
Page 13: Unpacking And Cleaning
UNPACKING AND CLEANING Remove planer from the shipping cartons. Check for damage and ensure all parts are intact. Any damage should be reported immediately to your distributor and shipping agent. Before assembling, read the manual thoroughly, familiarizing yourself with correct assembly and maintenance procedures and proper safety precautions. -
Page 14: Controls Identification
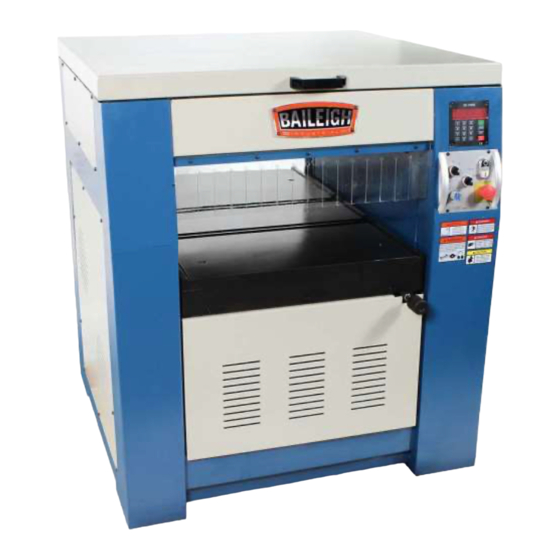
CONTROLS IDENTIFICATION A. Feed Motor On/Off Switch: After the main motor has been turned on for at least 5 seconds, this switch turns the feed motor ON and OFF. B. Cutterhead Service Switch: Turn to lock the cutterhead for blade inspection and change. -
Page 15: Internal Component Identification
INTERNAL COMPONENT IDENTIFICATION Fig. 3 A. Anti-Kickback Fingers: Provide additional safety for the operator. B. Serrated Infeed Roller: Pushes workpiece toward the cutterhead. C. Chipbreaker: Breaks off chips created by the cutterhead to prevent tear out and diverts the chips to the dust port. D. -
Page 16: Transporting And Lifting
TRANSPORTING AND LIFTING 1756 lbs (796kg) CAUTION: Lifting carrying operations should be carried out by skilled workers, such as a truck operator, crane operator, etc. If a crane is used to lift the machine, attach the lifting straps carefully, making sure the machine is well balanced. -
Page 17: Installation And Assembly
INSTALLATION and ASSEMBLY WARNING: FOR YOUR OWN SAFETY, DO NOT CONNECT THE MACHINE TO THE POWER SOURCE UNTIL THE MACHINE IS COMPLETELY ASSEMBLED AND YOU READ AND UNDERSTAND THE ENTIRE INSTRUCTION MANUAL. IMPORTANT: Consider the following when looking for a suitable location to place the machine: ... -
Page 18: Electrical
ELECTRICAL CAUTION: HAVE ELECTRICAL UTILITIES CONNECTED TO MACHINE BY A CERTIFIED ELECTRICIAN! Check if the available power supply is the same as listed on the machine nameplate. WARNING: Make sure the grounding wire (green) is properly connected to avoid electric shock. DO NOT switch the position of the green grounding wire if any electrical plug wires are switched during hookup. -
Page 19: Extension Cord Safety
Check with a qualified electrician or service personnel if the grounding instructions are not completely understood, or if in doubt as to whether the tool is properly grounded. Use only 3-wire extension cords that have grounding type plugs and receptacles that accept the tool’s plug. -
Page 20: Testing Machine Operation
TESTING MACHINE OPERATION Once assembly is complete, test run your machine to make sure it runs properly. If, during the test run, you cannot easily locate the source of an unusual noise or vibration, stop using the machine immediately, then review Troubleshooting. Test Run the Machine: 1. -
Page 21: Tighten V-Belts
Test Headstock Cover Limit Switch: 1. Release the EMERGENCY STOP button by twisting the knurled backside of the button clockwise until the whole assembly pops out. 2. Start the planer by pushing the CUTTERHEAD MOTOR switch. 3. Slowly and with great care, lift the top cover up (Fig. 5) only about 1/2"... -
Page 22: Power Controls
POWER CONTROLS There is a LED readouts on the digital control. The LED shows the actual position of the table. Table Movement - Manual 1. Press the button on digital control. 2. Table movement will stop when the button is released. Table Movement - Programmed 1. -
Page 23: Basic Operation
BASIC OPERATION CAUTION: Always wear proper eye protection with side shields, face shield, safety footwear, and leather gloves to protect from, chips, dust, burrs, and slivers. 1. Put on safety glasses and a respirator, and secure loose clothing and long hair. 2. -
Page 24: Power Feed Rate
Plane ONLY natural wood fiber. DO NOT plane MDF, plywood, laminates, or other synthetic products. Plane WITH the grain. Never feed end-cut or end-grained lumber into your planer. Do not plane boards with loose or large knots, splits, cross grain or other obvious blemishes or defects. - Page 25 TABLE ROLLERS 0 – 0.023” (0 – 0.6mm) Adjustment Height Range The height of the table rollers will vary, depending 0 – 0.023” Feed Direction on the condition of the wood you intend to plane. (0 – 0.6mm) When planing rough cut stock, set the rollers high to keep the lumber from dragging along the bed.
-
Page 26: Maintenance
MAINTENANCE WARNING: Make sure the electrical disconnect is OFF before working on the machine. Maintenance should be performed on a regular basis by qualified personnel. Always follow proper safety precautions when working on or around any machinery. Maintenance on your planer should be done at periodic intervals to ensure that the machine is in good working order. -
Page 27: V-Belt Maintenance
V-BELT MAINTENANCE V-belt removal and replacement is simply a matter of loosening the V-belts, rolling them off the pulleys, replacing them with new belts, and then tensioning them. This planer uses three V-belts to drive the cutterhead. Always replace the three cutterhead V- belts with a matched set of three belts. -
Page 28: Lubrication
LUBRICATION This planer features factory-sealed bearings. Sealed bearing requires no lubrication during its lifetime. Should a bearing fail, your planer will probably develop a noticeable rumble/vibration which will increase when the machine is put under load. Proper lubrication of other machine components is essential for long life and trouble-free operation. - Page 29 TABLE CHAIN TENSION The table chain transfers movement from the table gearbox to the table elevation screws. This chain can be adjusted to remove slack if the chain stretches over time. 5. UNPLUG OR DISCONNECT PLANER FROM POWER SOURCE AND LOCK OUT POWER. 6.
- Page 30 TABLE PARALLELISM Maximum Allowable Tolerance Cutterhead/Table Side-to-Side 0.01mm Table parallelism is critical to the operation of the planer. It is essential the table is parallel with the cutterhead within 0.01mm from side-to-side. Table Parallelism Inspection The easiest way to determine if your table has a parallelism problem is to plane a workpiece and measure the thickness in multiple locations.
- Page 31 5. Determine which side of the table you will adjust to bring the table parallel with the cutterhead (within 0.01mm). 6. Use the 12mm hex wrench to loosen the table elevation housing bracket cap screws for that side of the table (Fig. 15).
-
Page 32: Adjust Infeed / Outfeed Rollers
ADJUST INFEED / OUTFEED ROLLERS Distances Below Cutterhead at BDC: 0.0023” (0.06mm) Infeed Roller 0.0027” (0.07mm) Outfeed Rollers Pressure Bar To ensure accurate results and make the adjustment process quicker and easier, we recommend using a Dial indicator for these adjustments. If a Dial indicator is not available, wood blocks and feeler gauges can be used. -
Page 33: Anti-Kickback Fingers
ANTI-KICKBACK FINGERS CAUTION: Proper operation of the anti-kickback fingers is essential for the safe operation of this machine. Failure to ensure that they are working properly could result in serious operator injury. This planer provides an anti-kickback system as a safety feature. The anti-kickback fingers hang from a rod suspended across the cutterhead casting. -
Page 34: Outfeed Roller Tension
OUTFEED ROLLER TENSION The amount of tension or downward pressure of the outfeed roller needs to be enough to pull the workpiece along the planing path without binding, and prevent snipe to the end of the workpiece by keeping it firmly on the planing table. -
Page 35: Adjust Pressure Bar
ADJUST PRESSURE BAR Distances Below Cutterhead at BDC to Pressure Bar = 0mm To ensure accurate results and make the adjustment process quicker and easier, we recommend using a Dial indicator for these adjustments. Pressure Adjustment Using Dial Indicator 1. Make sure the cutterhead and table are parallel, and the cutterhead is at BDC. See “Table Parallelism”... - Page 36 TABLE ELEVATION LIMIT SCREW The table movement is limited by upper and lower limit switch. When the table position reaches the limit screws on table contact with limit switch, table movement stops. Table position upper and lower height limit: Upper height limit = 6mm Lower height limit = 300mm The digital control works properly when the LED readout shows the height limit, but table can still...
-
Page 37: Inspecting Knives
INSPECTING KNIVES The height of the knives can be easily and quickly inspected with the knife setting gauge. This inspection will ensure that the knives are protruding equally and are parallel with the cutterhead body. WARNING: Knife inserts are dangerously sharp. Use extreme caution when working with or around the knife inserts. -
Page 38: Setting/Replacing Knives
SETTING/REPLACING KNIVES Setting the knives correctly is crucial to the proper operation of the planer and is very important in keeping the knives sharp. If one knife protrudes higher than the others, it will do the majority of the work, and thus, dull much faster than the others. The included knife gauge is designed to set cutterhead. -
Page 39: Electrical Schematic
ELECTRICAL SCHEMATIC... -
Page 43: Electrical Cabinet Layout
Electrical Cabinet Layout... -
Page 44: Cutterhead Parts Diagram
CUTTERHEAD PARTS DIAGRAM... -
Page 45: Cutterhead Parts List
Cutterhead Parts List Item Description Item Description Bolt M8 x 20 Screw M6 x 12 Nut M8 Set Screw M10 x 12 Cover Spring Support 1 Flat Washer M8 Ball Bear 6204E Screw M8 x 16 Outfeed Roller Limit Plate Outfeed Axle Right Bear House Support 2... - Page 46 TABLE PARTS DIAGRAM...
- Page 47 Table Parts List Item Description Item Description Screw M6 x 12 Chain 08B 198 Flat Washer M6 Screw M8 x 25 Back Plate Lock Washer M8 Screw M12 x 40 Flat Washer M8 Lock Washer M12 Up / Down Motor Plate Lock Washer M6 Lock Washer M6 Bolt M6 x 30...
- Page 48 TABLE ROLLER PARTS DIAGRAM...
- Page 49 Table Roller Parts List Item Description Qty. Item Description Qty. Table Special Nut M8 Bolt M8 x 20 Plate Special Nut M8 Shaft Roller Bracket Shaft Screw M4 x 10 Plate Bracket Special Washer Roller E-Clip 25 Bolt M6 x 25 Shaft Limit Bracket Set Screw M5 x 8...
-
Page 50: Infeed Parts Diagram
INFEED PARTS DIAGRAM... -
Page 51: Infeed Parts List
Infeed Parts List Item Description Qty. Item Description Qty. 301 Bolt M8 x 20 320 Ball Bear 6000 302 Lock Washer M8 321 Gear 303 Special Washer 322 Cover 304 Infeed Motor 323 Adjusting Plate 305 Key 8 x 40 324 Main Motor Plat 306 Key 6 x 20 325 Flat Washer M8... -
Page 52: Stand Parts Diagram
STAND PARTS DIAGRAM... -
Page 53: Stand Parts List
Stand Parts List Item Description Item Description Stand Right Up Plate Power Plate Gas Spring 200N Flat Washer Cover 1" Screw M6 x 12 Loose Leaf Switch Box Lock Washer M8 Box Plate 1 Nut M8 Cap Screw M4 x8 Screw M8 x 20 Screw M6 x12 Flat... - Page 54 NOTES...
- Page 55 NOTES...
- Page 56 , WI 54220 UFEK RIVE ANITOWOC : 920. 684. 4990 F : 920. 684. 3944 HONE BAILEIGHINDUSTRIAL BAILEIGH INDUSTRIAL, INC. 1455 S. C , CA 91761 AMPUS VENUE NTARIO : 920. 684. 4990 F : 920. 684. 3944 HONE BAILEIGH INDUSTRIAL LTD. U...
Need help?
Do you have a question about the IP-2511-HD and is the answer not in the manual?
Questions and answers