Table of Contents
Advertisement
Advertisement
Table of Contents

Related Manuals for Furuno PP-505-FE


Summary of Contents for Furuno PP-505-FE
- Page 1 OPERATOR'S MANUAL PRINTER PP-505-FE Model (For FE-700/FE-800) www.furuno.com...
- Page 3 How to discard a used battery Some FURUNO products have a battery(ies). To see if your product has a battery(ies), see the chapter on Maintenance. Follow the instructions below if a battery(ies) is used. In the European Union The crossed-out trash can symbol indicates that all types of batteries must not be discarded in standard trash, or at a trash site.
- Page 4 SAFETY INSTRUCTION Read these safety instructions before you operate the equipment. Indicates a condition that can cause death or serious WARNING injury if not avoided. Indicates a condition that can cause minor or moderate CAUTION injury if not avoided. Warning, Caution Mandatory Action Prohibitive Action Safety Information for Operator...
- Page 5 A Word to the Owner of the PP-505 Congratulations on your choice of the FURUNO PP-505 Printer. For 60 years FURUNO Electric Company has enjoyed an enviable reputation for innovative and dependable marine electronics equipment. This dedication to excellence is furthered by our extensive global network of agents and dealers.
-
Page 6: Table Of Contents
TABLE OF CONTENTS 1. OPERATION ..................... 1 1.1 General .........................1 1.2 Panel..........................1 1.3 Turning on the Power ....................2 2. REPLACEMENT OF THERMAL PAPER............3 3. INSTALLATION ....................4 3.1 Complete Set ........................4 3.2 General Mounting Considerations .................4 3.3 Tabletop/Bulkhead Mount ....................5 3.4 Flush Mount ........................5 3.5 Wiring..........................6 4. -
Page 7: Operation
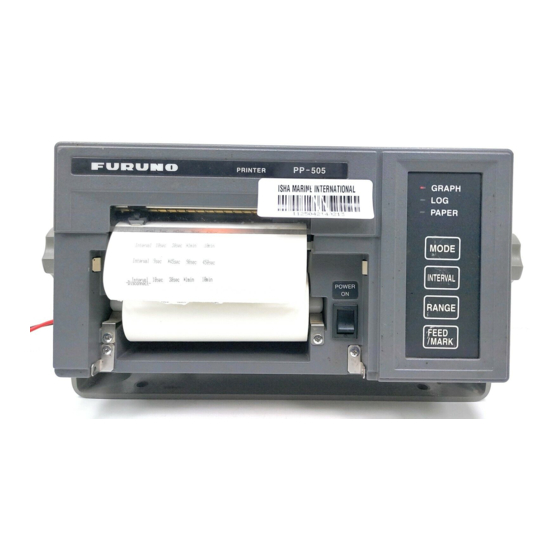
1. OPERATION General Panel Operation of the PP-505 is simple; just turn Power Switch on the power. The depth graph or the log, whichever is selected for printing, is printed out at the interval set. PP-505 PRINTER GRAPH PAPER Below are example printouts. MODE INTERVAL POWER... -
Page 8: Turning On The Power
OPERATION Changing the mode Feeding the paper/Printing the marker Press the [MODE] key to change the printing To feed the paper, press and hold down the mode from depth graph to log printing [FEED/MARK] key. alternately. Press the [FEED/MARK] key momentarily to The printing interval setting is printed print the marker. -
Page 9: Replacement Of Thermal Paper
2. REPLACEMENT OF THERMAL PAPER When the thermal paper runs out, the PAPER LED blinks, printing stops automatically and the aural alarm sounds for five seconds. Adhesive may With 1 meter of paper remaining, a red paper remain on paper Tape end mark appears on the paper. -
Page 10: Installation
3. INSTALLATION Complete Set Name Type Mass Remark 3.1 kg Main Unit PP-505 (with hanger) Spare Parts SP08-01600 Installation CP16-00800 Materials Accessories FP08-00500 Flush Mount Kit OP08-4 Option (004-511-330) General Mounting Heat accumulation Considerations The PP-505 consumes very little power, so there is no need for forced air ventilation. -
Page 11: Tabletop/Bulkhead Mount
Tabletop/Bulkhead Mount Flush Mount The main unit can be mounted on a desktop, Flush mount panel kit is optionally supplied. bulkhead, or in a panel. Make sure the selected location is strong enough to support Flush mount kit OP08-4 (Code No.: 004-511-330) the main unit against possible vibration and shock. -
Page 12: Wiring
3. INSTALLATION 1. Referring to the illustration below, prepare Wiring a cutout in the mounting area and drill four Refer to the interconnection diagram at end pilot holes for the flush mount angles. of manual for connection. Refer to the outline drawing at end of manual. 2. -
Page 13: Maintenance
4. MAINTENANCE Checking the power connector Fuse Replacement Check for loosened or disconnected power To protect the equipment from serious connector. damage, a 3A fuse is provided on the rear cabinet of the main unit. The fuse protects WARNING against overvoltage/reverse polarity of the ship’s mains or internal fault of the equipment. - Page 14 APPENDIX REPLACEMENT OF PRINTER ASSEMBLY/TERMAL HEAD 1. Loosen the four M4 × 15 screws fixing the 4. Move the carriage to position rear cabinet to the main unit assembly. rotating the carriage shaft by fingers, as 2. Disconnect the connectors connected to shown below, where the thermal head the rear cabinet to detach the rear assembly can be replaced easily.
-
Page 15: Appendix Replacement Of Printer Assembly/Thermal Head
6. Pull out the connector end of the flexible 9. Hold the flexible cable end with a cable from the connector. Take care not to tweezers and pull it out until it is damage the flexible cable. positioned as shown below. Head Holder End of Flexible 180°... - Page 16 11. Fix the flexible cable to the carriage with 12. Fold back the end of the cable and insert the flexible cable support, inserting the it into the connector. projection on the carriage into the hole of 180° the cable. End of Flexible Cable Flexible Cable Support...
-
Page 17: Specifications
FURUNO PP-505-FE SPECIFICATIONS OF PRINTER PP-505-FE (PRINTER FOR FE-700/800) DATA FORMAT Receiving system RS-232C Speed 9600 bps Data length 8 bits Parity Stop bit 1 bit PRINTER SECTION Printing system 9 dots serial thermal head printing system Character Alphanumeric Dot pitch 0.28 mm/ dot... - Page 24 ・FURUNO Authorized Distributor/Dealer 9-52 Ashihara-cho, Nishinomiya, 662-8580, JAPAN A : JUL 2003 Printed in Japan All rights reserved. A4 : MAY 26, 2014 Pub. No. OME-23662-A4 ( TAHA ) PP-505-FE 0 0 0 1 4 8 2 2 0 1 0...
Need help?
Do you have a question about the PP-505-FE and is the answer not in the manual?
Questions and answers