Table of Contents
Advertisement
Quick Links
1. INTRODUCTION......................................................................................................1
2.SPECIFICATION....................................................................................................... 2
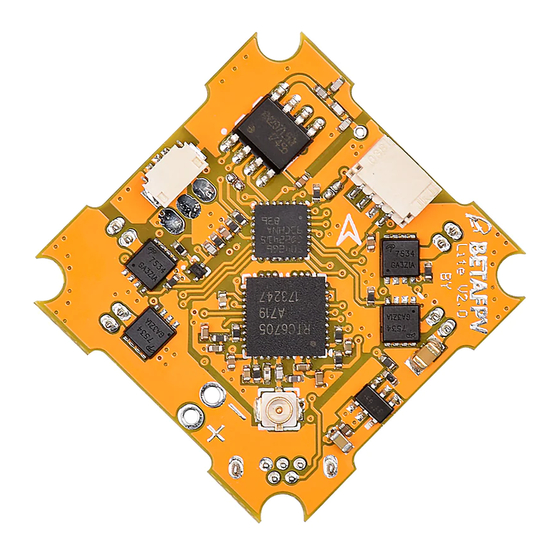
3.DIAGRAM..................................................................................................................3
4.BASIC FUNCTION.................................................................................................... 4
5.RECEIVER CONNECTION AND BINDING METHOD.........................................4
5. 1 Bulit-in Bayang Receiver................................................................................. 5
5. 2 SBUS Protocol................................................................................................. 5
5. 3 DSMX Protocol................................................................................................6
6.OSD MENU................................................................................................................ 6
6.1 How to Enter OSD Menu.................................................................................. 6
6.2 How to Operate OSD Menu.............................................................................. 7
6. 3 How to Tune PID............................................................................................. 7
6.4 How to Change Frequency and Power of VTX................................................ 8
6.5 How to Change the Display Position of OSD Info on Screen...........................9
6.6 How to Set Rate...............................................................................................10
7.ARM & SWITCH FLIGHT MODE......................................................................... 11
7. 1 OSD Illustration............................................................................................. 11
7.2 Armed & Disarm............................................................................................. 12
7.3 Flight Mode..................................................................................................... 12
7.4 Features of Different Flight Mode...................................................................14
8.ASSEMBLY GUIDE................................................................................................ 14
8.1 Recommendation.............................................................................................14
9.DEVELOPMENT..................................................................................................... 15
CONTENT
Advertisement
Table of Contents

Related Manuals for BETAFPV Lite brushed V2 FC


Summary of Contents for BETAFPV Lite brushed V2 FC
-
Page 1: Table Of Contents
CONTENT 1. INTRODUCTION......................1 2.SPECIFICATION....................... 2 3.DIAGRAM........................3 4.BASIC FUNCTION....................4 5.RECEIVER CONNECTION AND BINDING METHOD.........4 5. 1 Bulit-in Bayang Receiver................. 5 5. 2 SBUS Protocol....................5 5. 3 DSMX Protocol....................6 6.OSD MENU........................ 6 6.1 How to Enter OSD Menu.................. 6 6.2 How to Operate OSD Menu................7 6. -
Page 2: Introduction
1. INTRODUCTION BETAFPV Lite brushed V2 FC is a brushed flight controller with Silverware firmware. It is with build-in Bayang protocol receiver, and it also supports external receiver with SBUS protocol and DSMX protocol. For fans of Silverware firmware, now you could try it with brushled drone like Beta65S. -
Page 3: Specification
Adopting updated and improved LiteSilverware_f042_1S_brushed_V1.0 firmware. SPECIFICATIONS OF FC CPU: STM32F042G6U6 Six-Axis: MPU6050 Size: 26mm x 26mm, whoop mounting pattern OSD:BETAFPV LiteOSD OSD firmware:LiteOSD_f042_1s_brushed_v1.0.HEX Build-in Receiver: Bayang protocol Supported Receiver:SBUS protocol or DSMX protocol ... -
Page 4: Diagram
3.DIAGRAM... -
Page 5: Basic Function
4.BASIC FUNCTION Bulit-in 25mW video transmitter and just plug in a camera and play Includes the OSD menu. Supports PID or Rate tuning, vtx frequency changing via OSD menu Build-in receiver with Bayang protocol and support for external receiver with ... -
Page 6: Bulit-In Bayang Receiver
5. 1 Bulit-in Bayang Receiver Lite 1S brushed FC is with build-in Bayang protocol receiver. The communication protocol should be set as Bayang protocol when using built-in Bayang receiver, as follows: Press the FC key on the bottom of the FC and plug the battery at the same time ... -
Page 7: Dsmx Protocol
5. 3 DSMX Protocol Supports DSMX protocol. Here is the diagram with DSMX protocol receiver: The communication protocol should be set as DSMX protocol when using DSMX receiver, as follows: Press the FC button on the bottom of the FC and plug the battery at the same ... -
Page 8: How To Operate Osd Menu
If you use a toy transmitter like LiteRadio 1, and also active the TOY_TX option in the OSD menu. You could enter the OSD menu when the throttle stick in the lowest positon. 6.2 How to Operate OSD Menu By moving the cursor, you can enter sub-menu of PID, MOTO, RECEIVER and SMARTSUDIO to change the related parameters. -
Page 9: How To Change Frequency And Power Of Vtx
Enter OSD menu Move the cursor to PID option and enter PID sub-menu, the PID for ROLL, PITCH and YAW is available for tuning. If you want to change the PID parameters, please choose the EXIT option to ... -
Page 10: How To Change The Display Position Of Osd Info On Screen
• Enter OSD menu • Move the cursor to SMARTAUDIO option and enter SMARTAUDIO sub-menu • Move the cursor to CHAN to change frequency or move the cursor to POWER to change vtx power. • When changed the parameter, SET and BACK. The changes will be saved and take effect. -
Page 11: How To Set Rate
• Enter Display Menu, the value in the screen refers to the position of the OSD info. For example, DISARM: 13 means that “DISARM” shows in Row 13. • Change the value by stick. For example, if ‘’DISARM: 13’’ is changed to ‘’DISARM: 14’’, “DISARM”... -
Page 12: Arm & Switch Flight Mode
to your flying habit. Please note that PROFILE is used to set the ratio of Setpoint Weight and Transition. 7.ARM & SWITCH FLIGHT MODE 7. 1 OSD Illustration There are six parts in OSD info interface: (Use OSD info in the pic as example) •... -
Page 13: Armed & Disarm
7.2 Armed & Disarm If you use a radio transmitter with full 7 channels, you could use the default channel 5 to arm and disarm the drone. It is the same as Betaflight firmware. If you use a toy radio transmitter like LiteRadio 1 below, there is no additional channels. - Page 14 If you use a toy radio transmitter like LiteRadio 1, there is NO additional channel 5-8, you could use the OSD menu to switch flight mode. Enter the OSD menu and go to the Config page. Change the MODE. Do not forget to save the config.
-
Page 15: Features Of Different Flight Mode
Value Flight Mode acro level race_a (racemode with angle behavior on roll ais) race_h (racemode with horizon behavior on roll axis) horizon 7.4 Features of Different Flight Mode Disarm: The motors are disabled and will not be allowed to run. ... -
Page 16: Development
Contribution of bug fixes and new features is encouraged. All the source code for the flight controller and OSD is open in Github. ; Source code of the flight controller: https://github.com/BETAFPV/LiteSilverware Source code of the OSD: https://github.com/BETAFPV/LiteOSD The programmer ports for the FC MCU STM32F042G6U6 and OSD MCU EFM8BB21 are showed as below.
Need help?
Do you have a question about the Lite brushed V2 FC and is the answer not in the manual?
Questions and answers