Advertisement
Quick Links
PRODUCT GUIDE
Receiver-In-Canal
Rechargeable (RIC R)
Your new hearing aids offer Starkey's most advanced
technology with supreme sound quality and features.
They are customizable to fit your unique hearing
needs, helping you to stay connected to the people
and things you love most.
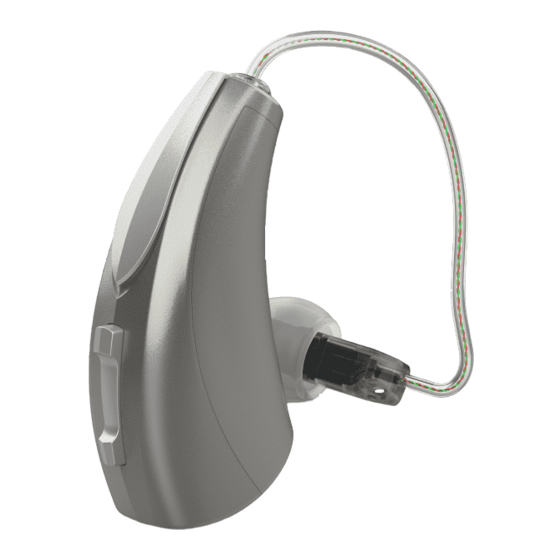
Hearing Aid Parts:
1. Hearing Aid
2. Cable
3. Receiver
4. Microphone
5. Rocker Switch User Control
6. Earmold
7. Charging Contacts
8. Removal Handle
Insertion and Removal
To insert the hearing aid:
1. Gently wrap the hearing aid over your ear
until it rests securely behind your ear.
2. Insert the earmold into your ear canal.
3. Softly press the earmold into place
with your fingertip.
To remove the hearing aid:
1. Gently grasp the cable at the opening of
the ear canal with your thumb and forefinger.
2. Gently pull the earmold out of your ear canal.
3. Remove the hearing aid from behind your ear.
With Earmold
5
7
2
1
4
3
2
3
6
8
2
2
4
4
1
Advertisement

Subscribe to Our Youtube Channel
Related Manuals for Starkey LIVIO RIC R


Summary of Contents for Starkey LIVIO RIC R
- Page 1 PRODUCT GUIDE Receiver-In-Canal Rechargeable (RIC R) With Earmold Your new hearing aids offer Starkey’s most advanced technology with supreme sound quality and features. They are customizable to fit your unique hearing needs, helping you to stay connected to the people and things you love most.
- Page 2 Receiver-In-Canal Rechargeable (RIC R) PRODUCT GUIDE Charging Your Hearing Aids Your hearing aid uses a rechargeable battery as its power source. Battery Indicator To charge the battery: 1. Plug your charger into an outlet. You will hear an indicator through your hearing aid 2.
- Page 3 Receiver-In-Canal Rechargeable (RIC R) PRODUCT GUIDE On-board Battery (Continued) • One blinking LED on the back of the charger indicates that the on-board battery is low and the charger should be connected to a power source. • When plugged into a power source, the back LED indicators will glow green to indicate successful on-board battery charging.
- Page 4 4. Use the opposite end of the stick to firmly insert the clean wax guard straight into the receiver. 5. Pull the stick straight out (do not twist) and discard the stick. Starkey.com/Support For more help, visit The Starkey logo and Starkey are registered trademarks of Starkey Laboratories, Inc. ©2021 Starkey. All Rights Reserved. 4/21 FLYR3840-00-EE-GS...
Need help?
Do you have a question about the LIVIO RIC R and is the answer not in the manual?
Questions and answers