
Related Manuals for ES&S AutoMARK


Summary of Contents for ES&S AutoMARK
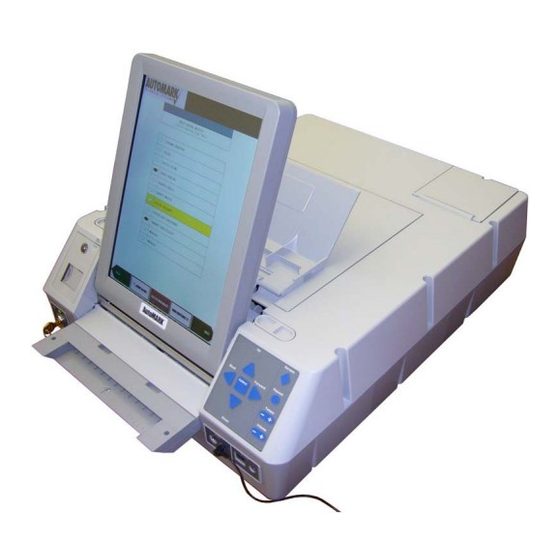
- Page 1 ES&S AutoMARK™ Pre-Election Day Checklist Rear Access Door Touch Screen Monitor Compact Flash Lid Latches Access Door Key-Operated Mode Switch Keypad Ballot Feed Tray ADA Port Headphone Jacks...
- Page 2 Access Door Key, Mode Switch Key, and the headphones from the carrying/ storage case. 9. Position the ES&S AutoMARK™ in front of you. The Keypad is located on the front of the terminal. 10. Inspect the power cord for damage. If the cord is damaged, discard it and contact ES&S for a new cord.
- Page 3 20. Plug the headphones into the appropriate headphone jack in front of the terminal. Cleaning the ES&S AutoMARK™ 21. Use alcohol wipes to clean the outside panels and screen of the ES&S AutoMARK™ unit. Ensure the unit is dry before turning it on. Installing The Compact Flash Card Compact Flash Card...
-
Page 4: Ink Cartridge
The test ink cartridge may be replaced with another regular Inkjet cartridge or an Infrared Ink Cartridge depending upon which tabulator is being used in conjunction with the ES&S AutoMARK™. Rear Access Door... - Page 5 31. Insert an unmarked ballot being used in this election into the ballot feed tray. 32. Once the ES&S AutoMARK™ prints and ejects the ballot, confirm the ES&S AutoMARK™ filled all ovals/arrows and printed the name of each candidate next to the oval/arrow. Press Yes to recalibrate the printer.
- Page 6 33. Repeat steps 31 and 32 inserting the ballot in all possible orientations (right-side up, upside down, inserted front-wards, inserted backwards). Confirm the ES&S AutoMARK™ filled all ovals/arrows and printed the name of each candidate next to the oval/arrow. 34. Press Done.
- Page 7 42. Press Done after you complete the calibration. If you skip this step, the settings may not be remembered when the system is re-booted. Setting Date and Time 43. Select System Maintenance 44. Enter the System Password and press OK. 45.
- Page 8 Testing the ES&S AutoMARK™ Perform thorough testing to ensure everything is in working order before the election. The sooner the tests are performed, the sooner an issue that may arise can be resolved. You will need multiple blank copies of your current election’s ballot to test the printer.
- Page 9 62. Press OK to accept your write in and return to the previous screen. 63. Review Summary Screen once all races are voted. Press NEXT. 64. Press the MARK BALLOT button. 65. Remove marked ballot. The “Insert Your Ballot” screen will appear. 66.
- Page 10 Language Selection or Voter Instruction screen followed by the Verification Summary Screen. If the test is not successful, the ES&S AutoMARK™ will eject the ballot or displays an error message. If this happens, continue on to the troubleshooting section at the end of the maintenance manual.
- Page 11 Rear Access Door. Note: The Test Ink Cartridge must be replaced on election day prior to the ES&S AutoMARK™ being turned on. If the unit is turned on without the ink cartridge installed, this message will appear “Alert! A problem has occurred.
- Page 12 92. Unplug the power cord from the wall outlet. 93. Remove the power cord from the ES&S AutoMARK™. 94. Place the ES&S AutoMARK™, power cord, Access Door Key, Security Key, and the headphones into the carrying/ storage case. Charging the Battery 95.
- Page 13 99. From the main menu, select Battery Status. 100. Confirm the Strength is Good and that the power source is External. Note: The power source indicating External when the ES&S AutoMARK™ is plugged into an outlet confirms the power supply cord is in good working condition.
Need help?
Do you have a question about the AutoMARK and is the answer not in the manual?
Questions and answers