
Related Manuals for ES&S AutoMARK


Summary of Contents for ES&S AutoMARK
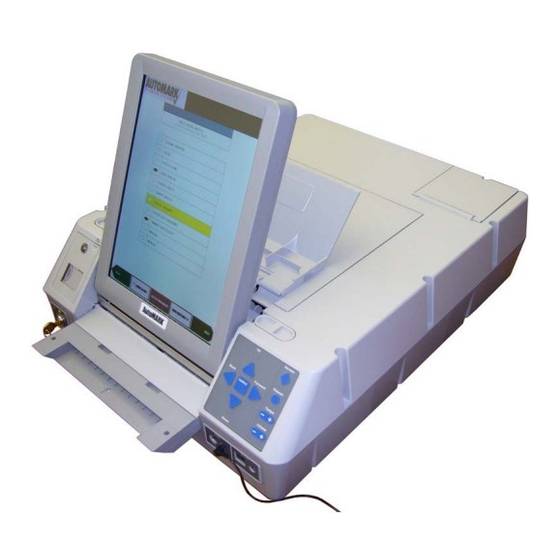
- Page 1 ES&S AutoMARK™ Election Day Checklist Rear Access Door Touch Screen Monitor Compact Flash Access Door Lid Latches Key-Operated Mode Switch Keypad Ballot Feed Tray ADA Port Headphone Jacks...
- Page 2 Access Door Key, Mode Switch Key, and the headphones from the carrying/ storage case. 2. Position the ES&S AutoMARK™ in front of you. The Keypad is located on the front of the terminal. 3. Inspect the power cord for damage. If the cord is damaged, discard it and contact ES&S for a new cord.
- Page 3 16. Close and lock the Compact Flash Access Door. Installing the Ink Cartridge The test ink cartridge may be replaced with another regular Inkjet cartridge or an Infrared Ink Cartridge depending upon which tabulator is being used in conjunction with the ES&S AutoMARK™. Once the ink cartridge is...
-
Page 4: Ink Cartridge
installed, the unit must remain on for the duration of the election day. If the unit is turned off for more than four minutes, the ink cartridge must be replaced. Rear Access Door Cartridge 17. Remove the screw or snap that secures the Rear Access Door. Open the Door. - Page 5 Ensure the Compact Flash Card containing the current election definition is installed before the ES&S AutoMARK™ is turned on. The ES&S AutoMARK™ will not function if the card is not installed. 21. Turn the mode switch key to the middle or ON position.
- Page 6 Ballot Feed Tray. 24. If applicable, select the appropriate language for your ballot to be displayed on the ES&S AutoMARK™. Note: If English is the only language programmed to work for your election, the Language Selection Screen will not display. The Voting Instructions Screen appears after inserting your ballot.
- Page 7 Next or the Right Arrow key if using the keypad and repeat this process until you consider all contests and questions for the ballot. 27. The Summary Screen appears when you have considered all contests and questions for your ballot. Review this screen to confirm your selections.
- Page 8 How To Vote Using the Sip-N-Puff The ES&S AutoMARK™ has a port located on the front of the terminal that an election official can plug an ADA device in for the voter. The ADA device supported by the AutoMARK™...
- Page 9 How do I Verify my Ballot? The ES&S AutoMARK™ allows the voter to insert their marked ballot into the ballot feed tray and to verify their vote. Note that no changes can be made from this verification step and you will only be able to view and hear the summary screen.
- Page 10 How Do I Change the Volume/ Change the Tempo? The following ES&S AutoMARK™ options on the keypad make the audio easier to hear: 47. Press REPEAT on the keypad to repeat the text just read through the headphones.
- Page 11 Cleaning the ES&S AutoMARK™ 57. Before storing the ES&S AutoMARK™, use alcohol wipes to clean the outside panels and screen of the ES&S AutoMARK™ unit. Ensure the unit is dry before storing it. Closing the Touch Screen and Storing the ES&S AutoMARK™...
- Page 12 65. Remove the power cord from the ES&S AutoMARK™. 66. Place the ES&S AutoMARK™, power cord, Access Door Key, Security Key, and the headphones into the carrying/ storage case.
Need help?
Do you have a question about the AutoMARK and is the answer not in the manual?
Questions and answers