Table of Contents
Advertisement
Advertisement
Table of Contents

Related Manuals for Beko BC73FC


Summary of Contents for Beko BC73FC
- Page 1 Frost Free Combi BC73FC Fridge / Freezer...
-
Page 3: Table Of Contents
Contents Introduction & safety warnings................2 Electrical requirements..................3 Transportation instructions.................4 Installation instructions ..................5 Getting to know your fridge / freezer..............6 Suggested arrangement of food in the fridge / freezer........7 Temperature control and adjustment..............8 Getting Started....................9 Storing frozen food.....................9 Freezing fresh food..................10 Making ice cubes.....................10 Defrosting......................11 Cleaning and care....................12... -
Page 4: Introduction & Safety Warnings
Congratulations on your choice of a quality Appliance which has been designed to give you service for many years. WARNING ! IMPORTANT ! DO NOT connect your appliance to the electricity supply until all packing and transit protectors have been removed. -
Page 5: Electrical Requirements
Should the mains lead of the appliance become damaged or should it need replacing at any time, it must be replaced by a special purpose made mains lead which can only be obtained from a BEKO Authorised Service Agent. WARNING! THIS APPLIANCE MUST BE EARTHED If the fitted moulded plug is not suitable for your socket, then the plug should be cut... -
Page 6: Transportation Instructions
TRANSPORTATION INSTRUCTIONS 1. The appliance should be transported only in a vertical upright position. The packing as supplied must be intact during transportation. 2. If during the course of transport the appliance has to be transported horizontally, it must only be laid on its left hand side when standing in the front of the appliance. After bringing it to upright position,it must not be operated for at least 4 hours to allow the system to settle. -
Page 7: Installation Instructions
IMPORTANT INSTALLATION INSTRUCTIONS 1. The space in the room where the appliance is installed must not be smaller than 10 cubic metres. 2. See for detailed Installation Instructions including reversing door opening direction. 3.This appliance has been designed to operate in ambient temperatures up to 32 degrees C (90 degrees F) and is equipped with Advanced Electronic Temperature Control System [AETCS] which ensures that at the advised setting [4 - four on the knob] the frozen food in the freezer will not defrost even if the ambient temperature... -
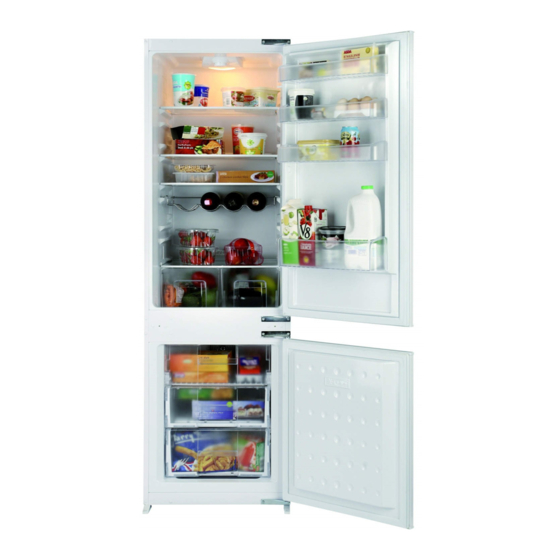
Page 8: Getting To Know Your Fridge / Freezer
GETTING TO KNOW YOUR COMBI FRIDGE / FREEZER DOOR SHELF TEMPERATURE SETTING KNOB INTERIOR LIGHT EGG TRAY DOOR SHELF WINE RACK CABINET SHELVES DEFROST WATER BOTTLE COLLECTION SHELF CHANNEL SALAD CRISPER FREEZER FAN FROZEN FOOD STORAGE DRAWERS... -
Page 9: Suggested Arrangement Of Food In The Fridge / Freezer
Arrangement Examples (See diagram) 1. Baked, chilled cooked food, dairy products, cans. 2. Wine rack 3. Meat, sausages, cold cuts. 4. Fresh fish, meat and easily perishable food 5. Frozen food and freezing of fresh food. 6. Frozen food. 7. Small bottles, cans, tubes. 8. -
Page 10: Temperature Control And Adjustment
TEMPERATURE CONTROL AND ADJUSTMENT Operating temperatures are controlled by the thermostat knob (see diagram) located on the ceiling of fridge compartment. Settings may be made from 1 to 5, 5 being the coldest position. When the appliance is switched on for the first time, the thermostat should be adjusted so that after 24 hours, the average fridge temperature is no higher than +5°C (+41°F). -
Page 11: Getting Started
STARTING Final Check Before you start using the fridge/freezer check that: 1. The interior is dry and air can circulate freely at the rear of the cabinet. 2. Clean the interior as recommended under "CLEANING AND CARE." 3. Insert the plug into the wall socket and switch on the electricity supply. •... -
Page 12: Freezing Fresh Food
FREEZING FRESH FOOD Please observe the following instructions to obtain the best results. Do not freeze too large a quantity at any one time. The quality of the food is best preserved when it is frozen right through to the core as quickly as possible. Do not exceed the freezing capacity of your appliance in 24 h which is 3.5 kg (7.9 lb) Placing warm food into the freezer compartment causes the refrigeration compressor to operate continuously until the food is frozen solid. -
Page 13: Defrosting
DEFROSTING A) FRIDGE COMPARTMENT The fridge compartment defrosts automatically. The defrosting water runs to the drain tube via a collection container at the back of the appliance (1). (see diagram) During defrosting water droplets may form at the back of the fridge compartment where concealed evaporator is located. -
Page 14: Cleaning And Care
CLEANING AND CARE ** We recommend that you switch off the appliance at the socket outlet and pull out the mains plug before cleaning. ** Never use any sharp abrasive instrument, soap, household cleaner, detergent and wax polish for cleaning. ** Use luke warm water to clean the cabinet of the appliance and wipe it dry. -
Page 15: Replacing The Interior Light Bulb
REPLACING THE INTERIOR LIGHT BULB (See diagram) Should the light fail to work, proceed as follows. 1. Switch off at the socket outlet and pull out the mains plug. • You may find it useful to remove shelves for easy access. 2. -
Page 16: Do's And Don'ts
DO'S AND DON'TS Clean and defrost your appliance regularly (See "Defrosting") Keep raw meat and poultry below cooked food and dairy products. Take off any unusable leaves on vegetables and wipe off any soil. Leave lettuce, cabbage, parsley and cauliflower on the stem. Wrap cheese firstly in greaseproof paper and then in a polythene bag excluding as much air as possible. -
Page 17: Energy Saving Tips
ENERGY SAVING TIPS 1- Ensure your appliance is installed in a well ventilated area. If the ambient temperature is low (but in no case lower than 5 degrees C), then the energy saving will be more. In this case, check temperatures of fridge and freezer compartments with an accurate thermometer and lower the thermostat setting (towards 1) if necessary. -
Page 18: Installation Instructions - Detailed Step By Step
INSTALLATION INSTRUCTIONS (All dimensions are in mm) The backwall of the wooden cabinet must be left open completely to kitchen wall in order to allow sufficient air circulation to cool down the condenser unit for energy efficiency. -
Page 23: Reversing The Doors
REVERSING THE DOORS... - Page 24 Top Door 1.Unscrew top hinge (4). 2.Carefully remove the top door. 3.Unscrew lower hinge (6) 4.Remove plastic plugs (10 &11). 5.Refit top hinge (4) as lower hinge (14) on the left hand side. 6.Replace top door 7.Refit lower hinge (6) as top hinge (16) on the left hand side. Lower door 1.Unscrew top hinge (7) 2.Carefully remove the lower door.
-
Page 25: Guarantee Details
GUARANTEE DETAILS Your new Beko product is guaranteed against the cost of breakdown repairs for two years from the date of the original purchase. What is c overed? • Repairs necessary as a result of faulty materials, defective components or manufacturing defect. -
Page 26: How To Obtain Service
If you have purchased an extended guarantee please refer to the instructions contained within the extended guarantee agreement document. Otherwise please call the appropriate number above where service can be obtained at a charge. Should you experience any dif rvice please contact the Beko Customer Help-Line. Tel: 0845 6004911 e-mail: service@beko.co.uk This product bears the selective sorting symbol for waste electrical and electronic equipment (WEEE). - Page 28 Watford Hertfordshire 4578335401...
Need help?
Do you have a question about the BC73FC and is the answer not in the manual?
Questions and answers