Table of Contents
Advertisement
Quick Links
Advertisement
Table of Contents

Subscribe to Our Youtube Channel
Related Manuals for MilDef Crete DT10


Summary of Contents for MilDef Crete DT10
- Page 1 TABLET COMPUTER DT10 USER’S GUIDE (Preliminary Version)
- Page 2 No part of this publication may be reproduced and modified without the written permission of MilDef Crete Inc. MilDef Crete Inc. reserves the right to make changes in the products or the product specifications without any prior notice. Customers are advised to contact MilDef Crete Inc.
- Page 3 Revision History: Revision Date Changes Author...
- Page 4 Radiation Exposure Statement This equipment complies with FCC RF radiation exposure limits set forth for an uncontrolled environment. This device was tested for typical lap held operations with the device This equipment complies with FCC radiation exposure limits set forth for an uncontrolled contacted directly to the human body to the back side of the notebook computer.
- Page 5 FCC (Federal Communications Commission) Statement This equipment has been tested and found to comply with the limits for a Class-B digital device pursuant part 15 of the FCC Rules. These limits are designed to provide reasonable protection against harmful interference in a residential installation. This equipment generates, uses, and radiates radio frequency energy.
- Page 6 Products with the CE Marking comply with both the EMC Directive (2004/108/EC) and the Low Voltage Directive (2006/95/EC) issued by the Commission of the European Community. Compliance with these directives implies conformity to the following European Norms: CISPR 22 Radio Frequency Interference EN55022 EN61000-4-2, EN61000-4-3, EN61000-4-4, EN61000-4-5, EN61000-4-6, EN55024...
- Page 7 CE Declaration of Conformity It is confirmed to comply with the requirements set out in the Council Directive on the approximation of the laws of the member states relating to Electromagnetic Compatibility Directive (2004/108/EC), Low-voltage Directive (2006/95/EC) and the procedures given in R&TTE Directive (1999/5/EC).
- Page 8 Power Conservation This tablet computer consumes less power compared to conventional consumer computers. The power consumption may be further reduced by properly configuring the Power Management Setup. It is recommended that the power saving features be enabled even when not running on battery power.
- Page 9 Battery Precautions Only use batteries designed for this tablet computer. Using incompatible battery types may cause explosion, leakage or damage to the computer. Do not remove the battery from the computer while the computer is powered on. Do not continuously use a battery that has been dropped, or that appears damaged ...
- Page 10 Environmental Information, Material Safety & Recycling All materials used in the manufacturing of this equipment are recyclable or environmentally friendly. Please recycle the packing materials in accordance with local regulations at the end of the product's service life. Notice: The equipment may contain insignificant amount of hazardous substances for health ...
-
Page 11: Table Of Contents
TABLE OF CONTENTS CHAPTER 1 - GETTING STARTED ............... 1 ........................1 NPACKING ......................... 2 ORKPLACE ..................... 2 NVIRONMENTAL ATINGS ....................... 3 UGGEDNESS ....................4 PPEARANCE VERVIEW ......................9 EADY FOR CHAPTER2 - OPERATING INFORMATION ..........11 ............... 11 TART SING ABLET OMPUTER... - Page 12 PCH-IO C ................42 ONFIGURATION ....................... 44 .................... 44 ELECTIONS ......................45 ECURITY & E ..................... 46 CHAPTER 5 – DRIVERS AND APPLICATIONS ......... 47 ........................47 HIPSET VGA .......................... 48 ........................48 UDIO ME ........................49 NTEL ................49 NTEL APID TORAGE...
- Page 13 DL10 ....................... 62 OCKLIGHT DR ..................62 ULTI ATTERY HARGER USB K ..................63 XTERNAL EYBOARD KBD ....................64 EYBOARD CHAPTER 8 – MAINTENANCE AND SERVICE .......... 65 ........................65 LEANING ..................... 65 ROUBLESHOOTING RMA S ......................66 ERVICE...
-
Page 14: Chapter 1 - Getting Started
Getting Started Chapter 1 - Getting Started Unpacking The following components come with your computer. If anything is missing or damaged, please notify the dealer immediately. Computer unit AC Adapter AC Power Cord Utility DVD Quick Guide ... -
Page 15: Workplace
Getting Started Workplace A clean and moisture-free environment is preferred. Make room for air circulation. Remember to avoid areas from: Sudden or extreme changes in temperature. Extreme heat. Strong electromagnetic fields (Near television set, motor rotation area, etc.). ... -
Page 16: Ruggedness
Getting Started Ruggedness The computer is designed with rugged features such as vibration, shock, dust, and rain/water protection. However, it is still necessary to provide appropriate protection while operating in harsh environments. NEVER immerse the computer in water. Doing so may cause permanent damages. Drop may cause parts break or permanent damages. -
Page 17: Appearance Overview
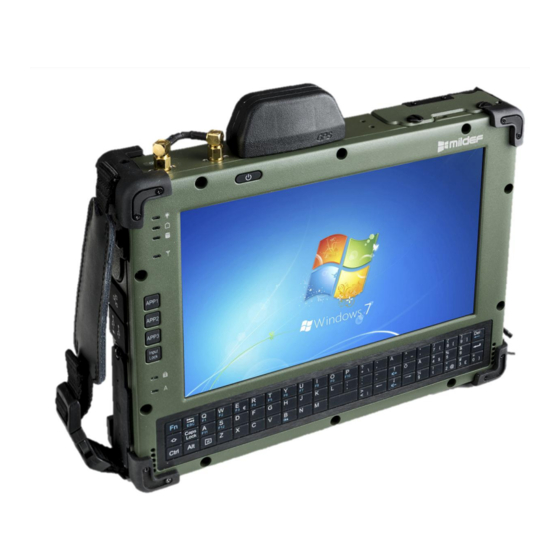
Getting Started Appearance Overview Note: The following illustrations show the tablet mounted on optional devices, which may not appear on your devices. Front Power Button LED Indicators Application Keys & Input Lock Key Microphone Touch Screen Keyboard Chapter One - 4... - Page 18 Getting Started Rear Secondary battery connector Chapter One - 5...
- Page 19 Getting Started Left 1. Battery 2. GLAN RJ45 3. USB 2.0 x 1 (Top) USB 2.0 with Fast Charger x 1 (Bottom) 4. Multi Bay: Std.: ExpressCard (Top) PCMCIA (Bottom) Opt.: ExpressCard (Top) SIM Card + SD Card (Bottom) Chapter One - 6...
- Page 20 Getting Started Right 1. 3-pin DC jack 2. Serial port DB9 (COM1, Default: RS232) Note: The External COM1 port default is RS232, and can be selected by BIOS (RS232/RS422/RS485).Please refer to IT 8783F Super IO Configuration Sub-Menu section. Chapter One - 7...
- Page 21 Getting Started 1. Optional Wi-Fi Antenna 2. Optional GPS Antenna 3. 2.5” SATA II HDD / Optional SSD Bottom 1. Docking connector Chapter One - 8...
-
Page 22: Ready For Use
Getting Started Ready for Use After taking a quick look at your tablet computer, the following illustrations will get you ready for using it. 1. Mounting the Battery Mount the battery into the battery bay. Close the cover, turn clockwise and lock firmly with a flat-head screwdriver or a coin. - Page 23 Getting Started 3. Turning ON the Power Make sure the battery is securely mounted. Connect all power cords properly. Turn on the power of your tablet computer by pressing the “Power Button“. Press to turn on the power of your tablet computer. Note: ...
-
Page 24: Chapter2 - Operating Information
Operating Information Chapter2 - Operating Information Start Using Your Tablet Computer Always turn on your tablet computer by using the power button. This is the standard operating procedure to start using your tablet computer. After turning on the power of your tablet computer, it will start with the Operating System (OS) installed. -
Page 25: Stop Using Your Tablet Computer
Operating Information Stop Using Your Tablet Computer Each time when you finish working with your tablet computer, there are several ways to stop your tablet computer from operating. Shut down Directly tap “Shut down” from your OS to turn OFF the power of your computer. Before shutting down, please do remember to save any unfinished works and close your applications to prevent your HDD from suffering possible data loss or damage. -
Page 26: Working With Power Button (Heater Kit)
Operating Information Working with Power Button (Heater Kit) Your tablet computer is equipped with a heater kit to enable work under low temperature. The heater will heat up the HDD to the temperature set by the user before booting the system. -
Page 27: Installing Operating System
Operating Information Installing Operating System Your computer is designed to operate with Microsoft Windows 7 or Windows 8 32 / 64-bit Operating System. Please connect your computer with an external USB-interface drive, such as an ODD or a USB thumb drive, and start the OS installation. Note: ... - Page 28 Operating Information Keyboard US International (UI) keyboard layout: British (GB) keyboard layout: Swedish (SV) keyboard layout: German (DE) keyboard layout: Russian (RU) keyboard layout: Chapter Two - 15...
-
Page 29: Using Hard Disk Drive (Hdd) / Optional Solid State Drive (Ssd)
Operating Information To perform 2 layer combinational keystroke functions (keystroke functions printed in blue), press and hold the [Fn] key, then press the corresponding key combinations. A list of useful combinational button functions is provided below for operational reference: Description Switches your tablet computer’s keyboard backlight on or off. -
Page 30: Using Expresscard
Operating Information Using ExpressCard The computer supports 54mm and 34mm wide ExpressCard. You can install an ExpressCard while the computer is running. The computer automatically detects the card. To install an ExpressCard: - Hold the card with the top side of the card. - Slide the card into the slot until the card is completely seated in its connector. -
Page 31: Using Pcmcia Card
Operating Information Using PCMCIA Card There is one PCMCIA slot equipped on the computer supporting 1x typeⅡPCMCIA card with 3.3V and 5V. PCMCIA card can efficiently expand a variety of functions to your computer by simply inserting the card into the slot and pushing the eject button to remove. The following illustration shows the insertion of a PCMCIA card: Chapter Two - 18... -
Page 32: Intel ® Rapid Start Technology
Operating Information ® Intel Rapid Start Technology ® Your tablet computer can operate Intel Rapid Start Technology when SSD is installed. This technology enables your system resume time not only to be as fast as wake-up time from S3 (Sleep) mode, but also to be more energy saving. Before using Intel Rapid Storage Technology, please check the following system requirements: System Requirement:... -
Page 33: Using The Touch Screen
Operating Information Using the Touch Screen Your tablet computer is equipped with a highly sensitive touch screen, allowing you to navigate on the touch screen easily without using other external devices. Before using the touch screen, please follow the instructions below to calibrate your stylus pen for a more precise positioning: 1. - Page 34 Operating Information A stylus pen is provided for operating the touch screen. A list of operating tips is provided below to help you operate the touch screen more effectively with your stylus pen. Desired Operation Stylus Action Tap the touch screen once with your stylus pen. Single Click Quickly tap the touch screen twice with your stylus pen.
-
Page 35: Operating Wireless Devices
Operating Information Operating Wireless Devices For your ease of operations, you can turn on/off your wireless devices through the proprietary software application - “Device Power Manager”. Note: Depending on the configuration of your tablet computer, your Device Power Manager menu may appear differently from the screenshots provided in this section. - Page 36 Operating Information Launch the Device Power Manager After launching the utility, please tap “Bluetooth” to enable the Bluetooth function (tap again to disable). Once the Bluetooth function starts up, the wireless LED indicator (color blue) will turn on and the Bluetooth icon will show up in the operating system accordingly.
- Page 37 Operating Information Wireless LAN (Option) Wireless LAN is an optional wireless communication module for your tablet computer. An embedded antenna will be pre-installed in your tablet computer to access the internet wirelessly. To activate your Wireless LAN function, please follow the illustrations below: Driver &...
- Page 38 Operating Information GPS (Option) GPS is an optional module for your tablet computer. This GPS module supports both GPS and Galileo systems. An embedded antenna is pre-installed in your tablet computer to support the functions of your GPS. Driver & Application Installation Install the Device Power Manager application: Read from the Utility DVD and find the directory listed in the readme file to finish installation.
-
Page 39: Using Docklight Dl10 (Option)
Operating Information Using Docklight DL10 (Option) Docklight acts as docking unit or port enhancer. It contains more ports that are not available on system unit. Mount Docklight 1. Open the rubber cap on the docking connector. 2. Align the docking connector. 3. -
Page 40: Chapter3- Managing Power
Managing Power Chapter3- Managing Power AC Adapter The AC adapter performs two functions: It powers the computer from an external AC source. It charges the computer battery. The adapter automatically detects the AC line voltage (110V or 220V) and adjusts accordingly. -
Page 41: Battery
Managing Power Battery The computer will automatically switch to battery when the external power source (AC adapter or optional vehicle adapter) is disconnected. Battery Power Saving Tips The computer comes with an intelligent power-saving feature. You may extend the battery life by: Setup power saving functions in Operating System Power Management options (e.g. - Page 42 Managing Power Battery Gauge You may check battery status from battery gauge. Click the power/battery icon to reveal the battery gauge window. The following is the illustration of Battery Gauge in Windows OS. Note: Battery characteristic varies depending on factors such as ambient temperature, charging method, load current, aging, etc.
-
Page 43: Acpi Support
Managing Power ACPI Support Your computer supports ACPI (Advanced Configuration and Power Interface) for power management. With ACPI and an ACPI-compliant operating system (such as Microsoft Windows), this feature will allow you to reduce the power consumption and conserve energy. By supporting ACPI, the AC adapter LED and the Power indicator LED will show in different ways. -
Page 44: Usb Fast Charging
Managing Power USB Fast Charging Your tablet supports USB fast charging feature, enabling to quickly charge your fast-charging compatible devices. But note, fast charging is not supported in every power mode. The following table shows details for USB Charging information: Mode USB 2.0 Charging Features Fast charging supports... -
Page 45: Chapter 4 - Bios Setup
Optional Devices BIOS Setup Chapter 4 - BIOS Setup Press [F2] at boot up to enter BIOS setup. Use arrow keys to select options and [+/-] to modify them. When finished, move to “Exit” and press [Enter] then confirm save by pressing [Y]. -
Page 46: Advanced Menu
Optional Devices BIOS Setup Advanced Menu Aptio Setup Utility Main Advanced Chipset Boot Security Save & Exit Trusted Computing ► Trusted Computing Setting ► SATA Configuration ► Intel (R) Rapid Start Technology ► USB Configuration ► IT8783F Super IO Configuration : Select Screen →←... - Page 47 Optional Devices BIOS Setup Advanced Menu Selections You can make the following selections on the Advanced Menu. Feature Options Description Trusted Disabled TPM Support Computing Enabled SATA SATA Mode Selection SATA Mode Selection: IDE, AHCI, Configuration RAID Serial ATA Port 0 Software Preserve Intel Rapid...
-
Page 48: Trusted Computing Sub-Menu
Optional Devices BIOS Setup Trusted Computing Sub-Menu Aptio Setup Utility Advanced Enables or Disables Configuration BIOS support TPM SUPPORT [Disable] security device. O.S. will not show Security Current Status Information Device. SUPPORT TURNED OFF protocol INT1A interface will not be available. -
Page 49: Sata Configuration Sub-Menu
Optional Devices BIOS Setup SATA Configuration Sub-Menu Aptio Setup Utility Advanced Determine how SATA SATA Mode Selection [AHCI] controller(s) operate. Serial ATA Port 0 Empty Software Preserve Unknown Serial ATA Port 1 Empty Software Preserve Unknown Serial ATA Port 2 SATA SSD (120.0 : Select Screen →←... -
Page 50: Intel (R) Rapid Start Technology Sub-Menu
Optional Devices BIOS Setup Intel (R) Rapid Start Technology Sub-Menu Aptio Setup Utility Advanced Enables or disable Intel Intel (R) Rapid Start Technology [Disabled] Rapid Start Technology : Select Screen →← ↑↓: Select Item Enter: Select –/+: Change Opt. F1: General Help F2: Previous Values F3: Optimized Defaults F4: Save &... -
Page 51: Usb Configuration Sub-Menu
Optional Devices BIOS Setup USB Configuration Sub-Menu Aptio Setup Utility Advanced Enables Legacy USB Configuration support. AUTO option disables USB Devices: legacy support if no USB 1 point devices are connected. Disable option will keep Legacy USB Support [Enabled] USB devices available USB3.0 Support [Enabled] only for EFI applications... -
Page 52: It8783F Super Io Configuration Sub-Menu
Optional Devices BIOS Setup IT8783F Super IO Configuration Sub-Menu Aptio Setup Utility Advanced Set Parameters of Serial Port 0 (COMA) IT8783F Super IO configuration IT8783F Super IO Chip IT8783F ►Serial Port 0 Configuration : Select Screen →← ↑↓: Select Item Enter: Select –/+: Change Opt. -
Page 53: Rf Device Control Configuration Sub-Menu
Optional Devices BIOS Setup RF Device Control Configuration Sub-Menu Aptio Setup Utility Advanced RF Device Control Setting RF Device Control GPS STATUS Present [Enabled] BT STATUS Present : Select Screen →← BLUETOOTH [Enabled] ↑↓: Select Item WLAN STATUS Present Enter: Select WLAN [Enabled] –/+: Change Opt. -
Page 54: Ec Thermal Control Sub-Menu
Optional Devices BIOS Setup EC Thermal Control Sub-Menu Aptio Setup Utility Advanced EC Thermal Control EC Thermal Control Setting Thermal cooling trip point [87 C] : Select Screen →← ↑↓: Select Item Enter: Select –/+: Change Opt. F1: General Help F2: Previous Values F3: Optimized Defaults F4: Save &... -
Page 55: Chipset Menu
Optional Devices BIOS Setup Chipset Menu Aptio Setup Utility Main Advanced Chipset Boot Security Save & Exit System Agent (SA) ► System Agent (SA) Configuration Parameters ► PCH-IO Configuration : Select Screen →← ↑↓: Select Item Enter: Select –/+: Change Opt. F1: General Help F2: Previous Values F3: Optimized Defaults... - Page 56 Optional Devices BIOS Setup PCH-IO Configuration Sub-Menu Selections You can make the following selections on the PCH-IO Configuration sub-menu. Feature Options Description Disabled Enable or disable onboard NIC. Controller Enabled Wake on LAN Disabled Enable or disable integrated LAN to wake the system Enabled Disabled...
-
Page 57: Boot Menu
Optional Devices BIOS Setup Boot Menu Aptio Setup Utility Main Advanced Chipset Boot Security Save & Exit Sets system boot Boot Option Priorities order Boot Option #1 [P2: SATA SSD...] Boot Option #2 [IBA GE Slot 00C8 v...] Network Device BBS Priorities : Select Screen →←... -
Page 58: Security Menu
Optional Devices BIOS Setup Security Menu Aptio Setup Utility Main Advanced Chipset Boot Security Save & Exit Administrator Password Description Password If ONLY the Administrator’s password is set, then this only limits access to Setup and is only asked for when entering Setup. -
Page 59: Save & Exit Menu
Optional Devices BIOS Setup Save & Exit Menu Aptio Setup Utility Main Advanced Chipset Boot Security Save & Exit Exit system setup after Save Changes and Exit saving the changes Discard Changes and Exit Save Changes and Reset Discard Changes and Reset : Select Screen →←... -
Page 60: Chapter 5 - Drivers And Applications
Optional Devices Drivers and Applications Chapter 5 – Drivers and Applications The Utility DVD includes all the drivers for the installed devices in your tablet computer. Please consult the dealer if there is any driver missing. Also, through Device Manager in Windows, you are able to perform “Driver Update”... -
Page 61: Vga
Optional Devices Drivers and Applications Windows 7/Ultimate 64-bit: Run "win64_15288.exe" in the directory of "\Drivers\Windows 7 (64-bit)\Intel_VGA", and then follow the instructions to install. Windows 7/Ultimate 32-bit: Run "win64_15288.exe" in the directory of "\Drivers\Windows 7 (32-bit)\Intel_VGA", and then follow the instructions to install. Windows 8/Ultimate 64-bit: Run "win64_152812.exe"... -
Page 62: Intel Me
Optional Devices Drivers and Applications Intel ME Windows 7/Ultimate 64-bit: Run "Setup.exe" in the directory of " \Drivers\Windows 7 (64-bit)\Intel_ME\ME_SW_7.1.85.1216", and then follow the instructions to install. Windows 7/Ultimate 32-bit: Run "Setup.exe" in the directory of "\Drivers\Windows 7 (32-bit)\Intel_ME\ME_SW_7.1.85.1216", and then follow the instructions to install. Windows 8/Ultimate 64-bit: Run "Setup.exe"... -
Page 63: Wireless Power Manager
Optional Devices Drivers and Applications Wireless Power Manager Windows 7/Ultimate 64-bit: Run "setup.exe" in the directory of "\Utilities\0107\", and then follow the instructions to install. Windows 7/Ultimate 32-bit: Run "setup.exe" in the directory of "\Utilities\0107\", and then follow the instructions to install. -
Page 64: Usb3.0
Optional Devices Drivers and Applications USB3.0 Windows 7/Ultimate 64-bit: Run "Texas Instruments xHCI Driver v1.12.25 ( Multilanguaje - WHQL ).exe" in the directory of "\Drivers\Windows 7 (64-bit)\USB3.0\Texas Instruments xHCI Driver v1.12.25 ( Multilanguaje - WHQL )", and then follow the instructions to install. Windows 7/Ultimate 32-bit: Run "Texas Instruments xHCI Driver v1.12.25 ( Multilanguaje - WHQL ).exe"... -
Page 65: Turbo Boost Monitor
Optional Devices Drivers and Applications Turbo Boost Monitor Windows 7/Ultimate 64-bit: Run "setup.exe" in the directory of "\Drivers\Windows 7 (64-bit)\IntelR Turbo Boost Technology Monitor", and then follow the instructions to install. Windows 7/Ultimate 32-bit: Run "setup.exe" in the directory of "\Drivers\Windows 7 (32-bit)\IntelR Turbo Boost Technology Monitor", and then follow the instructions to install. -
Page 66: Nd Gigabit Lan (Option )
Optional Devices Drivers and Applications 2nd Gigabit LAN (Option) Windows 7/Ultimate 64-bit: Run "setup.exe" in the directory of "\Drivers\Windows 7 (64-bit)\RTL8111E\Install_Win7_7046_07202011", and then follow the instructions to install. Windows 7/Ultimate 32-bit: Run "setup.exe" in the directory of "\Drivers\Windows 7 (32-bit)\RTL8111E\Install_Win7_7046_07202011", and then follow the instructions to install. -
Page 67: Wifi (Option)
Optional Devices Drivers and Applications WiFi (Option) Windows 7/Ultimate 64-bit: Run "Wireless_15.3.1_Ds64.exe" in the directory of "\Drivers\Windows 7 (64-bit)\Intel_WiFi6235\WLAN\64bit", and then follow the instructions to install. *: Then into the“Wireless Power Manager”to turn on the WLAN device. Windows 7/Ultimate 32-bit: Run "Wireless_15.3.1_Ds32.exe"... -
Page 68: Gps (Option)
Optional Devices Drivers and Applications GPS (Option) Windows 7/Ultimate 64-bit: *: First into the "Wireless Power Manager" to turn on the GPS device. Run "ublox_A4_U5_USB_drv3264_install_UI.exe" in the directory of "\Drivers\Windows 7 (64-bit)\UBlox 6H Driver", and then follow the instructions to install. Windows 7/Ultimate 32-bit: *: First into the "Wireless Power Manager"... -
Page 69: Tpm (Option)
Optional Devices Drivers and Applications TPM (Option) Windows 7/Ultimate 64-bit: *: First into the "BIOS" to turn on the TPM device. Run "setup.exe" in the directory of "\Drivers\Windows 7 (64-bit)\TPM", and then follow the instructions to install. Windows 7/Ultimate 32-bit: *: First into the "BIOS"... -
Page 70: Chapter 6 - Specifications
Specifications Chapter 6 – Specifications Platform Intel® Huron River Platform Intel® Sandy Bridge i7-2610UE 4 MB Intel Smart Cache Memory Intel® Cougar Point QM67 Memory Max. 8GB System Memory Industrial grade DDR3 SO-DIMM x 1, 1333MHz Touch Screen Type: 9” WXGA with LED B/L Resolution: 1280 x 768 pixels Brightness (min.~ typ.): TBD... -
Page 71: Audio
Specifications Audio HD Audio and Stereo Speakers I/O Ports Serial port DB9 (Default RS232) GLAN RJ45 Multi Bay: Std:. ExpressCard slot (ExpressCard/54) x 1(Top) PCMCIA Card slot x 1(Bottom) Opt.: ExpressCard slot (ExpressCard/54) x 1(Top) SIM Card slot x 1 + SD Card slot x 1(Bottom) Docking connector x 1 ... -
Page 72: Dimensions And Weight
Specifications Dimensions and Weight Width: 250mm (9.8”) Depth: 190mm (7.4”) Height: 42.5mm (1.6”) Weight: 1.9Kg (4.18 lb) Note: Weight varies depending on system configurations. Power Primary Battery: Type: 6 x 18650 cells Lithium Ion Capacity: 10.8V/ 5800mAh Dimensions: 149 mm (W) x 57.4 mm (D) x 20.5 mm (H) Weight: 300 g (0.65 1b.) Optional 2... -
Page 73: Operating & Storage Temperature
Specifications Operating & Storage Temperature Operating Temp.: Std.: -20 °C~+50 °C* Opt.: -30 °C~+50 °C Storage Temp.: -40 °C ~ +70 °C Materials and Recycling Materials of the computer are as follows: Cabinet: Magnesium alloy AZ91D UL grade PC+ABS GE C2800 or TN-3813BW Bracket: Aluminum 5052 Steel with Nickel plating... -
Page 74: Chapter 7 - Optional Devices
Optional Devices Chapter 7 – Optional Devices Communication WiFi/Bluetooth: Intel® Centrino® Advanced-N 6235, Dual Band Board Form Factor: PCIe Half Mini Card Wi-Fi Certified: 802.11 a/b/g/n Bluetooth: Supports BT 2.1, 2.1+EDR, 3.0, 3.0+HS, 4.0 (BLE) Interface: PCIe (WiFi)/USB (BT) GPS: u-blox Neo-M8 (USB interface) ... -
Page 75: Docklight Dl10
Optional Devices Docklight DL10 The Docklight can attach to computer or stand unit for mobile or stationary operation. Ports: Serial x 2, USB2.0 x 4, RGB, Audio (speaker out, microphone in), DC jack, Optional Giga LAN RJ45 x 1 Dimensions: 250mm (W) x 37mm (D) x 61mm (H) Weight: 0.45Kg (1 lb.) approximately... -
Page 76: External Usb Keyboard
Optional Devices External USB Keyboard An optional 89-key external USB keyboard with LED backlight and IP rating of IP54 is available for your tablet computer. The detailed specification is provided below: 89-key layout emulates 101/102-key KB Life: >1 million times, water/dust protection up to IP54 ... -
Page 77: Mini Keyboard Kbd
Optional Devices Mini Keyboard KBD Mini Keyboard KBD is designed for all models. KBD also brings convenience of use through multi-language keyboard versions and USB interface. The detailed specification is provided below: USB interface with 30 cm USB cable 66-Key design with function keys to simulate standard keyboards. -
Page 78: Chapter 8 - Maintenance And Service
Maintenance and Service Chapter 8 – Maintenance and Service Cleaning ALWAYS turn OFF the power, unplug the power cord and remove the battery before cleaning. The exterior of the system and display may be wiped with a clean, soft, and lint-free cloth. If there is difficulty removing dirt, apply non-ammonia, non-alcohol based glass cleaner to the cloth and wipe. -
Page 79: Rma Service
Maintenance and Service RMA Service If troubleshooting solutions are unsuccessful, consult your dealer for RMA. Shipping instructions: 1. Remove any personal add-on devices or other media. 2. Use the original shipping container and packing materials, if possible. 3. If the original packing materials are not available, wrap the equipment with soft material (e.g.
Need help?
Do you have a question about the DT10 and is the answer not in the manual?
Questions and answers