
Related Manuals for homelabs HME020030N


Summary of Contents for homelabs HME020030N
- Page 1 ENERGY STAR RATED DEHUMIDIFIER 22, 35 and 50 Pint* Capacity Models HME020030N HME020006N HME020031N HME020391N...
- Page 2 BEFORE FIRST USE: To prevent any internal damage, it is very important to keep refrigeration units (like this one) upright throughout their journey. Please leave it standing upright and outside the box for 24 HOURS before plugging it in. In the event this product malfunctions or customer believes it is defective, the customer should contact Customer Service and retain the defective product pending further instructions.
-
Page 3: Table Of Contents
TABLE OF CONTENTS Important Safety Instructions Parts Description Operation 9-13 Care & Cleaning Troubleshooting Warranty Warning Contact Us... - Page 5 Congratulations on bringing home your new appliance! Don’t forget to register your product at homelabs.com/reg for updates, coupons, and other relevant information. Although greatly appreciated, product registration is not required to activate any warranty.
-
Page 6: Important Safety Instructions
Important Safety Instructions IMPORTANT NOTICE FOR FIRST TIME USE TURN ON DEHUMIDIFIER PLEASE NOTE: This dehumidifier defaults to CONTINUOUS MODE, disabling TURN OFF use of the LEFT/RIGHT buttons. CONTINUOUS MODE To regain use of the buttons, confirm CONTINUOUS MODE is turned off. BEGIN USING LEFT/RIGHT BUTTONS SAVE THESE INSTRUCTIONS / FOR HOUSEHOLD USE ONLY... - Page 7 Important Safety Instructions ELECTRICAL INFORMATION - The hOme nameplate is located on the rear panel of the dehumidifier and contains ™ electrical and other technical data specific to this dehumidifier. - Be sure the dehumidifier is properly grounded. To minimize shock and fire hazards, proper grounding is important.
-
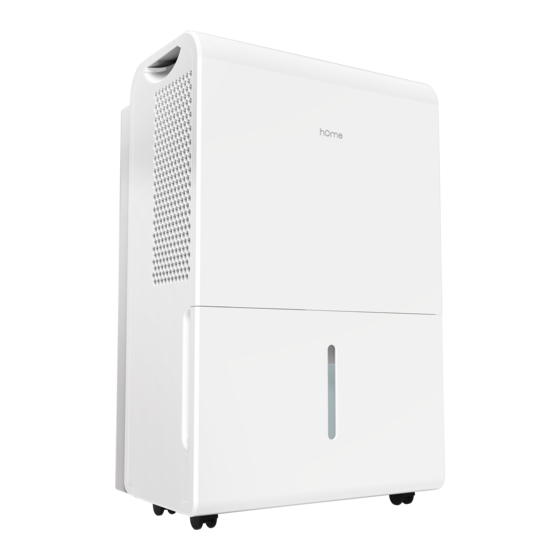
Page 8: Parts Description
Parts Description FRONT REAR Control Panel Handle (both sides) Air Outlet Grille Air intake Grille/Air Filter Panel Continuous drain Hose Outlet Bucket Water Level Window Power Cord Storage Bracket Pump drain hose outlet (Only applicable to HME020391N) Caster Power Cord Pump drain hose Power Plug ACCESSORIES... -
Page 9: Operation
Operation PLACEMENT - This unit may have been tilted or placed upside down during more than 15.75in (40cm) shipping. To ensure this device works properly, please ensure this unit is upright for at least 24 hours before initial use. - This dehumidifier is designed to operate with a working more than 15.7in (40cm) environment between 41°F (5°C) and 90°F (32°C). - Page 10 Operation CONTROL PANEL PUMP button (Only applicable to HME020391N) TURBO button Press to activate the pump operation. Controls the fan speed. Press to select either High Note: Before starting pump, make sure the or Normal fan speed. Set the fan control to High for pump drain hose is attached, the continuous maximum moisture removal.
- Page 11 Operation CONTROL PANEL (CONT.) LED display LEFT / RIGHT buttons Shows the set % humidity level from 35% to 85% or NOTE: When the dehumidifier is first turned on, it will auto start/stop time (0~24) while setting, then shows go on Continuous mode by default. This will disable the actual (±5% accuracy) room % humidity level use of the LEFT/RIGHT buttons.
- Page 12 Operation REMOVING THE COLLECTED WATER 1. Use the bucket Note: Do not use continuous draining when the When the bucket is full, remove the bucket and empty it. outdoor temperature is equal to or less than 32°F (0°C), otherwise the water will freeze, causing the water hose to block up and the dehumidifier may be damaged.
- Page 13 Operation REMOVING THE COLLECTED WATER (CONT.) 3. Pump draining (Only applicable to HME020391N) Note: - Remove the continuous drain hose from the unit. Replace the plastic cover of the continuous drain hose - Make sure the connection is tight and there is outlet tightly.
-
Page 14: Care & Cleaning
Care & Cleaning CARE AND CLEANING OF THE DEHUMIDIFIER WARNING: Turn the dehumidifier off and remove the plug from the wall outlet before cleaning. Clean the dehumidifier with water and mild detergent. Do not use bleach or abrasives. 1. Clean the Grille and Case - Do not splash water directly onto the main unit. -
Page 15: Troubleshooting
Troubleshooting Before contacting customer service, reviewing this list can save time. This list includes the most common occurrences that are not the result of defective workmanship or materials in this dehumidifier. PROBLEM CAUSE/SOLUTION Dehumidifier does - Make sure the dehumidifier’s plug is inserted completely into the outlet. not start - Check the house fuse/circuit breaker box. -
Page 16: Warranty
A receipt indicating the purchase date is required for any claim, so please keep all receipts in a safe place. We recommend that you register your product on our website, homelabs.com/reg. Although greatly appreciated, the product registration is not required to activate any warranty and product registration does not eliminate the need for the original proof of purchase. - Page 20 For Household 1-800-898-3002 © 2020 hOmeLabs, LLC help@homelabs.com 37 East 18 Street, 7th Floor Use Only homelabs.com/help New York, NY 10003...
Need help?
Do you have a question about the HME020030N and is the answer not in the manual?
Questions and answers
My dehumidifier was not turning on very often and the exterior filter was clean, so I took it outside and cleaned the coils with a water hose. Now, after using it a few days later, the humidity level shows lower than I think it actually is. What can I do
If your hOmeLabs HME020030N dehumidifier shows a lower humidity level than expected after cleaning the coils, check if the temperature is too low (below 41°F or 5°C), as this can affect readings. Also, ensure there is no kerosene heater or other source of water vapor in the room that may interfere with humidity levels.
This answer is automatically generated