
Subscribe to Our Youtube Channel
Related Manuals for Crosstour CR700


Summary of Contents for Crosstour CR700
-
Page 1: Table Of Contents
Contents (I) Structure diagram (II) Button and interface description (III) Startup (IV) Basic operation instructions for video recording /photographing / playback (V) Instructions for menu setting (VI) Product specifications (IX) Frequently asked questions and solutions - 1 -... -
Page 2: (I) Structure Diagram
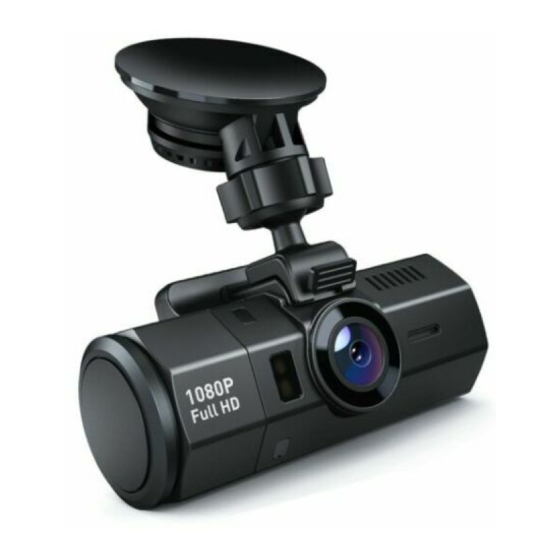
(I) Structure diagram 1) TF card 2) Reset button 3) HDMI output 4) USB interface 5)Microphone 6) Power button 7) Up button /Fast rewind/ Microphone button 8) Down button/ Fast forward 9) MODE(switching) button/Locking Speaker External hanging suction interface 12) Video button/ Photo button/ Confirm button 13)Menu button/ Capture button 14) Display 15) IR light... -
Page 3: (Ii) Button And Interface Description
(II) Button and interface description Button name Button function Instructions 1. Power on: Short press Power Button and the cam will start up. Power Power on/ power off 2. Power off: Long press Power Button until the cam shuts down. Short press this Button to restart the machine 复位功能... - Page 4 playback settings. 1. Short press it to select upward under menu Zoom in; mode. Fast rewind; 2. Select a file upward under playback mode. Up Button Select upward; 3. Short press it to turn off/on audio under video Turn on /off audio record. mode.
-
Page 5: (Iii) Startup
(III) Startup 1.Instructions of the recorder installed on the car: Auto power on/ off: It automatically powers on and starts recording when the car is on. And it automatically powers off, stops recording and saves the video when the car is off. 2.Instructions for manual operation when no car charger is inserted: ①Manually switching on/off: Short press Power Button, the cam turns on and enters video mode;... - Page 6 twice to switch to playback mode. (V) Instructions for menu setup 1.Video recording settings: After being powered on, it enters the video mode and automatically starts recording. Short press Video Button to stop recording. Short press Menu Button to switch to video recording settings.
- Page 7 It starts recording once it detects moving subjects within 3 meters in front of the lens, otherwise it stops recording. It automatically starts recording 10s video and stops recording after no dynamic motion appears. Off/ 10 Seconds/ 20 Seconds/ 30 Seconds. Default value: 10 Power off delay: Seconds.
- Page 8 Exposure, Format, Default setting, Version. Operation: 1. Short press Up/ Down Button to switch to setting option. 2. Short press Video Button to enter and short press Up /Down Button to select. 3. After modification, press Video Button to save or press Mode Button to exit. You can set the display order of date and time, such as YY/MM/DD.
- Page 9 minutes. Note: If there is no operation on the cam within the set time, the cam will automatically turn itself off when the cam is not recording. Off / one minute / three minutes / five minutes. Default value: three Auto Lcd Off: minutes.
- Page 10 the card, otherwise please select “cancel”. “Cancel”or“Ok”may be selected. Select“Ok”to restore factory Default setting: settings, otherwise please select “cancel”. You can view version information. Version: Photo settings After being powered on, it enters the video mode and automatically starts recording. Short press Video Button to stop recording.
- Page 11 Playback settings After being powered on, it enters the video mode and automatically starts recording. Short press Video Button to stop recording. Press Mode Button twice to switch to playback mode. The playback icon is displayed in the upper left corner of the screen. Short press Menu Button to go to settings.
-
Page 12: (Vi) Product Specifications
(VI) Product specifications Sensor 2M CMOS sensor, 1/3 inch sensing area G-sensor Built-in (emergently save files in case of an accident. Files saved will not be overwritten) Size of LCD 2.0 inch LCD Lens SONY IMX323 SENSOR, 170°WIDE ANGLE, 6 glass fixed-focus lens Pixel of photo 12M, 10M, 8M, 5M, 2MHD, VGA Pixel of video... - Page 13 Video compression H.264 encoding format Motion detection Support Image format Storage card TF card (Class 10 or above, up to 32G) Microphone Support Built-in speaker Support Power interface 5V 1,5A Video output HDMI signal output Audio Built-in microphone/ horn (PCM) - 13 -...
- Page 14 VII. Troubleshooting Please refer to the following to solve the problems occurred during normal operation: The screen prompts “mass storage” while being connected to computer. This is normal situation. The cam is now equal to a card reader which means that you can now transfer the files from the machine to the computer.To avoid this situation, you can use a phone plug to charge the cam.
- Page 15 The images are blurry. Please check whether there is dirt, fingerprint at the lens; please wipe the lens with lens paper before shooting. There are cross stripes in the image When a wrong“frequency”is set, it may occur. Please set it as“50Hz”or“60Hz” based on local power frequency.
Need help?
Do you have a question about the CR700 and is the answer not in the manual?
Questions and answers