
Related Manuals for TeraBee Proximeter


Summary of Contents for TeraBee Proximeter
- Page 1 Proximeter Quick User Guide Technical support: support@terabee.com Sales and commercial inquiries: terabee-sales@terabee.com...
-
Page 2: Table Of Contents
Visual notifications Graphical User Interface Installing the GUI Use of the GUI as a End user Basic configuration of the Proximeter Downloading the encounters data as a end user Use of the GUI as Administrator Configuration of the Proximeter Computing the data Import of .csv file... -
Page 3: Introduction
Please refer to the Terabee Proximeter Specification Sheet for details. 1.3. Standard precautions It is recommended to sanitize the Proximeter regularly. Do not spray liquids directly on the Proximeter and prefer using standard antimicrobial products. 2. About Terabee Proximeter 2.1. -
Page 4: Advanced Sensor Networking
(50 seats) simultaneously. Each Proximeter is constantly updating, and the advanced sensor networking means that, if an encounter has ended, one seat is available and the Proximeter can automatically start detecting a different encounter with that available seat. Copyright © Terabee 2020... -
Page 5: Ultra Wide Band Technology
The Ultra wideband applications are subject to regulations that vary depending on the country. The Proximeter can be used in the European Union, the United States, Canada, Norway, Switzerland and the United Kingdom. Countries not listed above may also approve this product, please contact us for further information. -
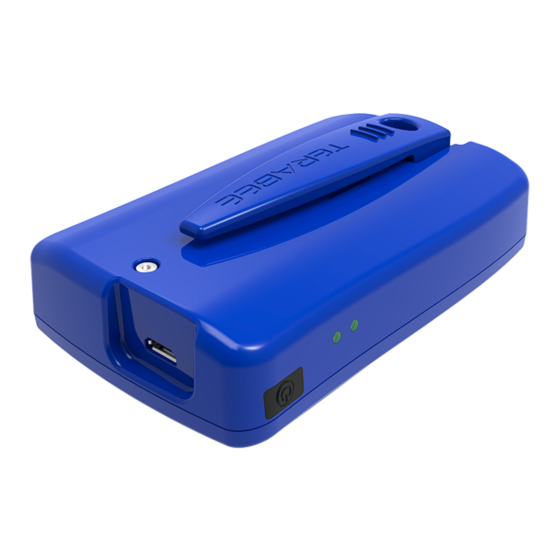
Page 6: Getting Started
The device turns on simply by pressing the button on the side as indicated in the picture. After pressing one time, the Status LED will turn green after one second as shown in the Figure below. Copyright © Terabee 2020 Terabee, 90 Rue Henri Fabre 01630, St Genis-Pouilly, France (next to CERN) Company Confidential 6/16... -
Page 7: Turn Off
finished using it for the day. In this state, the device will not switch ON again until the battery level reaches a safe level of charge. Copyright © Terabee 2020 Terabee, 90 Rue Henri Fabre 01630, St Genis-Pouilly, France (next to CERN) Company Confidential... -
Page 8: Battery Charging
3.4. Battery charging The fully charged Proximeter will keep working for around three working days but the user is recommended to charge the battery on a daily basis, like a mobile phone. Charging is done by inserting the microUSB connector as depicted in the following Figures. A mobile phone micro USB 3.0 charger will be able to charge the device (5V, 1A is advised). -
Page 9: Visual Notifications
Device is being charged Charging LED & Status 1. Device is OFF 2. If connected to a charger, device is fully charged Copyright © Terabee 2020 Terabee, 90 Rue Henri Fabre 01630, St Genis-Pouilly, France (next to CERN) Company Confidential 9/16... -
Page 10: Graphical User Interface
5.2. Use of the GUI as a End user To use the Graphical User Interface, the Proximeter must be powered on, and the status LED should be Green. The Proximeter shall be connected to the computer via the micro USB cable provided by Terabee. -
Page 11: Basic Configuration Of The Proximeter
5.2.1. Basic configuration of the Proximeter A password will be requested to access the configuration dashboard and to download the encounters data. Select the "end user" access mode and enter the password that has been provided by Terabee. Copyright © Terabee 2020... - Page 12 All the parameters are visible to the End User for information and better understanding of the application. Sensor configuration The Terabee Proximeter integrates a buzzer and vibration to provide real-time alerts to the user. Those notifications can be activated/deactivated by simply checking the box associated to the alert: ●...
-
Page 13: Downloading The Encounters Data As A End User
● Enter a filename for saving and select ".csv" as type of file ● Click the "Save" button The encounters data from the Proximeter is now available directly in the saved .csv file. 5.3. Use of the GUI as Administrator... -
Page 14: Configuration Of The Proximeter
This window provides information about the device (serial number, the com port connected and the device unique ID used to log encounters). The date and time of the Proximeter are automatically updated with the date and time of the computer, so that the .csv reports are properly dated. -
Page 15: Computing The Data
● Date: date output following this format: "YYYY-MM-DD" ● Time: time output following this format "HH:MM" (HH from 00 to 23) Copyright © Terabee 2020 Terabee, 90 Rue Henri Fabre 01630, St Genis-Pouilly, France (next to CERN) Company Confidential 15/16... -
Page 16: Import Of .Csv File
filters to the encounters. Tracing the encounters at risk is thus made easier. Figure - Example of .csv data import on Google Spreadsheet Copyright © Terabee 2020 Terabee, 90 Rue Henri Fabre 01630, St Genis-Pouilly, France (next to CERN) Company Confidential 16/16...
Need help?
Do you have a question about the Proximeter and is the answer not in the manual?
Questions and answers