
Related Manuals for Engl Z15


Summary of Contents for Engl Z15
- Page 1 All manuals and user guides at all-guides.com MIDI Footswitch Operator´s Manual...
-
Page 2: Table Of Contents
All manuals and user guides at all-guides.com Table of Contents page: Introduction Features and Functionality at a Glance Operating modes and Setup routines at a Glance: MIDI Program bank mode MIDI Program direct access mode Controller Setup MIDI Channel Setup Switch Loop Setup Internal Continuous Controller Control Panel Features: button... -
Page 3: Introduction
9. offers a special feature - button-operated Internal Continuous Controllers. 10. A very practical power supply option: via a 5-pin MIDI cord connected to ENGL amps, power amps or preamps equipped with a MIDI IN port featuring phantom power that is enabled via the "ENGL MIDI Foot Controller" switch. -
Page 4: Controller Setup
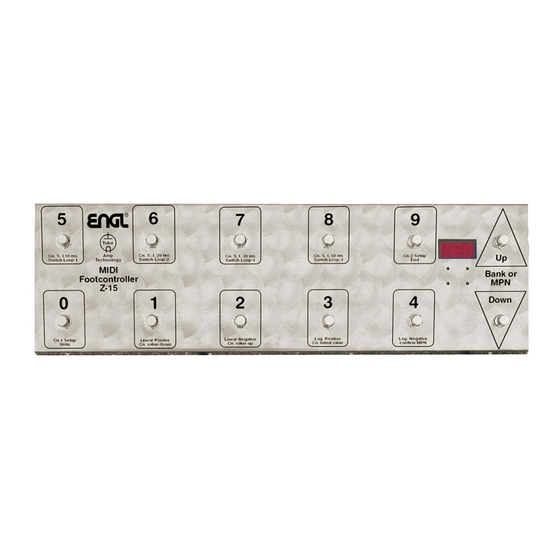
All manuals and user guides at all-guides.com Control Panel Features At page 23 of the manual, you'll find diagrams of the front panel. In this section, we'll first look at the two operating modes and setup routines. Please refer also to the condensed instructions printed on the control panel. For purposes of clarity, buttons and their functions are shown in italic letters,... -
Page 5: Internal Continuous Controller
All manuals and user guides at all-guides.com MIDI Channel Setup This is also a setup routine; it serves to determine the MIDI channel by which MIDI data are sent. To activate the MIDI Channel Setup routine, press Down buttons simultaneously for about three seconds until >c< appears at the display's first position, followed by the currently selected MIDI channel, for example, >c12<... -
Page 6: Button, Button, Button
All manuals and user guides at all-guides.com The first bank 00x must be active in order to access this routine. Press and hold the button for about three seconds until the display reads >Cn.1<. Write This feature serves to store initial and edited settings for ->... -
Page 7: Button, Button, Led 1, Led 2, Led 3, Led, 4 Up Button
All manuals and user guides at all-guides.com button When you press this button in MIDI Program Bank Mode , the foot controller activates MIDI patch 03, 13, 23, 33 and so forth up to 123 within the selected bank. Log. Positive When the Controller 1 Setup Controller 2 Setup... - Page 8 All manuals and user guides at all-guides.com Up MPN Press this button in MIDI Program Direct Access Mode to select MIDI patches directly. Every time you press the button, the MIDI patch number increases by one. Pressing and holding the button causes MIDI patches to scroll continuously in ascending order. The display flashes, indicating the selected patch, until you confirm your selection by pressing the button.
-
Page 9: Button, Button
The right digit in the display stops flashing when you return to the bank in which the last MIDI patch was selected. After the foot controller is powered up, the ENGL logo runs across the display until a button is activated. -
Page 10: Down Button
All manuals and user guides at all-guides.com Controller Setup Routine. After about two seconds, the display shows the assigned controller number. After about another two seconds, it indicates the curve assigned to the continuous controller and the selected send interval for the given continuous controller. -
Page 11: Connections On The Rear Panel Of The Foot Controller
MIDI-enabled device using a suitable MIDI cord. A 5-pin cord connected to MIDI IN port of an ENGL amp can provide power to the foot controller. To this end, you must set the ENGL amp's phantom power selector accordingly, that is, to the... -
Page 12: Switch Loop 1 2 Switch Loop 1 2
You have two different methods to choose from: MIDI Program Bank Mode This mode is active as soon as you power the Z-15 foot controller up and the ENGL logo runs across the display. In this mode, you can select directly 13 banks (00x to 12x) comprising ten MIDI patches per bank using the - buttons (excepting the first bank MPN 000 and MPN 129, which do not exist). -
Page 13: Via Midi Program Direct Access Mode
ENGL 580 MIDI Preamp's master volume or the mute circuit of various ENGL amps and rack units offering this option, this feature can be quite useful, particularly if you don't have an external expression pedal to use for this purpose. -
Page 14: Setting Parameters For Expression Pedal 1 Via Controller 1 Setup
MIDI Program Bank Mode A tip from the designer: The ENGL foot controller sends data via the selected MIDI channel. Which channel you choose doesn't matter unless you want to work with several MIDI devices in a MIDI loop and address and control a specific device via MIDI. To do this, the receiver and foot controller's MIDI channel assignments must match. -
Page 15: Internal Continuous Controller
All manuals and user guides at all-guides.com controller number 8, and selecting a descending logarithmic curve and a 50-ms send interval: -> Press Down four times; the display reads >00.7.<, >00.6.<, >00.5.<, >00.4.< -> Press to select the controller curve characteristic, in this case a logarithmic descending wave form;... -
Page 16: Configuring Switch Loops 1 To
All manuals and user guides at all-guides.com continuous controllers . The Controller Setup routine from which MIDI Program Direct Access Mode is accessed determines which parameter values are assigned to the Internal Controller. If you access this mode from Controller Setup 1 , the Internal Continuous Controller... -
Page 17: Handling And Care
A tip from the designer: The four Switch Loops are very handy auxiliary tools. Some devices such as the ENGL Screamer 50 and ENGL Ritchie Blackmore Signature 100 head sport stereo footswitch inputs for switching channels and other features. These features may also be switched... -
Page 18: Troubleshooting
Taking the place of conventional two-way footswitches with on/off functionality, the four Switch Loops serve to remote control functions of amps such as the ENGL Screamer, ENGL Ritchie Blackmore Head, ENGL Powerball Head and many more. You'll find the Switch Loops' terminal assignments and circuit diagrams on page 23. - Page 19 The number of MIDI patches on the MIDI device may be limited (look this up in the MIDI device's operating manual). -> Is your ENGL amp or ENGL MIDI peripheral device equipped with a display providing visual confirmation? If not (as is the case with the E670, E570 and Z-7), perhaps you have not programmed different settings (presets) to the MIDI patches.
- Page 20 Example: On the E580 Preamp, controller number 7 has a fixed assignment to master volume. If you use a continuous controller on the ENGL Z-15 to address this function, you must assign controller number 7 to it in the appropriate Controller Setup routine.
-
Page 21: Technical Data
All manuals and user guides at all-guides.com Technical data Power supply: 9 to 13 volts AC or 9 to 15 volts DC, approx.300 mA; Logic control system: Processor, software: T89C51AC2 with internal 32 K Flash for source code, integrated 2 K memory (EEPROM) and 10-bit A/D; MIDI interface: Asynchronous date protocol compliant with the MIDI standard... -
Page 22: Graphical View Of The Four Controller Curves
" & & " " log. positive log. negative " " & & " " Note: Technical specifications are subject to change without notice ENGL Gerätebau GmbH Germany Internet: http://www.engl-amps.com Text, design, grafics and layout: Horst Langer, ENGL Amp Designer... -
Page 23: Wiring Of Principal Connectors
All manuals and user guides at all-guides.com Wiring of Principal Connectors MIDI Out, DIN connector *: Power supply from ENGL devices that are equipped with a MIDI IN page: 11 Pin 2 - power supply port. via MIDI cable *... - Page 24 All manuals and user guides at all-guides.com www.engl-amps.com...
Need help?
Do you have a question about the Z15 and is the answer not in the manual?
Questions and answers