Advertisement
Quick Links
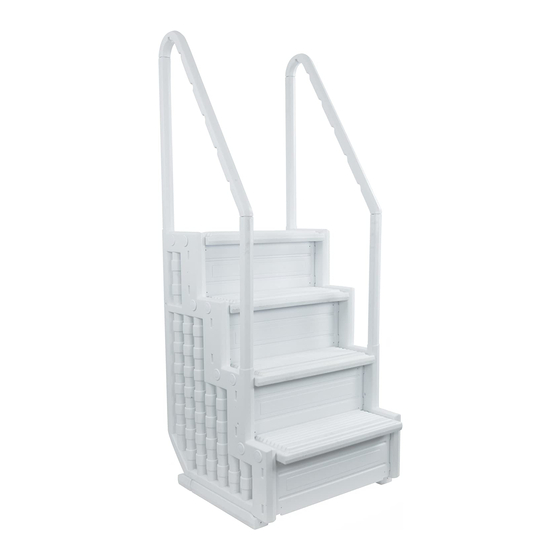
AQUA SELECT
ABOVE-GROUND POOL STEP
MODEL 832402B
Below are the options available with use of the Aqua
Select® Everest Step. The cartons and instructions
necessary will vary depending on which set-up you
have purchased. Please find the model you purchased
on the next page and note the information regarding
location of the instructions and assembly.
FOR USE WITH:
®
Aqua Select
Everest
STEP W/FLIP UP OUTSIDE
LADDER (832401BK)
CARTONS REQUIRED
(1) 832402B — Aqua Select® Everest Step
(1) 832420 — Aqua Select® Outside Ladder
(1 CARTON)
FOR USE WITH:
Aqua Select
GATED ENTRY WITH
IN POOL LADDER (832406EV)
CARTONS REQUIRED
(1) 832402B — Aqua Select® Everest Step
(1) 832405P — Aqua Select® Pickets
(1) 832406 — Aqua Select® Gate
(1) 832406SC — Aqua Select® Heavy Duty In-Pool
Ladders
EVEREST
®
®
Everest
Aqua Select
(1) 832402B — Aqua Select® Everest Step
(1) 832405B — Aqua Select® Crossover and Enclosure
(1) 832406 — Aqua Select® Gate
FOR USE WITH:
®
Everest
BRIDGE SYSTEM
(832421B)
CARTONS REQUIRED
8256
Advertisement

Subscribe to Our Youtube Channel
Related Manuals for Aqua Select 832402B

Summary of Contents for Aqua Select 832402B
- Page 1 IN POOL LADDER (832406EV) CARTONS REQUIRED CARTONS REQUIRED CARTONS REQUIRED (1) 832402B — Aqua Select® Everest Step (1) 832402B — Aqua Select® Everest Step (1) 832402B — Aqua Select® Everest Step (1) 832405P — Aqua Select® Pickets (1) 832420 — Aqua Select® Outside Ladder (1) 832405B —...
-
Page 2: Tools Required
There are four cartons necessary to install your new bridge. You should have 2 step cartons (832402B) which include the instructions necessary to install the steps only. The third carton is marked (832405B) and this contains the crossover necessary to connect the two steps. The instructions for the assembly and installation of the crossover are located in the crossover box. - Page 3 PARTS & HARDWARE FOR STEP A. LONG HANDRAIL POST (2) B. SHORT HANDRAIL POST (2) (AC LONGPOS) (AC SHORTPOS) C. STEPS (4) D. RISERS (4) (832402BS) (AC RISERS) G. HANDRAILS (2) E. BASES (2) F. MOUNTING BRACKETS (2) (832402SR) (832402MB) (AC BASE) K.
- Page 4 ANTIGUA STEP PARTS PART # MODEL # DESCRIPTION 832402SR Steprail AC LONGPOS Long Post 832402BS Steps 832402MB Mounting Bracket AC RISER Step Raisers AC SHORTPOS Short Post 832402LC Lock Caps AC PANELS Side Panels AC BASE Step Base...
- Page 5 STEP 1 Lay one of the side panels (H) down on a flat surface. • Each step (C) has a groove where the riser will slide in • which is located on the bottom of each step. Line up a step (C) by positioning the connected •...
- Page 6 STEP 4 • Leave the side panel facing upward and position one of the lock caps (I) centered over any hole on the side panel. • Using a small rubber mallet or a (block of wood and a small hammer), tap on the locking cap until it is secured over the pin sticking through the side of the step and is flush with the side panel.
- Page 7 STEP 6 • In order for step to sit properly, it must be weighted in place using approximately 50 lbs of sand. To weight step, place funnel in opening of side panel Place funnel up on top step. Pour 25 Lbs. of here and pour sand through sand into each side of the step.
- Page 8 NOTE sand, rock the step left and right to distribute sand. **IF YOU ARE INSTALLING THE AQUA SELECT® EVEREST STEP with FLIP UP OUTSIDE LADDER PLEASE REFER TO 832420 INSTRUCTIONS AT THIS TIME. **IF YOU ARE INSTALLING THE AQUA SELECT® EVEREST BRIDGE SYSTEM, PLEASE REFER TO 832405B INSTRUCTIONS AT THIS TIME.
-
Page 9: Safety Information
STEP 10 • Lubricate inside of long and short handrail posts with liquid soap or lubricant. • Attach handrails (D) to handrail posts by pushing into posts. The more curved part of the handrail is meant to be installed in the long handrail post. •... - Page 10 STEP 11 • The low voltage wire running from the light to the controller can be run under the step and under the mounting bracket if using with an existing deck. • The low voltage wire can then be run down under the deck to the control pad and transformer.
- Page 11 • The Step Bright controller allows you to either manually or automatically control the light. • The low voltage connects to the power cord attached to the controller. Simply plug the cords together and tighten the locking ring connector. • The other cord coming from the controller (left side/ bottom) connects to the transformer cable the same way.
- Page 12 DANGER WARNING is ladder is designed and WARNING SAFETY manufactured for Aboveground, NOTICE To prevent Semi-Inground Entrapment or IMPORTANT Flat Bottom Drowning, Pools DO NOT SWIM 48”, 52” and 54” through, behind in wall height or around the and pool decks ladder 48”, 52”...
Need help?
Do you have a question about the 832402B and is the answer not in the manual?
Questions and answers
Do you have a video on how to assemble the Aqua Select Anti-Slip in-Pool Steps with Outside Flip-Up Ladder. Does it require you to drill holes?