Table of Contents
Advertisement
Quick Links
Advertisement
Table of Contents

Subscribe to Our Youtube Channel
Related Manuals for Celestron FlipView 44314


Summary of Contents for Celestron FlipView 44314
- Page 1 INSTRUCTION MANUAL MODEL #44314, 44315 ENGLISH...
- Page 2 1. INTRODUCTION Thank you for purchasing the Celestron FlipView™ Handheld LCD Digital Microscope with a 5 MP sensor and flip out 3.0- inch full color TFT LCD screen. Your microscope is a precision optical instrument, made of the highest quality materials to ensure durability and long life.
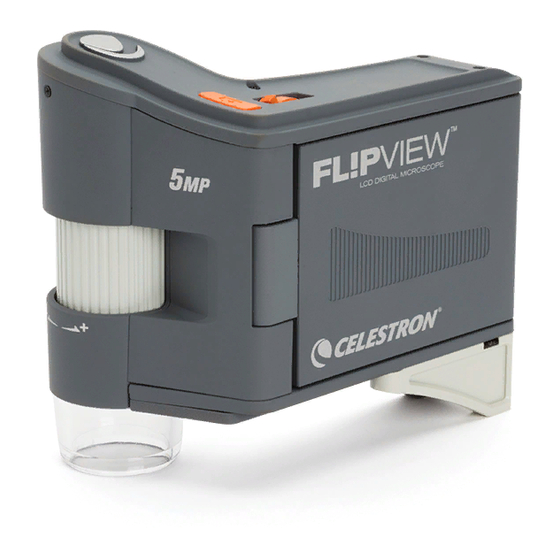
- Page 3 PARTS Shutter trigger Flip out LCD screen Flip out leg Settings button Color mode button/up button Playback/left button Illuminator adjustment wheel Battery compartment Zoom control button 5 V AC in port Mini USB port Video out port Micro SD card slot 14.
-
Page 5: Insert Micro Sd Card
INSERT MICRO SD CARD To capture images with your microscope while not connected to a computer, insert a Micro SD card in the card slot (13) on the back of the unit. Press firmly until the card clicks into place. NOTE: A MicroSD card is NOT included. - Page 6 3. OBSERVING AND CAPTURING IMAGES: DIGITAL IMAGING VIEW A SPECIMEN Power FlipView on and aim it at your specimen. Adjust the illuminator by rotating the illuminator adjustment wheel (7). Adjust the focus wheel (18) until the specimen is in focus. CAPTURE AN IMAGE To capture a still image, press the shutter trigger (1).
- Page 7 ADJUST DIGITAL ZOOM: When observing your specimen, you can zoom in and out using the zoom control button (9) CAPTURE VIDEO: In video mode, press the shutter trigger (1) to start recording. Press it again to stop recording. REVIEW IMAGES Press the playback button (6) once from still image mode or twice from video mode.
-
Page 8: Slide Show
PROTECT IMAGES This feature protects images or videos from being deleted from the MicroSD card. To protect an image or video file, press the the setup button (4) to bring up the menu. Press the down button (16) to scroll to “Protect. ” Press OK. Follow the prompts and select “OK”... -
Page 9: Resolution Settings
4. SOFTWARE MENU INTRODUCTIONS MENU From the preview mode, press the setup button (4) to enter the main menu. The menu choices will vary depending on the mode you are in: still image or video. Use the down button (16), the up button (5) and the OK button(15) to navigate the menu. - Page 10 When you press the capture button, the icon will be displayed in the upper left corner of the LCD screen. When all the frames have been taken, FlipView will return to the preview screen. To stop the auto capture before it completes, press the capture button once.
-
Page 11: Setup Menu
SETUP MENU While in the main menu press the playback button (6) button to enter setup. The choices here are: Language Power Save Frequency Date Stamp TV out Date/Time Format SD System Reset Version LANGUAGE FlipView supports 11 languages: English German French Spanish... -
Page 12: Date Stamp
DATE STAMP If you wish, you can display a date stamp on image files (but not on video files). The choices are: DATE/TIME: Displays both DATE and TIME on the saved image file DATE: Displays only the date on the image file OFF: Will NOT display any DATE/TIME information NOTE: The DATE and/or TIME will NOT be displayed in the preview mode-... -
Page 14: Using The Software
Choose “Preview on Computer” on the LCD screen, by pressing the OK button (15). Open the Celestron Portable CapturePro Software on your PC by clicking the desktop icon. View the streaming image in the software interface. NOTE: Once the software is launched, the LCD screen will go blank. - Page 15 OPTIONS: Under the Options menu item, you will find: RESOLUTION: Sets the sensor image resolution. Choose from 2 resolution settings: - 320 x 240 - 640 x 480 NOTE: When connected to a PC, FlipView cannot capture high-resolution images, but can be used for demonstration and streaming. To take advantage of full 5 MP resolution, unplug FlipView from the computer.
-
Page 16: Calibration And Measurement
9. CALIBRATION AND MEASUREMENT The Celestron Portable CapturePro software includes a Set the height of the microscope and focus on your measurement feature. To use this feature, you must first specimen. Then, replace your specimen with the perform a measurement calibration. -
Page 17: Measuring Tools
To ensure that calibration was successful, go back to the Image Capture screen. Click the ruler icon and from the dropdown menu select the option “Any Angle Line” Click and drag a line across the same “known value” as before. If the calibration was successful, the distance you measured should be exact to the “known value”... - Page 18 TAKING NOTES AND MARKING THE IMAGE Portable CapturePro includes functionality to mark, draw on, or and add notes to saved images. This can be handy for quick note taking and pointing out features on your specimen image. 1. MARKING To use this feature, click the Draw icon in the Image Preview window.
-
Page 20: Care And Maintenance
The battery is not charging. 13. WARRANTY Your FlipView LCD Microscope has a two year limited warranty. Please visit the Celestron website for detailed information on all Celestron microscopes: © 2014 Celestron • All rights reserved. • celestron.com 2835 Columbia Street •...
Need help?
Do you have a question about the FlipView 44314 and is the answer not in the manual?
Questions and answers