Table of Contents
Advertisement
Quick Links
Advertisement
Table of Contents

Subscribe to Our Youtube Channel
Related Manuals for Celestron 44308


Summary of Contents for Celestron 44308
- Page 5 INSTRUCTION MANUAL MODEL #44308...
- Page 6 1. INTRODUCTION Thank you for purchasing the Celestron Handheld Digital Microscope Pro with a 5MP sensor and professional stand. Your microscope is a precision optical instrument, made of the highest quality materials to ensure durability and long life. It is designed to give you a lifetime of pleasure with a minimal amount of maintenance.
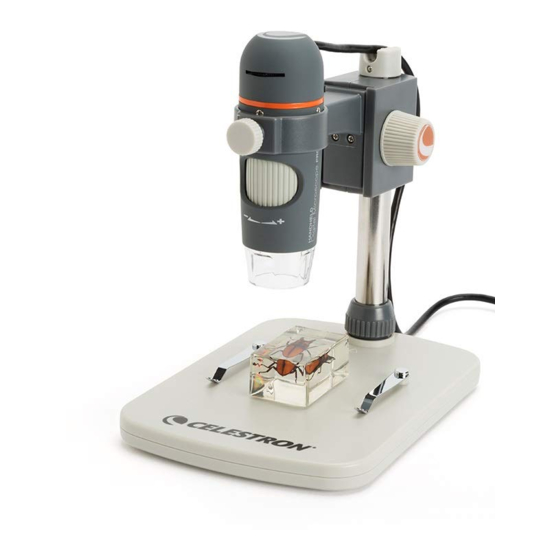
- Page 7 B. PARTS FUNCTION Lock Wheel Height Adjustment Wheel Focus Wheel Height Adjustment Lock Nut Microscope Holder lock Nut Shaft Connection Lock Collar Shutter Button Illuminator Adjustment Wheel USB Plug Stage Base Support Shaft ENGLISH...
-
Page 8: Specifications
5 MP, 3 MP, 1.3 MP, VGA (12 MP with interpolation*) Video resolution VGA, 30fps Computer interface 2.0 USB Software Celestron Micro CapturePRO (with measuring and note taking features) Operating systems supported Windows: Windows XP/Vista/7/8 Mac: OSX 10.6/10.7 Mac: OSX 10.6 - 10.8 Software languages... - Page 9 B. ATTACH MICROSCOPE Insert the microscope in the Microscope Holder and tighten the Lock Nut (5) to secure it in place. C. INSTALL SOFTWARE—WINDOWS Insert the Micro CapturePro CD into CD-ROM Drive. The following interface will display automatically: Click the “Install Capture Pro” button and follow the Setup Wizard as it guides you through the installation D.
- Page 10 3. USING YOUR MICROSCOPE A. CONNECTING Connect the microscope to your computer via the USB 2.0 cable. Click on the Micro CapturePro desktop icon to launch the software. Your microscope should automatically connect and begin streaming images. NOTE: If the microscope is not connected to the USB port, the following error message will be displayed: “No device detected.
-
Page 11: Using The Software
When using the microscope in handheld mode, adjust The Shutter Trigger (7) and the Illuminator Adjustment the coarse focus by changing the distance between the Wheel (8) are located on the cord. microscope and your subject. Adjust fine focus with the Focus Wheel (3). - Page 12 OPTIONS: Under the Options menu item, you will find: Resolution: Sets the sensor image resolution. Choose from 4 resolution settings: - 1280 x 960 (1.3 MP) - 1600 x 1200 (2 MP) - 2048 x 1536 (3 MP) - 2592 x 1944 (5 MP) Date/Time: Turns the Date and Time stamp on or off.
-
Page 13: Calibration And Measurement
C. CALIBRATION AND MEASUREMENT The Celestron Micro CapturePro software includes a Set the height of the microscope and focus on your measurement feature. To use this feature, you must first specimen. Then, replace your specimen with the perform a measurement calibration. -
Page 14: Measuring Tools
To ensure that calibration was successful, go back to the Image Capture screen. Click the ruler icon and from the dropdown menu select the option “Any Angle Line” Click and drag a line across the same “known value” as before. If the calibration was successful, the distance you measured should be exact to the “known value”... - Page 15 E. TAKING NOTES AND MARKING THE IMAGE Micro CapturePro includes functionality to mark, draw on, or and add notes to saved images. This can be handy for quick note taking and pointing out features on your specimen image. MARKING To use this feature, click the Draw icon in the Image Preview window.
-
Page 16: Care And Maintenance
If the exterior of your microscope needs cleaning, wipe the microscope housing. it with a moist cloth. 6. WARRANTY Your Celestron Handheld Digital Microscope Pro has a two year limited warranty. Please visit the Celestron website for detailed information on all Celestron microscopes. www.celestron.com ENGLISH... - Page 17 FCC Note: This equipment has been tested and found to comply with the limits for a Class B digital device, pursuant to part 15 of the FCC Rules. These limits are designed to provide reasonable protection against harmful interference in a residential installation. This equipment generates, uses, and can radiate radio frequency energy and, if not installed and used in accordance with the instructions, may cause harmful interference to radio communications.
Need help?
Do you have a question about the 44308 and is the answer not in the manual?
Questions and answers