Advertisement
Quick Links
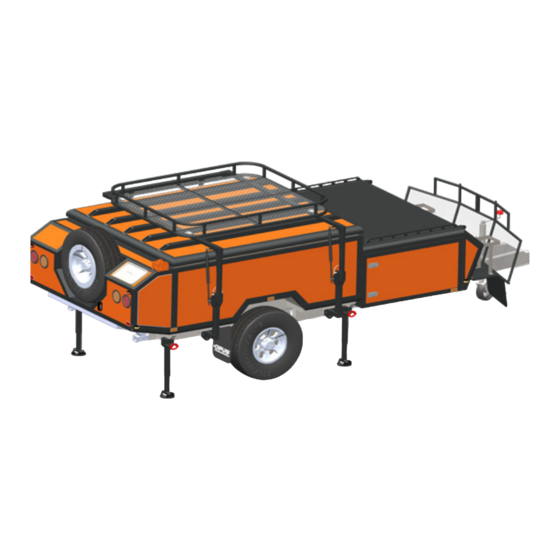
Towing
Optional Accessories
Stereo System
OWNERs MANUAL
Foldable Roof Rack
Battery
2020 MODEL
e-Go/Enduro Movers
Trailer Lights
LED Light Kit
Tent/Canopy
Material
Tropical Roof
Annex
Awning
Ensuite Room
Optional Accessories
Foldable Roof Rack
e-Go/Enduro Movers
LED Light Kit
4
4
7-PIN rounded plug
Stereo System with 2x speakers,
Radio, USB inputs, CD & DVD player
2x 100Ah deep cycle AGM batteries with 120V charger
LED tail lights, clearance lights, internal lights, number
plate light, tool box lights, kitchen light, annex light
400GSM Micro Weave Poly Cotton
Waterproof and UV Protective Tropical Roof
Fully Enclosed Annex with removable doors & side walls
Annex with doors & end walls removed
Removable ensuite shower room with floor
Optional (maximum 500lbs. load capacity)
Remote controlled
Flexible strip lighting system w/ dimmer switches
T ENT INFLA
TION TECHNOLOGY
www.opuscamper.us
Optional (maximum 500lbs. loa
Remote controlled
Flexible strip lighting system w/
T ENT INFLA
TION TECHNOLOGY
www.opuscamper.us
Advertisement

Related Manuals for Air OPUS OP2 2020


Summary of Contents for Air OPUS OP2 2020
- Page 1 Towing 7-PIN rounded plug Optional Accessories Stereo System Stereo System with 2x speakers, OWNERs MANUAL Radio, USB inputs, CD & DVD player Foldable Roof Rack Optional (maximum 500lbs. loa Battery 2x 100Ah deep cycle AGM batteries with 120V charger 2020 MODEL e-Go/Enduro Movers Remote controlled Trailer Lights...
- Page 2 Setting Up your Air OPUS ® Camper Page 10 - 11 Understanding the Air OPUS ® Switchboard Page 12 ® Understanding the air valves when setting up your Air OPUS Camper Page 13 ® Air OPUS Water System Page 14 -15 Air OPUS ®...
- Page 3 SPECIFICATIONS - 2 SLEEPER SPECIFICATIONS - 2 SLEEPER Body Work Baked enamel finish Electrical Box Material Main body aluminium frame & composite panel exterior, Power Supply 12V & 120V with galvanlized steel chassis and draw bar Towing 7-PIN rounded plug Dimension (Lid Closed) 16’2”...
- Page 4 11 Quick Tips to set up and pack up your Air OPUS ® DIMENSIONS - 2 SLEEPER Tip 1 - Invest in a cordless drill and 19mm hex head bit to adjust stabiliser Tip 4 - When legs rather than manually winding them.
- Page 5 11 Quick Tips to set up and pack up your Air OPUS ® HITCHING & TRAILER ELECTRICS About your Hitch Tip 7 - During canopy inflation make sure all external air valves are closed off and the main air valve is open before turning air pump on.
- Page 6 Before departing, place car in your Air OPUS ® lengthways. ® drive and check that the Air OPUS brakes are on. Refer to brake controller user manual for STEP 3 - Using the leg winder supplied, gently correct adjustment.
- Page 7 STEP 9 - Once lid is fully open and resting against stone guard secure in place using latch provided STEP 10 - At this stage walk around the Air OPUS ® inspect the tent to ensure that the canvas is properly located within the aluminium channels and that no part of the tent is caught or snagged.
- Page 8 Each water tank has its Retaining Ring Deflation Valve position by rotating own lockable fill point located on the driver side of the body of the Air OPUS ® and is anticlockwise.
- Page 9 STEP 7. Switch off the yellow gas valve when not in use and ensure that the gas bottle valve is CONNECTORS AND closed prior to packing up the Air OPUS® for transit or storage. WASTE HOSE, SO A CLOTH IS USEFUL...
- Page 10 ® 12 Volt - Safe operating procedures 120V Shore Power Connection - Safe operating procedures The Air OPUS ® has many 12V outlets - they are a combination of standard 12V sockets,12V light sockets, USB sockets and switches. These are located throughout your camper trailer both internally and externally.
- Page 11 Air OPUS FRIDGE SLIDE SETTING UP THE ADDITIONAL DAY BED ® Seating moved to create additional bed The seating area inside the Air OPUS ® can be reconfigured as shown. Your Air OPUS ® is supplied with a powered fridge slide to mount your 12V travel fridge.
- Page 12 INSTALLING YOUR Air OPUS Annex INSTALLING YOUR Air OPUS Annex ® ® Step 3 - Spread annex canvas out from the camper as shown Attaching annex to canopy Step 1 - To attach the annex to the canopy of the camper deflate the canopy to attain easy access to zip area (see picture as shown).
- Page 13 INSTALLING YOUR Air OPUS Annex INSTALLING YOUR Air OPUS ENSUITE ® ® Inflating the annex when attached to canopy continued... Step 8 - After main pump shuts off it has reached the desired pressure. Remember to turn the main inflation valve in the camper to the horizontal CLOSED position when inflation is complete.
- Page 14 24 hours. Step 4. Undo the ties holding the zips on ® IIt is strongly advised that you purchase a storage cover for your Air OPUS if it is to be the grey tube together and unfasten the zip. stored in an uncovered location. A storage cover is advised if your camper is left...
- Page 15 • Inspect the outside panels of your Air OPUS ® including the roof (bed lids) for any If it is unavoidable that you will have to pack down your Air OPUS® when the canvas is damage or cracks. ® wet, it is very important that the Air OPUS tent, annex and ensuite room are dried in the sun as soon as possible - this should be done within 24 hours.
- Page 16 Ventilation Condensation ® Ventilation is more important than is generally realised - your Air OPUS camper and annxe have several windows/vents that can be opened to help increase air ventilation. Condensation needs to be considered in both the Air OPUS ®...
- Page 17 Air OPUS WARRANTY Air OPUS WARRANTY ® ® Introduction The following information relates to warranties offered by OPUS®. Please read all the Camper Trailers information carefully, and should you have any questions relating to any aspect of this section, please contact OPUS®. By purchasing an item from OPUS®, you hereby agree to all terms and conditions of warranty as set out herein.
- Page 18 OWNERS MANUAL Air OPUS WARRANTY ® Tents Tents are guaranteed to be in new merchantable condition at the time of purchase. A limited manufacturer’s warranty period of 2 years applies to OPUS® canvas components, poles and fittings. General wear and tear excepted. Zips and mesh or screens are not covered.
Need help?
Do you have a question about the OP2 2020 and is the answer not in the manual?
Questions and answers