Table of Contents
Advertisement
Quick Links
Takara Belmont
Ultrasonic Steamer
MICRO MIST
Product No.
AK-200
Operating Manual
Thank you for purchasing our Belmont Micro Mist
ultrasonic steamer.
Please read this manual before using the
ultrasonic steamer.
Keep this manual in a place where it can be easily referred
to when necessary.
Contents
Request No. CACP93B0
5·6
10
12
12
13
14
15
17
18
19
3rd version 2021.11
2
4
7
8
Advertisement
Table of Contents

Subscribe to Our Youtube Channel
Related Manuals for Takara Belmont Ak-200


Summary of Contents for Takara Belmont Ak-200
-
Page 1: Table Of Contents
Takara Belmont Ultrasonic Steamer Contents MICRO MIST Safety Cautions and Warnings Location of Warning Labels·Specifications Product No. AK-200 Assembly Instructions 5·6 Component Parts Operating Manual Control Panel Preparation for use Usage Positioning the Unit Fitting the Face Guard Setting the Operating Mode... -
Page 2: Safety Cautions And Warnings
Safety Cautions and Warnings Signs and Symbols Before Using This Product Carefully read through and familiarize yourself with the "Safety Cautions and Warnings". The precautions indicated here are designed to prevent harm and injury to you and your customers and to facilitate the safe use of the product. - Page 3 Caution Use the handle to move the unit. Do not move the main unit using the Do not try to move the unit using the stand or the Nape Bar. hood. This may lead to the unit tipping over and may cause This may cause it to tip over.
-
Page 4: Location Of Warning Labels·specifications
This may cause ''OF'' code to be displayed and the machine to cease functioning. For continued protection against risk of fire replace as marked. Specifications Product No. AK-200 Rated Voltage 110V/120V 220V/230V/ 240V Rated Frequency 50/60 HZ Rated Power Consumption... -
Page 5: Assembly Instructions 5·6
Assembly Instructions Main Unit 1. Attaching the Base Stand Remove the main unit body (AK-200) and place it on the packing case, positioning it as shown in the illustration on the right. Support Cap Support *Use the two handles (depressions) on the Base Stand Flange A side to pick up the main unit. - Page 6 Assembly Instructions 2. Remove the Compression Cap Bolt. Stand the unit up before removing the cap bolt. Working on it while leaving it lying flat runs the risk of having the Height Support fall out. It may also cause damage to the support. Adjustment Knob 1) Stand the unit up after attaching the Base Stand.
-
Page 7: Component Parts
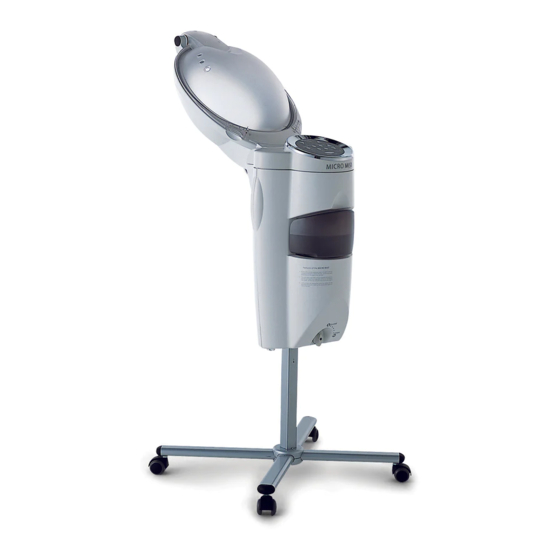
Component Parts Main Unit - Rear Hood Control Panel Water Container Handle Water Container Water Container Cap Holder Drain Cock Main Unit - Front Handle Power Switch Nape Pad Face Guard Height Adjustment Knob Nape Bar Main Unit Section Power Cord Drain Tank Takara Water Purifier (TJ-5) Base Stand Section... -
Page 8: Control Panel
Control Panel Time Setting Key Use this to change the time that has been set. ( UP ) and Pressing on ( DOWN ) together will change the time in 1-minute increments each time they are pressed. Keeping the keys depressed will change the time in succession (0 to 60 minutes). - Page 9 Display Panel Shows the operation time set or No water in the Water Container. the remaining operation time. Too much water. Warm-up in progress. (Overflow) (Preheating) Indicate Cooling in progress. malfunctioning. Temperature Level Key Use this to change the temperature of the mist. Pressing ( UP ) or ( DOWN ) will change the level each time they are pressed.
-
Page 10: Preparation For Use
Preparation for Use Put water in the Water Container 1. Remove the Water Container Cap and add the water. Always purify tap water before using it. Use either water from the accompanying Takara Water Purifier (TJ-5) or water that has been specifically purified for the steamer. - Page 11 Fastening the Face Guard to the Hood 1. Loosen the strap at the bottom Resin cord side Face the side with the seam (the woven cord side) of the to the front when installing. Face Guard. *The side with the crossed strap is the top part and the side with the strap to be fastened by the ends Align it with the center of the Hood.
-
Page 12: Usage
Usage Setting the Main Unit Finish preparing the customer (up to the attachment of the towel-turban) before setting the Main Unit. Towel-Turban 1. Setting the Main Unit behind the customer. Move the Main Unit to behind the customer. Loosen the Height Adjustment Knob on the Main Unit to move the Nape Bar up or down so that it touches the nape of the customerís neck (the center part of the back of the turban). -
Page 13: Setting The Operating Mode
Check to make sure that there is no space between the Face Guard Close the Upper Cover and the customerís head and then slowly close the top cover. Face Guard Turban Set this so that the space from the Face Guard to the *Press firmly until both right and Turban appears uniform. -
Page 14: Operations During Mist Generation
Usage Operations during Mist Generation During operation the selected mode lamp and the time display colon will flash alternately and the remaining operating time will be displayed on the Display Panel. Changing conditions during operation Press the key that corresponds to the setting to be changed. -
Page 15: After The Mist Operation Is Complete
After the Mist Operation is complete An electronic alarm (2 beeps) will sound to announce that time is up when the time set for the Mist Operation has elapsed (the time display will be at 0) and the cleaning time period (2 minutes) will begin. When the cleaning time period ends, the electronic alarm will sound (3 beeps) and the heat maintenance period (20 minutes) will begin.(The keep lamp will light up) *In the case where Cleaning has been set to OFF when making the settings, the heat maintenance period... - Page 16 Usage Discarding the Drain Tank water Remove the Drain Tank at the front of the Main Unit Drain Tank and discard the water accumulated in it. Drain Cock 1. Raise the Hood. 2. Move the Cock that keeps the Drain Tank in place to an upright position.
-
Page 17: Maintenance
Maintenance Unplug the machine when carrying out maintenance. The inside section of the Hood gets Control Section/Metal Section dirty easily, so it should be wiped Wipe with a soft dry cloth. clean periodically. If water is spilled on this section, wipe Hair stuck inside or chemicals may cause it off as soon as possible. -
Page 18: Display Codes
Display Codes The following displays indicate the condition of the machine, follow the directions on the Display decal. Indicates that warm-up Wait until warm-up has been is in progress. completed. This displays up to 59 seconds after the start of Cleaning. Indicates that Cleaning is in progress. -
Page 19: Troubleshooting
Troubleshooting Symptom Check Make sure that the power plug is properly No power plugged into the outlet. (Nothing displays on the Control Panel) Check to make sure that the Power Switch has been turned on. Check the fuses in your fuse box to make sure they haven't burned out. - Page 20 Memo TAKARA BELMONT CORPORATION 1-1, 2-Chome, Higashi-shinsaibashi,Chuo-ku,Osaka,Japan TEL : (06) 6213-5945 FAX : (06) 6212-3680 Printed in Japan...
Need help?
Do you have a question about the Ak-200 and is the answer not in the manual?
Questions and answers