
Related Manuals for IFR FM/AM-500


Summary of Contents for IFR FM/AM-500
- Page 1 MAINTENANCE MANUAl FM/AM-500/A C OMMUNICATIONS SERVICE MONITORS 10200 Wost York Street/Wichita, Kansas 67215 U.S.A./(316) 522-4981/TWX 910-741-6952 1002-5201-100...
- Page 2 PUBLISHED BY IFR, INC. Wichita, Kansas Copyright C 1986 by IFR, INC . All rights reserved. Printed in the United States of America. part of this publication may be reproduced, stored in a retrieval �ystem, or transmitted in any form or by any means, electronic, mechanical, photocopying, recording or otherwise without the prior permission of the publisher.
- Page 3 WARNING: HIGH VOLT AGE EQUIPMENT THIS EQUIPMENT CONTAINS CERTAIN CIRCUITS ANO/OR COMPONENTS OF EXTREMELY HI G H VOLTAGE POTENTIALS, CAPABLE OF CAUSING SERIOUS BODILY INJURY OR DEATH. WHEN PERFORMING ANY OF THE PROCEDURES CONTAINED IN THIS MANUAL, HEED ALL APPLICABLE SAFETY PRECAUTIONS. RESCUE OF SHOCK VICTIMS 1.
- Page 4 @�ur(<!�l INTEGRATED CIRCUITS AND SOLID STATE DEVICES SUCH AS MOS FET'S, ESPECIALLY CMOS TYPES, ARE SUS CEPTIBLE TO DAMAGE BY ELECTROSTATIC DISCHARGES RECEIVED FROM IMPROPER HANDLING, THE USE OF UNGROUNDED TOOLS, AND IMPROPER STORAGE AND PACKAGING. ANY MAINTENANCE TO THIS UNIT MUST BE PERFORMED WITH THE FOLLOWING PRECAUTIONS: 1.
- Page 6 9-5 ..•.•..1 9- 1 3 ....1 9-14 ....2 *10-6 ....3 6-14 ....1 *6-25 ....3 10-23 ....o *10-32 ....3 LIST OF EFFECTIVE PAGES Pg. No. Change No. Pg. No. Change No. 4-23 •••..••••••.••.. 2 8-1 thru 8-2 •••••••.
-
Page 7: Preface
PREFACE SCOPE This manual contains maintenance instructions for the FM/AM-500 and the FM/AM-SODA Communications Service Monitor. The information in this manual will enable the technician to: 1. Service, test, repair or replace any major assembly or module within the test set. - Page 8 SECTION 6 - DISASSEMBLY/REASSEMBLY PROCEDURES Provides detailed instructions for removing and/or disassembling the various modules within the FM/AM-500A, for purposes of repair or replacement. Contains mechanical assembly drawings of all modules within the FM/AM-500A. SECTION 7 - MODULE TESTING Contains detailed theory of operation, troubleshooting and testing recommendations for all modules within the FM/AM-500A deemed to be field repairable.
-
Page 9: Table Of Contents
TABLE OF CONTENTS Paragraph Title Page Pref ace . . . • . . • ..• ..• • . • . • • • • . . • . • • • • • • • . • • . • ..• . . • . . . i Tab 1 e of Contents •... - Page 10 Paragraph Title Page ....... General 2-2-1 Open PC Boards .••.•..•..••...•....•••.•..2-2-2 Enclosed PC Boards •••••••••••••••••••••••••••••••••••...
- Page 11 Paragraph Title Page ..3- 17 Laboratory Performance Evaluation Procedures ....... 3-3- 1 3- 19 1 kHz Tone Generator...
- Page 12 Paragraph Title Page 4 -2- 6 4 -19 Modulation Meter 4 -2- 7 4 -2 3 SINAD Meter ... . . 4 -2- 8 4 -2 7 Power Meter 4 -2-9 4 -29 Generate Out p ut Level •..•.•..••..•••••••..•.•••...
- Page 13 Paragraph Title Page Tr o u b 1 es ho o t i n g Phase Lo c k S· y stem • • • • • • • . • • • • • • • • • • 5 -3 3 5-5-1 Lock Light Indicates System Is Not Phase Locked ••••...
- Page 14 Paragraph Title Page ..6 -2-1 5 Front Panel 6 -1 9 ..... 6 -2-1 6 Generate Amplifier 6 -25...
- Page 15 Par ag raph Page Title ..7-19 7-4-2 Preparation Testing •••••• ....7-4-3 7-20 Testing •••• ..
- Page 16 Paragraph Page Tit 1 e Di gital Module 7-4 7 7- 9- 1 Theory of Oepration ••••••••••••••••••.•••.••••••••• 7-47 7- 9- 2 Preparation for Testing ......7-51 7- 9- 3 Testing ••••••••••••••••••••••••••••••••.••••••••••• 7-52 7 - 9 - 4 Reassembly •••••••••••••••••••••••••••••••..••••.• 7-56 7-10 Receive Audio Module .......
- Page 17 Paragraph P age Tit 1 7-13-4 Reassembly 7-83 7-14 Optional Generate Amplifier •••••••••••••••••••••••• 7-85 7-14-1 Theory of Operation •••••••••••••.••••.•••••••••.••• 7-85 7-14-2 Preparation for Testing •••••••••••••••••••••••••••• 7- 86 7-14- 3 Testing ....• ......7-86 7-14-4 Reassembly ••••••••••••••••••••••••.••••.•...••••••.
- Page 18 LIST OF ILLUSTRATIONS Figure Title Page Corrective Maintenance Flow Chart 1 - 5 1- 2 Controls, Indicators & Connectors 1- 6 FM/AM-500A Module Identifier ••••••••••••••••••••••• 2-3 Simplified Block Diagram •••.••••••••••••••••••••••• 2-4 Reference Frequencies Block Diagram ••••••••••••••••• 2-5 2 - 3 Frequency Conversion Modules Block Diagram •••••••••...
- Page 19 Figure Page Tit 1 e ....... . Rear Panel Assembly 6-16 Front Panel Assembly ...•••.••.•••••••••••••..••.••.
- Page 20 High Loop Divider PC Board ••.•••••..••..••••...•.••••••••• 9-10 9-13 Low Loop PC Board ...•••••..•..••••.•...•••.••••...•••• 9-11 Receiver/Generator PC Board •••..•..••••••.••••.•••••••••.• 9-12 9-14 9-15 Receive Audio PC Board (FM/AM-500) •••.•••••.••...•.•..•••• 9-13 Receive Audio PC Board (FM/AM-500A) ..•••..••.•••••••...•.• 9-13 9-16 Generate Audio PC Board ..•••••••••...•.••••••••..•••••• 9-14 9-17 9-18 Variable Tone Generator PC Board ••••••.••.••..•••••••..•...
- Page 21 10-17 Schematic ... • ..10-18 Receive Audio Schematic (FM/AM-500) ••••••••••••••• 10-22 10-19 Receive Audio Schematic (FM/AM-500A) ••.•••.••••.•. 10-24 10-20 Generate Audio Schematic •••••••••••••••••••••••.•. 10-26 10-21 Variable Tone Generator Schematic ••••••••••..•••••...
- Page 22 LIST OF TABLES Table Number Title Page Recommended Calibration Sequence 4- 2 Module Replacement and Alignment Requirements •••... 4-5 4 - 3 Frequency Error Meter Calibration 4-18 Power Supply Output Voltages ••••••••••••••••••••••• 7-9 7 -1 RF Frequency BCD Logic Values •••••••••••••••••••••• 7-30 7 - 2 RF Frequency Error Testing ••••.•••••.•••••••••••.••...
- Page 23 LIST OF TABLES Title Page Table Number 4- 1 Recommended Calibration Sequence •••••••••••••••••••••• 4-3 4- 2 Module Replacement and Alignment Requirements ••••••••• 4-5 Frequency Error Meter Calibration ••••••••••••••••••••• 4-18 7- 1 Power Supply Output Voltages •••••••••••••••••••••••••• 7-9 7 - 2 RF Frequency BCD Logic Values •••••••••••••••••••••••.•...
-
Page 24: General
The meter control switch provides three ranges of resolution in each mode, RF and audio. In addition, the FM/AM-500 with the optional oven oscilla tor, and all FM/AM-500A have three additional high resolution ranges in the RF mode. -
Page 25: Rf Output Level Control
1-2-4 RF OUTPUT LEVEL CONTROL The RF output level is controlled by an attenuator with steps in 10 dB increments and a vernier which adjusts from O to 11 dB above the posi tion of the step attenuator. The step attenuator dial is marked in both dB and millivolt scales. -
Page 26: Corrective Maintenance Procedures
numbers identifying the specific component on the schematic and assem bly drawing. Listed below are the series designators. Number Assembly Front Panel RF Frequency Thumbwheel Switch Variable Tone Frequency Thumbwheel Switch 1900 VCO Mixer Assembly 1210 MHz VCO PC Board 2000 2100 1300-2298 MHz VCO PC Board... - Page 27 EXECUTE PERFORMANCE START EVALUATION TEST(S) TEST SET PASS TEST IS FUNCTIONING RESULT(S)? PROPERLY FAIL 1) CALIBRATION ·-------------- ERROR ---------------. 2) UNSURE GO TO SECTION 4 OF THIS MANUAL NATURE REPEAT APPROPRIATE .,_ _ ----t ANO PERFORM APPROPRIATE CALIBRA OF ORIGINAL TION PROCEDURE(S).
-
Page 29: Section 2 - Theory Of Operation
SECTION 2 · THEORY OF OPERATION 2-1 INTRODUCTION This se�tion provides a functional description of the circuitry con tained in the FM/AM-500A Communications Service Monitor on the follow ing levels. Detailed module level theory of operation is contained in Section 7. 2-1-1 SIMPLIFIED THEORY OF OPERATION Paragraph 2-3 provides a simplified description of the signal flow... -
Page 30: Block Modules
5. Variable Tone Generator (Optional on FM/AM-500) - Generates audio frequency selected by Front Panel Thumbwheels. 2-2-2 ENCLOSED PC BOARDS 1. High Loop Synthesizer - Produces tuning voltages for first and second local oscillators in Dual VCO Module to maintain the correct difference between the two oscillators. -
Page 33: Intermodule Systems Theory Of Operations
500 KHz HIGH LOOP TCl<O STANDARD FREQ DIVIDER SELECT 1MHz ERROR EXT 10 MHz IN /DIGITAL COU NTER/ COU N TER TIMER • LOOP LFREQUENCYSTANDARD7 100 Hz FREQ DIVIDER I K Hz GENERATE SPEAKER I KHz AUDIO � PHASE/ 21.4 MHz FREQ OOMPARA"IQ;... -
Page 34: Audio System
counters only in the Hi g h Loop; the four ri g ht hand thumbwheels (100 kHz, 10 kHz, 1 kHz, and 100 Hz) set counters only in the Low Loop. Codin g from the 1 MHz thumbwheel, thou g h, is divided between both these modules. -
Page 35: Frequency Conversion Modules Block Diagram
A NTEN NA Ef'lAB LE TO OUTPUT REC /GEN 1300 Wiz 89 MHz � -----x._ ..--..__ � AUDIO MODULATION ---x..�----�DEMOD IF MODULE AUDIO DEMODULATOR CARRIER DUAL VCO THIRD FIRST SECOND \/CO LOW LO SYNTHESIZER 90-1088 MHz 1120 MHz � HIGH LOOP SYNTHESIZER 842 I... -
Page 36: Frequency Error Display
system, and displays the difference from the selected Variable Tone frequency on the Frequency Error Meter. In the Generate mode, audio signals to be modulated onto the carrier can come from any or all of four different sources. A lkHz signal from the Digital Module and a variable tone from the Variable Tone Generator can be coupled directly to the speaker amplifier or to the modulation amplifier, both in the Generate Audio Module, as desired. -
Page 37: Audio System Block Diagram
EXT MOD VARIABLE SPEAKER TONE SELECT VARIABLE 0-9999.9 KHz VAR TONE TONE � {:>- THUMBWHEEL GEN�ATOR SPEAKER ..,_ 0-9999.9 KHi MODULATION I KHz TONE OUT_ FIXED TONE SELECT M000..£7 �EN AUDIO Mlp-- AM/FM SELECTOR • 10.7 MHz ...- AM MOD CARRIER rnc.,, AUDIO MOOULE, r,'?C.-,1. -
Page 38: Frequency Error Indicator Block Diagram
VARIABLE RECEIVER TONE AUDIO GENERAlOR ___.., FREQUENCY TIMING SELECTOR FREQUENCY DIVIDER CIRCUIT CIRCUIT STANDARD CIRCUIT COUNTER SYSTEM lDtGITAL coUNTER7 FREQ ERROR Figure 2-6 Frequency Error Indicator Block Diagram quency is above or below the reference frequency, the ending count will be above or below the preloaded count of 128 respec tively. -
Page 39: Phase Lock Indicator Circuit
HIGH LOOP PHASE DETECTOR FRONT PANEL PHASE FLASHER FLASHER PHASE LOCK LOGIC LOCK LIGHT INDICATOR CIRCUIT PHASE GEN/LOCK LOCK SWITCH LOGIC GENERATE A UDI O PHASE LOCK INDICATOR CIRCUIT PHASE DETECTOR LOW LO OP Figure 2-7 Phase Lock Indicator Circuit Block Diagram unlocked module (High Loop or Low Loop Synthesizer) is illuminated. -
Page 40: Section 3 - Performance Evaluation
SECTION 3 - PERFORMANCE EVALUATION 3-1 GENERAL This section contains step-by-step test procedures for assessing the performance of the FM/AM-SOOA. These procedures should be used as a quick check if a malfunction with the set is suspected, and as the first step in the troubleshooting/maintenance process when the operat... -
Page 41: Test Equipment Requirements
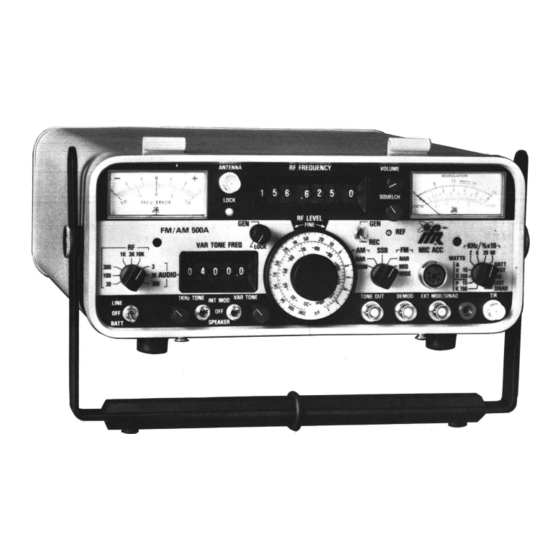
TEST SET-UP DIAGRAM: A diagrammatic aid for making connections between FM/AM-5OOA and any special accessory equipment. INITIAL FM/AM-5OOA - CONTROL SETTINGS: Initial FM/AM-5OOA Front Panel control settings required to begin the procedure (See Figure 1-2 for Front Panel control identification.) 3-1-1 TEST EQUIPMENT REQUIREMENTS Appendix Bat the back of this manual contains a comprehensive list of test equipment suitable for performing any of the procedures in this... -
Page 42: Mobile Performance Evaluation Procedures
3-2 MOBILE PERFORMANCE EVALUATION PROCEDURES Procedure Para. Page 3-2-1 1 kHz Tone Generator Performance Evaluation •••..••.••..•. 3-5 3-2-2 Variable Tone Generator Performance Evaluation .•..•• 3-7 Receiver Performance Evaluation ••.•..••.••..••.•.••.••••. 3- 9 3-2-3 3-2-4 RF Frequency Error Meter Performance Evaluation •••.••.•.. 3-11 3-2-5 Audio Frequency Error Meter Performance Evaluation 3-13... -
Page 43: Khz Tone Generator
3-2-1 PERFORf1ANCE EVALUATION: 1 kHz TONE GENERATOR SPECIAL ACCESSORY EQUIPMENT REQ'D: None TEST SET-UP DIAGRAM: None INITIAL FM/AM-5OOA CONTROL SETTINGS: Reference Figure 1-2 K EY CONTROL SETTING 15 1 kHz TONE Selector SPEA K ER Switch Fully ccw 16 1 kHz TONE Level Control 17 Power Switch VAR TONE Selector Switch 27 VOLUME Control... -
Page 44: Variable Tone Generator
3-2-2 PERFORMANCE VARIABLE TONE GENERATOR EVALUATION: SPECIAL ACCESSORY EQUIPMENT REQ'D: None TEST SET-UP DIAGRAM: None INITIAL FM/AM-SODA CONTROL SETTINGS: Reference Figure 1-2 SETTING CONTROL Fully ccw 13 VAR TONE Level Control 14 VAR TONE Selector Switch "SPEAKER" 1 kHz TONE Selector Switch "OFF 17 Power Switch... -
Page 45: Receiver
3 -2-3 PERFORMANCE RECEIVER EVALUATION: SPECIAL ACCESSORY EQUIPMENT REQ'D: Antenna Coax Cable, BNC Connectors TEST SET-UP DIAGRAM: None INITIAL FM/AM-SOOA CONTROL SETTINGS: R�ference Figure 1-2 SETTING CONTROL 4 Modulation Meter Mode Switch "SIG" Modulation Mode Selector Switch "FM MID" VAR TONE Selector Switch "OFF 1 kHz TONE Selector Switch... - Page 46 PROCEDURE STEP Rotate SQUELCH Control ( 28) back fully ccw. Rotate Modulation Mode Selector Switch ( 9) to "FM NAR" posi tion. Verify audio is noisy and severely distorted. Rotate RF FREQUENCY Thumbwheels ( 25) to local AM broadcast station. Rotate Modulation Mode Selector Switch (9) to "AM NORM"...
-
Page 47: Rf Frequency Error Meter
3-2-4 PERFORMANCE EVALUATION: RF FREQUENCY ERROR METER SPECIAL ACCESSORY EQUIPMENT REQ'D: Ohm Coax Cable, BNC/BNC TEST SET-UP DIAGRAM: None INITIAL FM/AM-500A CONTROL SETTINGS: Reference Figure 1-2 CONTROL SETTING Modulation Mode Selector Switch VAR TONE Selector Switch 15 1 kHz TONE Selector Switch 17 Power Switch Frequency !rror Meter... -
Page 49: Audio Frequency Error Meter
3 -2-5 PERFORM ANCE EVALUATION: AUDIO FREQUENCY ERROR METER SPECIAL ACCESSORY EQUIPMENT REQ'D: None TEST SET-UP DIAGRAM: None INITIAL FM/AM-500A CONTROL SETTINGS: Reference Figure 1-2 CONTROL SETTING Modulation Meter Range Switch Modulation Mode Selector Switch FM MID" VAR TONE Selector Switch 15 1 kHz TONE Selector Switch "INT MOD"... - Page 50 STEP PROCEDURE Rotate VAR TONE FREQ Thumbwheels (18) to "0997.0". Verify FREQ ERROR Meter (21) in�icates +3 Hz ( ± 0.18 Hz). Rotate Frequency Error Meter Range Switch (19) to "AUDIO 30". Rotate VAR TONE FREQ Thumbwheels (18) to "0970.0". Verify FREQ ERROR Meter (21) indicates +30 Hz ( ±...
-
Page 51: Generate Mode And Modulation Meter
3 -2 -6 PERFORMANCE EVALUATION: GENERATE MODE AND MODULATION METER SPECIAL ACCESSORY EQUIPMENT REQ' D: M i crophone TEST SET-UP DIAGRAM: None INITIAL FM/AM-500A CONTROL SETTINGS: Reference Figure 1-2 CONTROL SETTING Modulation Meter Range Switch 11 2 11 Modulation Mode Selector Switch FM MID VAR TONE Selector Switch... - Page 52 STEP PROCEDURE Slowly rotate 1 kHz TONE Level Control (16) cw until MODULA TION Meter (1) indicates 2 kHz deviation. Rotate Modulation Meter Range Switch (4) to "6". Verify MOD ULATION Meter (1) indicates _2 kHz (±180 Hz). Rotate 1 kHz TONE Level Control ( 16) cw until MODULATION Meter (1) indicates 6 kHz.
-
Page 53: Ssb
3-3 LABORATORY PERFORMANCE EVALUATION PROCEDURES Para. Procedure Page 3-3-1 1 kHz Tone Generator Performance Evaluation •••.•••••••.•. 3-19 3-3-2 Variable Tone Generator Performance Evaluation ..•... 3-21 3-3-3 Receiver Performance Evaluation .••.••..•..••..••..3-23 3-3-4 Generate System Performance Evaluation ..•..•..•...••. � 3-27 3-3-5 Frequency Error Meter Performance Evaluation - RF and 3- 31 . - Page 55 STEP PROCEDURE Connect FM/AM-SOOA to accessory test equipment as shown in Figure 3-1. Set Power Switch (17) in "LINE" position. Verify LOCK Lamp illumination 1s steady. Verify DMM indicates 2.50 VRMS or more. Rotate 1 kHz TONE Level Control (16) ccw until DMM indicates 2.50 VRMS.
-
Page 56: Variable Tone Generator Lab Test Set-Up
3 -3-2 PERFORMANCE EVALUATION: VARIABLE TONE GENERATOR SPECIAL �CCESSORY EQUIPMENT REQ'D: 1 Digital Multimeter (DMM), Digit, 100 KQ/V 3½ sensitivity, with true RMS 1 Frequency Counter, 0.1 Resolution, Digit 4½ 1 Distortion Analyzer Capable of ±0.5%@ 1 kHz 1 Coax Connector, BNC 1 son Coax Cable, BNC/ BNC 1 son Coax Cable, BNC/Alligator Clip... - Page 57 STEP PROCEDURE [��ffl If any of the following test procedures fails to produce the proper results, refer to Correc tive Maintenance Flowchart in Section 1 for appropriate corrective action. Connect FM/AM-500A to accessory test equipment as shown in Figure 3-2. Set Power Switch (17} in "LINE"...
-
Page 58: Receiver Lab Test Set-Up
3 -3-3 PERFORMANCE EVALUATION: RECEIVER SPECIAL ACCESSORY 1 Signal Generator Modulation Capabilities: EQUIPMENT REQ'D: Freq. Range 1.0-1000 MHz, Ampl. Range -110 dBm to -50 dBm, Freq. Accuracy ±0.00�% or with 10 MHz phase lock reference input or output available Distortion Analyzer, Measures 1 ess than 0.5% distortion at 1 kHz Digital Multimeter ( DMM), 100 Kn/V... - Page 59 INITIAL FM/AM-500A CONTROL SETTINGS: Reference Figure 1-2 CONTROL SETTING 4 Modulation Meter Range Switch IG" 9 Modulation Mode Selector Switch "FM NAR" VAR TONE Selector Switch "OFF" 15 1 kHz TONE Selector Switch "OFF" Fully ccw 16 1 kHz TONE Level Control "OFF"...
- Page 60 STEP PROCEDURE Set deviation on Signal Generator to 50 kHz. Verify Distor tion Analyzer indicates less than 3% distortion and DMM indi-· cates 3.0 VRMS (±1.0 VRMS). Rotate VOLUME Control (27) cw to verify tone is audible. Rotate SQUELCH Control (28) fully cw to verify tone ceases. Rotate VOLUME Control (27) and SQUELCH Control (9) fully ccw.
- Page 61 3-3-4 PERFORMANCE GENERATE SYSTEM EVALUATION: SPECIAL ACCESSORY 1 Frequency Counter Capable of Counting to 2 00 MHz EQUIPMENT REQ'D: with resolution of 0 .1 Hz 1 Spectrum Analyzer, 1 00 kHz to 1 GHz 1 Modulation Meter 1 Audio Generator Coax Cables, BNC/BNC TEST SET-UP DIAGRAM:...
- Page 62 STEP PROCEDURE Connect Frequency Counter to EXT STD Jack (32) and verify the output frequency is 10 MHz Master Oscillator tolerance). (± Connect Frequency Counter to T/R Jack (5) and verify output frequency is the same as in Step 1. Rotate GEN/LOCK Control (24) cw just out of detent.
- Page 63 PROCEDURE STEP > Rotate RF LEVEL Attenuator Control (11) through detents to " -100 dBm". Verify at each detent that Spectrum Analyzer displays a corresponding level (±3 dBm). Rotate RF LEVEL Attenuator Control (11) to -20 dBm. Rotate RF FREQUENCY Thumbwheels (25) to "001" MHz, then in 10 MHz increments from "010"...
- Page 64 3 -3-5 PERFORMANCE EVALUATION: FREQUENCY ERROR METER - RF AND SSB SPECIAL ACCESSORY 1 Signal Generator, Modulation Capabilities: EQUIPMENT REQ'D: Freq. Range 1.0-1000 MHz, Ampl. Range -110 dBm to -50 dBm, Freq. Accuracy ±0.005% or with 10 MHz phase lock reference input or output available 3 50n Goax Cables, BNC/BNC Coax Connector, BNC...
- Page 65 STEP PROCEDURE If any of the following test procedures fails to produce the proper results, refer to Correc tive Maintenance Flowchart in Section 1 for appropriate corrective action. Connect FM/AM-500A to accessory test equipment as shown in Figure 3-4. Verify FREQ ERROR Meter (21) indicates O Hz (±0 Hz). Set Signal Generator to produce a 500.0000 MHz CW at -50 dBm.
-
Page 66: Frequency Error Meter Lab Test Set-Up
3-3-6 PERFORMANCE EVALUATION: FREQUENCY ERROR METER - AUDIO SPECIAL ACCESSORY EQUIPMENT REQ'D: 1 Signal Generator, Modulation Capabilities: Freq. Range 1.0-1000 MHz, Ampl. Range -110 dBm to -50 dBm, Freq. Accuracy ±0.005% or with 10 MHz phase lock reference input or output available Coax Cables, BNC/BNC 1 Coax "T"... - Page 67 STEP PROCEDURE If any of the following test procedures fails to produce the proper results, refer to Correc tive Maintenance Flowchart in Section 1 for appropriate corrective action. Connect FM/AM-500A to accessory test equipment as shown in Figure 3-5. Verify FREQ ERROR Meter (21) indicates O Hz (±0 Hz). Set Signal Generator to produce a 1000 Hz FM carrier of 500.0000 MHz at -50 dBm with dispersion of 5 kHz.
-
Page 68: Modulation Meter Lab Test Set-Up
3-3-7 PERFORMANCE EVALUATION: MODULATION AND POWER METER SPECIAL ACCESSORY EQUIPMENT REQ'D: 1 Signal Generator, Modulation Capabilities: Freq. Range 1.0-1000 MHz, Ampl. Range -110 dBm to -50 dBm, Freq. Accuracy ±Q.005% or with 10 MHz ph ase lock reference input or output available Coax Cables, BNC/BNC TEST SET-UP... - Page 69 STEP PROCEDURE [�2,: � J If any of the following test procedures fails to produce the proper results, refer to Correc tive Maintenance Flowchart in Section 1 for appropriate corrective action. Connect FM/AM-500A to accessory test equipment as shown in Figure 3-6.
- Page 70 STEP PROCEDURE Rotate Modulation Meter Range Switch (4) to "2". Verify MODULATION Meter (1) indicates 20% (±1.6%). 3-37/3-38 Blank...
-
Page 71: Sinad Meter
3 -3-8 PERFORMANCE EVALUATION: SINAD METER SPECIAL ACCESSORY EQUIPMENT REQ'D: 1 Distortion Analyzer or Oscilloscope Coax Cables 1 Coax Connector TEST SET-UP DIAGRAM: None INITIAL FM/AM-500A CONTROL SETTINGS: Reference Figure 1-2 CONTROL SETTING Method A Method B Modulation Meter Range Switch SINAD SINAD... - Page 72 STEP PROCEDURE Adjust VAR TONE Level Control (13} for 10% distortion on Dis- tortion Analyzer. Rotate Modulation Meter Range Switch (4} to "DIST". Verify Modulation Meter (1} reads approximately 10%. B. USING OSCIL LOSCOPE Connect coax "Tee" to TONE OUT jack (10}. Connect one coax between "Tee"...
- Page 73 3-3-9 PERFORMANCE EVALUATION: POWER METER SPECIAL ACCESSORY EQUIPMENT REQ'D: 1 AM Transmitter, 4 W at 27 MHz Transmitter, W at MHz and 5-10 150-170 800-950 Transmitter, W at MHz and 50-100 150-170 800-950 1 Power Meter, Thru-line Coax Cables, BNC/BNC TEST SET-UP None DI AGRAM:...
- Page 74 P ROCEDURE STEP Rotate Modulation Meter Range Switch (4) to 150 WATTS AVG". Connect 50-100 W Transmitter in place to the 5-10 W Transmitter. Transmit a 150-170 MHz unmodulated CW (preferably at 50 W) and verify Modulation Meter (1) WATTS scale reading agrees with the Power Meter.
-
Page 75: Power Meter 4 -2
SECTION 4 - CALIBRATION 4-1 GENERAL This section contains calibration procedures for the following FM/AM- 500A Front Panel indicators and internal modules: Page Para. Calibration Procedure 4-2-1 Mechanical Zeroing of Modulation and Frequency Error Meters ••••. • •.•••••.•••••••••••••.•••.•••••.••••••••••. 4-7 4-2-2 Power Supply .......... - Page 76 IWARNING I WHEN THE FM/AM-500A IS OPERATING ON INTERNAL BATTERY OR EXTERNAL DC, A 115 OR 230 VAC POTEN TIAL EXISTS IN THE TRANSFORMER PRIMARY CIRCUIT. DO NOT OPERATE ON "BATT" (INCLUDING EXTERNAL DC) WITH THE AC POWER CORD INSTALLED TO AVOID AN UNPROTECTED LINE VOLTAGE POTENTIAL ON THE POWER CORD PLUG.
-
Page 77: Calibration Points
4-1-4 TEST EQUIPMENT REQUIREMENTS Minimum test equipment requirements are listed on each calibration procedure . 4-1-5 CONTROLS AND CALIBRATION POINTS The various controls� meters and connectors specified in the calibra tion procedures are followed by an item number. Figure 1-2 shows the location of each of th-e-se items. - Page 78 THEN TI£ FOLLOWING CALIBRATION STEPS MUST BE PERFORMED RECEIVER/ VARIABLE FREQUEN CY GENERATE HIGH LOOP LOW LOOP IF MODULE GENERATOR POWER 10 MHz MODlLATION S INAD POWER OUTPUT MODULE MODULE TONE ERROR � MODULE SUPPLY OS CILLATOR METER METER METER (SECTION 7) LEVEL (SEC TION 7)
- Page 80 4-2 CALIBRATION PROCEDURES 4-2-1 CALI BRAT ION PROCEDURE: MECHANICAL ZEROING OF MODULATION AND FREQUENCY ERROR METERS PREREQUISITES: None SPECIAL ACCESSORY EQUIPMENT REQ'D: 1 Small Slotted Screwdriver TEST SET-UP DIAGRA M: None CALI BRAT ION POINTS: See Figure 4-1 PROCEDURE STEP [�C?!: �...
- Page 81 CAL I BRAT I o· N PROCEDURE: POWER SUPPLY CALIBRATION PROCEDURE PREREQUISITES: None SPECIAL ACCESSORY EQUIPMENT REQ'D: 1 Battery Load Simulator IFR P/N 7003-9801-600 (Appendix C} 1 Digital Voltmeter (DVM} 100 KO/V, 3½ Digit TEST SET-UP DIAGRAM: None CALIBRATION POINTS:...
- Page 82 STEP PROCEDURE B. OPTIONAL SIMULCAST ( OVEN OSCILLATOR ) POWER SUPPLY Connect DVM between pin 1 of J5201 and ground. Adjust R5241 for a DVM indication as close to 12.0 as pos sible ( not to exceed 14.0 VAC ) . C .
- Page 83 4 -2-3 CALI BRAT ION PROCEDURE: 10 MHz OSCILLATOR CALIBRATION PROCEDURE PREREQUISITES: Power Supply Calibration SPECIAL ACCESSORY EQUIPMENT REQ'D: 1 Frequency Counter 10 MHz Capacity, 1 Hz resolution; 0.1 Hz Resolution if used for fine calibration. Counter Time Base accuracy: .1 ppm for standard oscillator .05 ppm for optional oscillator .01 ppm for optional oven oscillator...
- Page 84 P ROCEDURE STEP (Cont'd) [�C?i: � l The 1 0 MHz oscillator is located on Frequency Standard PC Board for models with standard and optional TCXOs. If the oven oscillator option is installed, the oscillator is installed on the Rear Panel, in the battery well. Rotate adjustment screw inside oscillator enclosure until Fre...
- Page 85 P ROCEDURE STEP Rotate REF Frequency Adjustment (29) on Front Panel as required to obtain 10 MHz within: a. ±1 Hz with standard oscillator b. ±0.5 Hz with optional oscillator c. ±0.1 Hz with optional oven oscillator 4-13/4-14 Blank...
- Page 86 Alternate: 5 kHz capability with .1 Hz Resolu tion 1 500 Coax Cable, BNC/BNC 1 Extender Cable TEST SET-UP DI AGRAM: None INITIAL FM/AM-500 CONTROL SETTINGS: Reference Figure 1-2 CONTROL SETTING VAR TONE Level Control Fully clockwise VAR TONE Selector Switch...
- Page 87 STE P PROCEDURE Adjust C3110 until Frequency Counter indicates 2048 kHz ±1 Hz. [t-49.I�l If preferred Frequency Counter is not available and alternate equipment is used, connect Fre quency Counter to TONE OUT Jack (10) and adjust C3110 until counter indicates 5000.0 Hz. 4-16...
- Page 88 10 MHz Oscillator Calibration, Mechanical Zeroing of Frequency Error Meter SPECIAL ACCESSORY EQUIPMENT REQ'D: Coax Cable, BNC/BNC TEST SET-UP DIAGRAM: None INITIAL FM/AM-500 CONTROL SETTINGS: Reference Figure 1-2 CONTROL SETTING Modulation Mode Selector "FM NAR" VAR TONE Selector Switch "OFF"...
- Page 89 STEP P R OCEDU RE {Cont'd) RF FREQUENCY Frequency Error FREQ ERROR Adjustm ent Step Thumbwheels Meter Range Switch Meter Reading Trim pot 010 000 0 RFlOK R4507 010 010 0 RFlOK -1.0 R4510 010 003 0 RF3K R4509 010 001 0 RFlK -1.0 010 000 3...
- Page 91 INITIAL FM/AM-500 CONTROL SETTINGS: See Figure 1-2 CONTROL SETTING 4 Modulation Meter Range Switch 2 kHz/%xl0" Modulation Mode Selector "FM NAR" 11 RF LEVEL Control Fully clockwise 12 RF LEVEL FINE Adjust Control Fully clockwise 14 VAR TONE Selector Switch "OFF"...
- Page 92 STEP PROCEDURE Adjust R3369 as necessary until MODULATION Meter (1} indicates 0 (±0.1}. Rotate Modulation Mode Selector (9} to "FM WIDE". Adjust R3370 as necessary until MODULATION Meter (1} indicates 0 (±0.1}. Rotate Modulation Meter Range Switch (4} to "6". Rotate Modulation Mode Selector (9} to "FM NAR".
- Page 93 Mechanical Zeroing of Modulation Meter SPECIAL ACCESSORY 1 Distortion Analyzer or Oscilloscope EQUIPMENT REQ 2 50n Coax Cables, BNC/BNC 1 Coa x TEST SET-UP DIAGRAM: None INITIAL FM/AM-500 CONTROL SETTINGS: Reference Figure 1-2 CONTROL SETTING Method A Method B 4 Modulation Meter Range Switch...
- Page 94 STEP PROCEDURE Rotate Modulation Meter Range Switch (4) to "DIST" and again alternately adjust trimpots R3318 and R3320 to a null indica tion on Modulation Meter (1). Adjust 1 kHz TONE Level Control (16) approximately to 1.4 VRMS in Distortion Analyzer Meter. Set VAR TONE Selector Switch (14) to "INT MOD"...
- Page 95 STE P PROCEDURE Set 1 kHz TONE Selector Switch in "INT MOD" position and rotate Modulation Meter Selector Switch to "DIST". Modulation Meter (1) should indicate approximately 10%. Repeat Steps 1 through 11, changing the null trimpots slightly each time, until approximately 10% distortion is achieved in Step 11.
- Page 96 W at 150-170 MHz and 800-950 MHz 1 Power Met er, Thru-line 2 50Q Coax Cables, BNC/BNC TEST SET-UP DIAGRAM: None INITIAL FM/AM-500 CONTROL SETTINGS: Reference Figure 1-2 CONTROL SETTING 4 Modulation Meter Range Switch 1 5 W ATTS A V G...
- Page 97 P ROCEDURE STEP Transmit a 150-170 MHz unmodulated CW. Note reading on Power Meter and adjust 15 W trimpot R3365 until Modulation Meter (1) WATTS Scale reading agrees with the Power Meter. Read the reflected power on the Power Meter. Reflected power should be less than 5% of applied power.
- Page 98 4-2-9 CALI BRAT ION PROCEDURE: GENERATE OUTPUT LEVEL CALIBRATION PROCEDURE PREREQUISITES: Power Supply Calibration SPECIAL ACCESSORY 1 Power Meter, 0 .1 dB Resolution EQUIPMENT REQ'D: TEST SET-UP DI AGRAM: None INITIAL FM/AM-5 00 CONTROL SETTINGS: Reference Figure 1-2 CONTROL SETTING Modulation Mode Selector FM NAR -3 0 dBm"...
- Page 99 STEP PROCEDURE Set Power Switch {17) in "LINE" position. Adjust R5114 as required to obtain the minimum DVM reading {zero, if possible). Place Power Switch {17) in "OFF" position. Connect P5101 to J5101 on Output Amplifier. Set Power Switch {17) in "LINE" position. Rotate RF LEVEL FINE Adjust Control {12) to "-31 dBm".
-
Page 100: How To Use Tabular Flowcharts
SECTION 5 - TROUBLESHOOTING 5-1 GENERAL This section contains tabular flowcharts designed to aid the technician in troubleshooting the FM/AM-5OOA. These flowcharts will enable the technician to isolate a given malfunction down to an individual module or PC board assembly. Typically, the technician will refer to the flowcharts in this section to isolate a trouble symptom which may have been detected during normal operation or while performing the Perfor... -
Page 101: Safety Precautions
D. CALIBRATION Make sure the FM/AM-500A is properly calibrated. One or more maladjusted calibration potentiometers may be the cause of the trouble symptom(s) and the apparent malfunction. 5-1-3 SAFETY PRECAUTIONS As with any piece of electronic equipment, extreme caution should be taken when troubleshooting "live"... -
Page 102: Disassembly/Reassembly Requirements
5-1-5 DISASSEMBLY/REASSEMBLY REQUIREMENTS To use the troubleshooting flowcharts in this section, the case must be removed from the FM/AM-5OOA. Refer to Section 6 for case removal, module or PC board removal and/or module disassembly/reassembly instructions. 5-1-6 INDEX OF TROUBLESHOOTING FLOWCHARTS Flowchart Paragraph Page... -
Page 103: Troubleshooting Power Supply
5-2 TROUBLESHOOTING POWER SUPPLY 5 - 2 - 1 TROUBLESHOOTING PROCEDURE: INCORRECT OUTPUT VOLTAGES SPECIAL ACCESSORY Digital Multimeter - 100 KO/V 3½ Digit EQUIPMENT REQ'D: STEP DIRECTIONS DECISION YES NO Set Power Switch in "LINE" position. Measure voltage between Is voltage +43 VDC (±5 V)? 3 12 J5201, pin 2 (ground) and pin 9. - Page 104 STEP DIRECTIONS DECISION Test the +5 V regulator circuit on Power Supply PC Board. Repair or replace as required. Refer to Power Supply paragraph in Section 7. Test the -12 V regulator circuit on Power Supply PC Board. Repair or replace as required.
- Page 105 STEP DIRECTIONS DECISION Trace circuitry back to power source to locate open. Repair or replace Refer to as required. Section 6 for appropriate removal and disassembly procedures. Repeat End of procedure. as necessary. 5-7/5-8 Blank...
-
Page 106: Incorrect Battery Charging Rate
5-2-2 TROUBLESHOOTING PROCEDURE: INCORRECT BATTERY CHARGING RATE SPECIAL ACCESSORY EQUIPMENT REQ'D: Battery Load Simulator - (Appendix C) Digital Multimeter - 100 KO/V, 3½ Digit STEP DIRECTIONS DECISION 0 FF Set Power Switch in position. Disconnect P/J5004 and connect Battery Load Simu- lator to P5004. - Page 107 DECISION STEP DIRECTIONS Test the battery charger current limiter circuit on the Power Supply PC Board. Repair or replace as required. Refer to Power Supply paragraph in Section Test the battery charger voltage regulator circuit on the Power Supply PC Board.
-
Page 108: Troubleshooting Receiver
5-3 TROUBLESHOOTING RECEIVER 5-3-1 TROUBLESHOOTING PROCEDURE: SENSITIVITY LOW AT CERTAIN FREQUENCIES SPECIAL ACCESSORY EQUIPMENT REQ'D: Spectrum Analyzer - 1300 MHz to 2300 MHz STEP DIRECTIONS DECISION YES NO Set RF FREQUENCY Thumb- wheels to a frequency with faulty sensitivity. Connect Spectrum Analyzer Is output level +8 dBm to J2103 and set center (±4 dB)? -
Page 109: Sensitivity Low At All Frequencies
SENSITIVITY LOW AT ALL FREQUENCIES SPECIAL ACCESSORY EQUIPME- N T REQ'D: Spectrum Analyzer - 10.7 MHz to 1500 MHz Signal Generator - 120 MHz at -30 dBm STEP DIRECTIONS DECISION Set FM/AM-500/A Controls as follows: RF FREQUENCY Thumbwheels "120.0000" GEN/REC Switch "REC" VOLUME Control... - Page 110 STEP DIRECTIONS DECISION YES NO Test IF Module. Repair or replace as required. Refer to IF Module paragraph in Section 7. Test output amplifier cir cuit of 1st VCO in Dual VCO Module. Repair or replace as required. Refer to Dual VCO Module para graph in Section 7.
-
Page 111: Improper Demodulation
5-3-3 TROUBLESHOOTING PROCEDURE: IMPROPER DEMODULATION SPECIAL ACCESSORY EQUIPMENT REQ'D: Signal Generator - 120 MHz at -50 dBm Oscilloscope - 10 MHz Bandwidth STEP DIRECTIONS DECISION YES NO Connect Signal Generator to ANTENNA Jack of FM/AM- 500A. Set FM/AM-500A controls as Which of the following follows: conditions applies? - Page 112 STEP DIRECTIONS DECISION YES NO 7. Inject a 120 MHz si g nal with 1 kHz modulation and 4 kHz deviation, at approximately -50 dBm. With Oscilloscope Probe, Does Oscilloscope display sample the FM Audio si g nal a 1 kHz audio si g nal? at J4301, pin 17.
- Page 113 STEP DIRECTIONS DECISION YES NO 14 . Test AGC circuit on Receive Audio PC Board. Repair or replace as required. Refer to Receive Audio Module paragraph in Sect i o_ n 7. Test AGC circuit in Receiver/Generator Module. Repair or replace as required.
-
Page 114: Troubleshooting Generator
5-4 TROUBLESHOOTING GENERATOR 5- 4 -1 TROUBLESHOOTING PROCEDURE: INCORRECT CARRIER AMPLITUDE SPECIAL ACCESSORY EQUIPMENT REQ'D: Digital Multimeter - 100 KO/V, 3� Digital Spectrum Analyzer - 10 MHz to 1500 MHz Signal Generator - 120 MHz at -30 dBm Extender Cable STEP DIRECTIONS DECISION... - Page 115 STEP DIRECTIONS DECISION YES NO Using DMM, test GEN/REC Switch and associated cir cuitry through Mother Bd. for a short to a voltage source. Repair or replace as required. Refer to Section 6 for Mother Board and Front Panel removal and disassembly procedures.
- Page 116 STEP DIRECTIONS DECISION YES NO Connect Spectrum Analyzer Is 10.7 MHz signal level 12 16 to J4302. less than -10 dBm? Test Receiver/Generator Module. Repair or replace as required. Refer to Receiver/Generator Module paragraph in Section 7. Connect Spectrum Analyzer Is 10 MHz signal level 14 15 to P5101.
- Page 118 STEP DIRECTIONS DECISION YES NO Test IF Module. Repair or replace as required. Refer to IF Module paragraph in Section 7. Troubleshoot High Loop and Dual VCO Modules. Refer to paragraph 5-5-2. 32. Troubleshoot·Low Loop Module. Refer to para graph 5-5-3. Test Phase Lock Circuit of Digital Module.
- Page 119 STEP DIRECTIONS DECISION Test AM Modulator/Leveler circuit on Generate Audio PC Board. Repair or replace as required. Refer to Generate Audio Module paragraph in Section 7. Test Attenuator circuit in Receiver/Generator Module. Repair or replace as required. Refer to Receiver/Generator Module paragraph in Section 7.
- Page 120 STEP DIRECTIONS YES NO DECISION Connect Spectrum Analyzer At each detent, is signal level 20 dB {±3 dB) above to P5102. Rotate Step Attenuator cw and observe the attenuator marking? signal level at each detent. Return attenuator to -20 dBm. Test the Output Amplifier for RF leakage.
-
Page 121: Incorrect Carrier Frequency
5-4-2 TROUBLESHOOTING PROCEDURE: INCORRECT CARRIER FREQUENCY SPECIAL ACCESSORY EQUIPMENT REQ'D: Digital Multimeter - 100 Kn/V, 3� Digit Frequency Counter - 10 MHz to 1000 MHz with 10 Hz Resolution STEP DIRECTIONS DECISION Set FM/AM-500A Controls as follows: RF LEVEL Control -20 dBm"... - Page 122 STEP DIRECTIONS DECISION YES NO Rotate RF FREQUENCY Thumb Are frequencies correct? wheels to the following frequencies and observe Frequency Counter: 011.1111 011.2222 011. 3333 011. 4444 011. 5555 011.6666 011. 7777 011. 8888 011. 9999 010.0000 6. Rotate RF FREQUENCY Thumb Are all frequencies cor...
- Page 123 STEP DIRECTIONS DECISION YES NO Does frequency respond to Smoothly rotate GEN/LOCK Control fully ccw and GEN/LOCK Control movement? observe Frequency Counter for appropriate change. Test Timebase Divider Cir cuit of Digital Module. Repair or replace as required. Refer to Digital Module paragraph in Section Measure voltage at J4301, Does voltage vary directly...
-
Page 124: Inadequate Response To Variable Generator Control
5 -4-3 TROUBLESHOOTING PROCEDURE: INADEQUATE RESPONSE TO VARIABLE GENERATOR CONTROL SPECIAL ACCESSORY EQUIPMENT REQ'D: Digital Multimeter - 100 Kn/V, 3½ Digit STEP DIRECTIONS DECISION YES NO Rotate GEN/LOCK Control cw out of detent and set Power Switch in "LINE" position. Measure voltage at J4501, Is voltage greater than +3.5... - Page 125 STEP DIRECTIONS DECISION YES NO Test GEN/LOCK Control on Front Panel. Repair or replace as required. Refer to Section 6 for Front Panel removal and disassem- bly. End of procedure. Repeat as necessary. 5-32...
-
Page 126: Tr O U B 1 Es Ho O T I N G Phase Lo C K S· Y Stem
5-5 TROUBLESHOOTING PHASE LOCK SYSTEM 5-5-1 TROUBLESHOOTING PROCEDURE: LOCK LIGHT INDICATOR SYSTEM IS NOT PHASE LOCKED SPECIAL ACCESSORY EQUIPMENT REQ'D: Digital Multimeter - 100 Kn/V, 3½ Digit Extender Cable STEP DIRECTIONS DECISION YES NO With GEN/LOCK Control in Is illumination: "LOCK"... - Page 128 STEP DIRECTIONS DECISION YES NO Allow set to fully warm up. Does Lock Light flash when 16 17 set is hot? 16. Test High Loop Divider Circuit under high temper ature conditions. Repair or replace as required. Refer to High Loop Synthe sizer Module paragraph in Section 7.
- Page 129 DIRECTIONS YES NO STEP DECISION Test Wire Harness and Mother Board. Repair or replace as required. Refer to Section 6 for Mother Board removal procedure. Test Phase Lock Indicator Circuit on Generate Audio PC Board. Repair or replace as required. Refer to Generate Audio Module paragraph in Section 7.
-
Page 130: High Loop Does Not Phase Lock
5-5-2 TROUBLESHOOTING PROCEDURE: HIGH LOOP DOES NOT PHASE LOCK SPECIAL ACCESSORY E Q UIPMENT RE Q 'D: Di g ital Multimeter - 100 K0/V , 3� Di g it S p ectrum Anal y zer - 90 MHz to 2300 MHz Fre q uenc y Counter - 10 MHz to 1000 MHz with 10 Hz Resolution Power Su pp l y - 0-40 voe... - Page 131 STEP D IRECTIONS DECISION YES NO Does voltage vary smoothly 9 18 and correspond with vol tage from variable Power Supply? Connect P/J2101 and connect Frequency Counter to P2205. Step RF FREQUENCY Thumb Does frequency begin at 11 14 wheels from "000" MHz 1300 MHz and increase in through "999"...
- Page 132 STEP DIRECTIONS DECISION YES NO Test frequency select net work of High Loop. Repair or replace as required. Refer to High Loop Synthe sizer Module paragraph in Section 7. Test High Loop Module. Repair or replace as required. Refer to High Loop Synthesizer Module paragraph in Section 7.
- Page 133 STEP DIRECTIONS DECISION Test TCXO Circuit on Fre- quency Standard PC Board (or oven oscillator if installed). Repair or replace as required. Refer to Frequency Standard Module paragraph in Sec- tion 7. 25 . Disconnect P/J4001. Does light illuminate with Observe light on High Loop P/J4001 disconnected? Module, then reconnect...
-
Page 134: Low Loop Does Not Phase Lock
5 -5-3 TROUBLESHOOTING PROCEDURE: LOW LOOP DOES NOT PHASE LOCK SPECIAL ACCESSORY EQUIPMENT REQ'D: Digital Multimeter - 100 KO/V, 3½ Digit Frequency Counter - 100 Hz to 80 MHz with 1 Hz Resolution STEP DIRECTIONS YES NO DECISION 1. Select "0.0000" MHz on RF Is light illuminated on 2 16 FREQUENCY Thumbwheels... - Page 135 STEP DIRECTIONS DECISION 5. Test Phase Lock Indicator Circuit in Low Loop. Repair or reRlace as required. Refer to Low Loop Synthesizer Module paragraph in Section 7. 6. Rotate RF FREQUENCY Thumb Are all voltages approxi wheels to "1.1111" MHz and mately +11 V? measure voltages at J4201, pins 2, 3, 4, 5, 9, 11,...
- Page 136 STEP DIRECTIONS DECISION YES NO Test Time Base Divider Circuit on Digital Module. �epair or replace as required. Refer to Digital Module paragraph in Section Connect Frequency Counter Is Frequency 10 MHz? to EXT STD Jack on Rear Panel. Test divider circuit on Frequency Standard.
-
Page 137: Section 8 - Disassembly/Reassembly Procedures
SECTION 6 - DISASSEMBLY/REASSEMBLY PROCEDURES 6-1 DISASSEMBLY/REASSEMBLY PROCEDURES 6-1-1 GENERAL This section contains instructions that are necessary to remove and disassemble modules within the FM/AM-500A. Case removal (para. 6-2-1) is a prerequisite for all module removals. Most module removals are reflected in Figure 6-2, Composite Disassembly. -
Page 138: Index Of Module Disassembly And Reassembly Procedures
6-1-3 INDEX OF MODULE DISASSEMBLY AND REASSEMBLY PROCEDURES Title Paragraph Page Disassembl y ........6-2-1 Case ....•••..•....•..• 6-2-2 Battery .•.••• 6-2-3 Oven Oscillator 6-2-4 Frequency Standard 6-2-5 Power Supply •••.•. 6-2-6 1100 MHz Low Pass Filter ••••••••.•••.•.•.•••..•••• 6-2- 7 Speaker .•..•••.. -
Page 141: Frequency Standard Pc Boa Rd
ALL EXTERNAL POWER CORDS MUST BE DISCONNECTED BEFORE REMOVING THE BATTERY. 1. Disengage battery wire harness connector (46}. 2. On some FM/AM-500 only, remove two screws (56} and spacers (54} through Rear Panel (48} and Battery (47}. 3. Lift Battery (47} from compartment. -
Page 142: 1120 Mhz Low Pass Filter
1. Remove screw (3) and lock washer (4) attaching PC board as s em bl y ( 5 ) to Re a r Panel ( 4 8 ) • 2. Remove two screws (51 and 52) and lock washers (50 and 53) attaching PC board assembly (5) to chassis (33). -
Page 143: Audio Pc Boards
6-2-9 AUDIO PC BOARDS (42) A. Removal (Figure 6-2) 1. Disconnect ribbon cable connector from Variable Tone Generator PC Board (42). 2. Lift PC Board Retainer (41) from over the PC boards. 3. Pull straight up on PC board (42) to disengage connector from Mother Board (39) and lift from chassis (33). -
Page 144: Enclosed Module Assemblies
v� ✓ ✓ 12__:_..j.�+-- � ----:: 11- --i- -� �- ..,;:- 9------.:.7 RECEIVER/GENERATOR HIGH LOOP SYNTHESIZER DIGITAL LOW LOOP SYNTHESIZER Figure 6-3 Enclosed Module Assemblies... -
Page 145: Enclosed Modules
6-2-10 ENCLOSED MODULES (43) A. Removal (Figure 6-2) 1. Disengage all ribbon cables necessary to allow module removal. 2. Tag and disconnect flexible coax cables from module being removed. 3. Remove two screws (44) securing module (43) to chassis (33). 4. - Page 146 DETAIL FM/AM-500 Olt.Y FM/AM-500A ONLY DETAIL Figure 6-4 Output Amplifier Assembly (SN 1001 thru SN 3224) 6-10...
- Page 147 6-2-11 OUTPUT AMPLIFIER (49) (S/N 1001 THRU 3224) Removal (Figure 6-2) Remove Battery ( 4 7) (par a graph 6 -2 -2 ) , i f i n s ta 11 e d • Discon ne ct four semi-rigid coax connectors from Outpu t Amplifier (49).
- Page 148 J5103 - ""'--1.Z � �@ J5101 L5110 L5109 J5106 L5108 �=------'=--------"-'-- DETAIL Figure 6-4a Output Amplifier Assembly (SN 3225 & On) 6- lla...
- Page 149 6-2-lla OUTPUT AMPLIFIER (49) (S/N 32 25 ON) A. Remo v a 1 ( Fi g u re 6-2 ) 1. Remove Battery (47) {paragraph 6-2-2}, if installed. 2. Disconnect four semi-rigid coax connectors from Output Amplifier (49). 3. Disconnect J5106 on Output Amplifier {49) from P5106. 4.
-
Page 150: If Module Assembly
DETAIL /,ff/, /,:·�_../5 ✓ /- 0 ·1 A-,. ��r �� r 17 21 20 19 /t( L tJ, W, �i � � ! DETAIL 1 9 20 17 1 8 '"1'<:L� Pr--8 '· - /X'\./, , "�"" [�/ /·�' J2208 1 4 �... -
Page 151: If Module
6-2-12 IF Module (45} A • R em ova 1 ( Fi gu re 6 -2 ) 1. Remove Power Su p ply PC Board (5) ( para gra ph 6-2-5). 2. Disco nnect four flexible coax ca bles from IF Block (45). (45). - Page 152 DETAIL 11� Figure 6-6 Dual vco Assembl Y 6-14...
-
Page 153: Dual Vco
6-2-13 DUAL VCO (14) A. Removal (Figure 6-2) 1. Disconnect five flexible coax cables from Dual VCO (14). 2. Unsolder harness wire from feedthru filter on Dual VCO (14). 3. Remove two screws (8 and 12) and lock washers (9 and 13) attaching Dual VCO (14) to inner mounting bracket (10), and withdraw module from chassis. -
Page 154: Rear Panel
Figure 6-7 Rear Panel Assembly 6-2-14 REAR PANEL {48) A. Removal (Figure 6-2) 1. Remove Battery {47), if so equipped. (Paragraph 6-2-2.) 2. Disconnect coax cable from External 10 MHz connector (55). 3. Remove two screws (1) and lock washers (2) attaching Output Amplifier {49) to Rear Panel {48). - Page 155 5. Remove screw (24) and lock washer (23) attaching mounting bracket ( F i g u re 6-7, I t em 2 7) to ch ass i s ( 3 3 ) • 6. Remove eight screws ( 17) attaching Rear Panel (48) to chassis ( 33).
- Page 156 e. Remove two screws (10, 28) and one lock washer (29) attach ing mounting bracket (27) and AC connector (9) to rear panel (8). 3. Remove 10 MHz coax connector (3). a. Loos en set screw ( 2). b. Unscrew coax connector (3) from Rear Panel (8). 4.
- Page 157 6-2-15 FRONT PANEL A. Removal (Figure 6-2} 1. Disconnect semi-rigid coax from ANTENNA connector (36} on Front Panel (35}. 2. Remove six screws (Figure 6-1, Item 5} attaching front escutcheon (Figure 6-1, Item 6} to Front Panel (35}. Remove escutcheon. 3.
- Page 158 54 55 �- � � 2:... - - - - -9 - - -- 10 DETAIL DETAIL ✓ �- -� -��- - - 7 -���,, ,,,. � 9 18 .,. - ✓ "' ' 22 ,,., - � � lJ;j 2 7 26 3 6 3 5 ��...
- Page 159 B. Disassembly (Figure 6-8) 1. Remove MIC/ACC Connector (22). a. On FM/AM-500A only, unsolder fuse (21) from MIC/ACC Con nector (22). b. Tag and unsolder leads to connector (22). c. Remove two nuts (18), one terminal lug (19) and one lock washer (20), then withdraw connector (22) from Front Panel ( 46).
- Page 160 4. Remove Thumbwheel Switches (56). a. Remove two nuts (58) and lock washers (57) attaching Thumb wheel Switch (56) to Front Panel (46). b. Withdraw switch (56) from Front Panel (46). 5. Remove Meters (49). a. Remove heat shrink tubing, identify and unsolder wires from meter (49) terminals.
- Page 161 Loosen set screw ( 11 ) and remove potentiometer drive gear ( 2 ) • m. Remove set screw ( 10 ) and spring ( 9). n. Unscrew potentiometer ( 6 ) from pivot block ( 8 ) . Remove Phase LOCK Indicator LED ( 60 ) ( Detail A ) . a.
- Page 162 (��I�J Rotate GEN/LOCK Control fully counterclockwise into detent, then align knob with LOCK index mark. Rotate VOLUME and SQUELCH Controls fully counterclockwise and position knob with index at 7:00 o'clock. 6-24...
- Page 163 10� � 2----, ,,, / Figure 6-9 Generate Amplifier A ssembly 6-2-16 GENERATE AMPLIFIER A. Rem ova 1 The o ptional Generate Amplifier is an external plug-in module with no locking restra ints. To remove, pull module stra ight awa y from Front Panel.
-
Page 164: Attenuator Control Alignment
FI NE ADJUST KOOB CENTERL I NE OF SCREW HOLES IN DRIVE GEAR CENTERLINE OF SCREW HOLES IN HUB Figure 6-10 Attenuator Control Alignment 6-3 ASSEMBLY 6-3-1 RF LEVEL ATTENUATOR (Figure 6-8) 1. Position attenuator (7) on Front Panel (46) and install four flat head screws (45). - Page 165 9. Connect ohmmeter to common and m1n1mum resistance terminals of potentiometer (6). Ohmmeter should read "0" resistance. 10. Adjust potentiometer (6) to 130 ohms (±120 ohms). 11. Place nylon washer (29), gear (30), and hub (31) on shaft of attenuator (7). Tighten two set screws (32) in hub.
- Page 166 16. Install knob (38) on attenuator (7) shaft. Recesses are drilled into knob to allow knob to fit over dial-attaching screw heads, and rest flush against dial (37). Secure knob with two set screws (39). 6-28...
- Page 167 The Dual VCO Module and the 88-90 MHz bandpass filter poles in the IF Module are not field repairable and should, therefore, be returned to the IFR Factory for repair. 7-1-2 DISASSEMBLY REQUIREMENTS Removal of the exterior case from the FM/AM-500A is a primary require...
- Page 168 For certain procedures in this manual, the equipment listed in Appendix B may exceed the minimum required specifications. For this reason, minimum use specifications appear within all module test procedures where accessory equipment is required. 7-1-4 SAFEJY PRECAUTIONS As with any piece of electronic equipment, extreme caution should be taken when troubleshooting "live"...
- Page 169 7-1-5 INDEX OF MODULE TESTING PROC EDURES Page Paragraph Title ........Power Supply .
- Page 170 7-2 POWER SUPPLY 7-2-1 THEORY OF OPERATION ( Refer to Figure 7-1 and Power Supply Cir cuit Schematic in Section 10 ) A. GENERAL The Power Supply consists of a transformer and associated rec tifier, regulator, battery charger, and timer-interrupt cir cuits.
-
Page 171: Power Supply Block Diagram
• +40V _ +!IV_ +5V REG RECTIFIERS XFMR �� +15V _ + 12 v_ • �+12V REG • • -15V -12v_ -12V REG T IMER BATTERY BATTERY XFMR CHARGER DRIVER +12 voe EXTERNAL PWR IN _ Figure 7-1 Power Supply Block Diagram farmer's two primary windings in parallel or series to accom... - Page 172 Transistor Q5205 and op amp U5202B provide regulation of the -12 VDC supply, which comes from bridge rectifier BR5201. One input to the op amp is from the regulated +12 VDC, which allows the -12 VDC to track the +12 VDC. Capacitors C5208 and C5209 filter the supply.
- Page 173 ..1 - DC Voltmeter 100 Kn/V 1 - Battery Load Simulator IFR P/N 7003-9801-600 (Appendix C) 1 - DC )ewer Supply ••• � •••.••••• +12 V@ 4 A 1 - Stopwatch ••••••••••••••••••• 30 minute capacity (minimum), with 1 second resolution C.
-
Page 174: Reassembly
6. Measure Power Supply output voltages in accordance with Table 7-1. Refer to Section 4 for calibration procedures. TEST POINT VOLTAGE TOLERANCE J5201, Pin +12.0 V ± 0.2 V J5201, Pin 3 -12. 0 V ±0.2 V J5201, Pin 10 + 5.0 V ±0.2 V J5201, Pin 9... - Page 175 7-3 IF MODULE 7-3-1 THEORY OF OPERATION (Refer to Figure 7-2 and to IF Module Circuit Schematic in Section 10) A. GENERAL An RF signal from the antenna first passes through a static protector to an antenna enable relay. Anytime the set is oper ating in the Receive mode, the relay is energized by the Mode Power Circuit in the Generate Audio Module and couples the sig...
- Page 176 1300-2289 MHz FROM FIRST VCO TO/FROM OUTPUT AMP 1000 MHz 1298 -1300 MHz FROM ANTENNA ANTENNA LOW PASS �--� BANDPASS RELAY FILTER FILTER FIRS T MIXER RELAY ENABLE GENERATE ENABLE SECOND MIXER 10.7 MHz TO/FROM 89 MHz R EC /GEN BANDPASS FILTER RECEIVE ENABLE...
-
Page 177: Preparation For Testing
C. FIRST MIXER/AMPLIFIER CIRCUIT Inductors L2204 through L2209 and capacitors C2219 through C2222 form the 1000 MHz lowpass filter. Filters FL2205, FL2206 and FL2207 form a 1300 MHz bandpass filter. Mixer MXR2202, which is between the two filters, mixes the signal it receives with the first VCO frequency to produce either the final RF frequency of less than 1000 MHz in the Generate mode, or the first IF frequency of between 1298 and 1300 MHz in the Receive... -
Page 178: Testing
1 - Signal Generator Capable of generating 1389 MHz at +?dBm 10%, ¼ W 1 - Resistor ••••••••.•••.••••.•• 1.0 4 - 50 Ohm Coax Cables •••••••••• BNC/SMB 1 - 50 Ohm "T" Coax Connector ••• BNC C. PREPARATION ( Refer to IF Module Component Location Drawing in Section 9 ) 1. - Page 179 6. (Cont'd) The resistor now causes the third mixer to con duct between the third VCO and the 89 MHz band pass filter ports without changing the applied frequency. This arrangement is used for test purposes only. 7. Using "T" coax connector, connect output of Signal Generator to J2205 and J2207.
-
Page 180: Dual Vco Block Diagram
7-4 DUAL VCO 7-4-1 THEORY OF OPERATION (Refer to Fi g ure 7-3 and Dual VCO Circuit Schematic in Section 10) A. GENERAL The Dual VCO furnishes the first and second local oscillator si g nals to the IF Module. The frequency of the first oscilla... - Page 181 (p rimarily the frequency error) are used to tune the first VCO to 1300 MHz plus the selected RF frequency. The high frequency components (primarily noise) of the error voltage tunes the second VCO. The result is that while the first VCO may vary slightly around its established frequency, the difference between the first and second VCO frequencies is held constant, producing a stable 90 MHz IF product.
- Page 182 THE DUAL VCO MODULE IS NOT FIELD REPAIRABLE DUE TO CRITICAL LENGTHS AND SENSITIVE ALIGNMENTS. IF THE DUAL VCO IS FAULTY, IT SHOULD BE RETURNED TO THE IFR, INC. FACTORY FOR REPAIR. IF THE FOLLOWING TEST IS PERFORMED, BE EXTREMELY CARE...
-
Page 183: Dual Vco Test Connections
C. PREPARATION (Refer to Figure 7-4, Dual VCO Assembly Drawing in Section 6 and Dual VCO Module Drawing in Section 9) 1. Disconnect jumper between FL2101 and FL2102. 2. Connect +12 VDC terminal of Power Supply to FL2101 and FL2102 (refer to Dual VCO Assembly Drawing in Section 6). 3. - Page 184 7-4-3 TESTING (Refer to Dual VCO Module Drawing in Section 9 and Circuit Schematic in Section 10) A. FIRST (1300-2298 MHz) VCO 1. Apply power to +12 Power Supply. 2. Using DVM, measure voltage at emitter of Q2101. Voltage voe. should be approximately +11 3.
- Page 185 5. Connect Spectrum Analyzer to Jl901. 6. While adjusting 10 potentiometer from level in Step A.5. smoothly to level in step A.8, observe 2420 MHz harmonic mixing with first VCO signal producing 1120 to 129 MHz sig nal. This unwanted signal must be 40 dB or more below mixer output signal, especially at crossing point of 605 MHz.
- Page 186 7-5 HIGH LOOP SYNTHESIZER MODULE THEORY OF OPERATION ( Refer to Figure 7-5 and High Loop Analog 7-5-1 and High Loop Divider Circuit Schematics in Section 10 ) A. GENERAL The High Loop Synthesizer receives the difference frequency of 90-1088 MHz resulting from mixing the first and second local oscillators in the Dual VCO Module.
-
Page 187: High Loop Synthesizer Block Diagram
pulses are nulled, the signal is amplified, then sent to the integrator circuit for the first VCO and to a gain control and digital-to-analog circuit for the second VCO. One amplifier in the integrator circuit varies the voltage con trolling the first VCO frequency. Two comparators limit this voltage to preset low and high levels, restricting the VCO to between 1275 MHz and 2330 MHz. - Page 188 A second output of the frequency detector operates in the phase lock indicator circuit. When the phase of the divider network output differs from the phase of the reference signal, an LED on the High Loop is illuminated and a logic voltage from the Generate Audio Module is grounded, allowing that logic circuit to produce a 2 Hz signal to the LOCK light on the Front Panel rather than the normal steady DC.
- Page 189 grounding the amplifier output. When the signal is low, Q4003 conducts, which brings the output high. One output of the second amplifier goes to the first phase sampler circuit; another is to the pulse generator. E. PULSE GENERATOR CIRCUIT ( On Analog PC Board) Initially, capacitor C4006 is charged through resistor R4006, and transistor Q4006 conducts a capacitor-charging voltage to ground.
- Page 190 is recharged. Transistors Q4005 and Q4007 are emitter-followers which buffer the DC output, providing two diode gaps of ampli fication to the second sampler. I. SECOND PHASE SAMPLER (On Analog PC Board) The output from the first sampler isolation amplifier is applied to the drain of FET Q4010.
- Page 191 from becoming too high when the RF FREQUENCY Thumbwheels are set for less than 200 MHz. To accomplish this, binary signals for 200, 400 and 800 MHz are coupled to NOR gate U4003B. If any of these signals is high, the gate output is low, pulling down the non-inverting input to op amp U4004B.
- Page 192 7-5-2 PREPARATION FOR TESTING A. REMOVAL AND DISASSEMBLY Remove the High Loop Synthesizer as outlined in Section 6. Disassemble if repair is required. B. REQUIRED TEST EQUIPMENT ..Digital Multimeter 100 Kr,,/V ..
- Page 193 2. Using DMM, verify the voltages on the following pins of P4102 are within tolerances given below: Pin No. Voltage Tolerance +5 V ± 0.2 -12 V ±0.2 +12 V ±0.2 +43 V ±6.0 [�§.f�l If all the required voltages are not present, troubleshoot the Power Supply and Distribution Circuit.
- Page 194 6. Set RF FREQUENCY Thumbwheels to "299 000 0". 7. Connect DVM between wiper of lOK pot and ground. 8. Adjust the 10 K pot to obtain each of the following fre quencies and record the corresponding voltage: a. 1250 MHz b.
- Page 195 21. Connect the Spectrum Analyzer to the T/R jack. 22. Rotate RF FREQUENCY Thumbwhee1s to "150 000 0". 23. Adjust trimpot R4053 to obtain the lowest overall noise. 24. Connect the Spectrum Analyzer to J2103 on the Dual VCO Module. 25.
- Page 196 7-6 LOW LOOP SYNTHESIZER 7-6-1 THEORY OF OPERATION (Refer to Figure 7-6 and Low Loop Circuit Schematic in Section 10) PHASE TO GEN AUDIO MOOILE _ LOCK INDICATOR /LDW LOOP SYNTHESIZER MODULE/ 100 Hz PHASE DETECTOR 793-77.3 MHz RF FREQ TO IF MOOULE THUMBWHEEL �...
- Page 197 LED on the Low Loop is grounded, allowing a continuous forward bias to illuminate the LED. The grounding of the LED also enables a 2 Hz oscillator in the Generate Audio Module, causing the LED on the Front Panel to flash at approximately half second intervals.
-
Page 198: Low Loop Synthesizer Test Set-Up
7-6-2 PREPARATION FOR TESTING A. REMOVAL AND DISASSEMBLY Remove and disassemble the Low Loop Synthesizer as outlined in Section 6. B. REQUIRED TEST EQUIPMENT 1 - Spectrum Analyzer ••••••••••• 60-1700 MHz 1 - Oscilloscope •••••••••••••••• 10 MHz Bandwidth {minimum) .. - Page 199 3. Verify phase lock LED on Low Loop Synthesizer Module is not 111 umi nated. 4. Connect oscilloscope to TP4201. Verify oscilloscope displays a smooth DC level of 2.75 V {±0.25 V). 5. Verify spectrum analyzer displays a level of +7 dBm {±4 dB) at 77.
- Page 200 7-7 RECEIVER/GENERATOR 7-7-1 THEORY OF OPERATION (Refer to Figure 7-8 and Receiver/Generator Circuit Schematic in Section 10) A. GENERATE MODE In the Generate mode, the Receiver/Generator utilizes a VCO tuned to 21.4 MHz to provide the carrier for RF signal genera �ion and SSB reception.
-
Page 201: Receiver/Generator Block Diagram
CR4301. Capacitor C4348 allows an attenuated sample of the generator signal to enter the receiver circuit. The first amplifier is dual-stage, consisting of field-effect transistors Q4301 and Q4302, filter FL4302, inductors L4302, L4303, L4304 and L4307, and related resistors and capacitors. The amplified signal is then connected by coupling transformer FL4303 to the bandpass filters. - Page 202 circuit, which forward-biases the isolation diodes and allows the filter to function. E. AM DEMODULATOR CIRCUIT When operating in the Receive AM or Receive SSB mode, the modu lated 10.7 MHz IF from the final amplifier coupler transformer FL4305 is applied to the base of RF transistor Q4312, which drives tuned filter FL4307.
- Page 203 H. AM MODULATOR CIRCUIT Inductor L4314 and capacitors C4368 and C4369 filter the square wave from flip-flop U4301B into a sinewave. Diodes CR4313 and CR4314 and associated circuitry form a voltage-controlled atten uator which is driven by an AM control voltage supplied by the modulator/leveler in the Generate Audio Module.
- Page 204 5. Set FM/AM-500A controls as follows: a. Modulation Mode Selector Switch "FM VAR" b. VAR TONE Selector Switch "OFF" "OFF c. 1 kHz TONE Selector Switch 7-7-3 TESTING (Refer to Receiver/Generator PC Board Drawing in Section 9 and Circuit Schematic in Section 10) 1.
- Page 205 11. Verify distortion is less than 5%. If not, test Q4301, Q4302 and Q4311. If one of these transistors is bad, replace it with one from the same manufacturer or replace all three with transistors from any one manu facturer. 12.
- Page 206 7-8 FREQUENCY STANDARD MODULE 7-8-1 THEORY OF OPERATION (Refer to Figure 7-9 and Frequency Standard Circuit Schematic in Section 10) A. GENERAL The Frequency Standard uses a Voltage Controlled Temperature Compensated Crystal Oscillator (TCXO) to furnish a constant, internally-produced 10 MHz reference frequency. When desired, an external 10 MHz signal can be used by connecting the signal source to the EXT STD jack on the Rear Panel of the set.
-
Page 207: Frequency Standard Block Diagram
D. FREQUENCY DIVIDER The frequency divider consists of dual counter U2503, tran sistor Q2502 and associated resistors. The 10 MHz input is divided by 10 in the first counter and sent to isolation amplifier transistor Q2502 before being supplied through P2502 to the Digital Counter at 1 MHz. - Page 208 2. Set REF potentiometer on Front Panel to center of its travel. { Refer to Controls, Indicators and Connectors Drawing in Section 1.) TESTING { Refer to Frequency Standard PC Board Drawing in 7-8-3 Section 9 and Circuit Schematic in Section 10) 1.
- Page 209 7-9 DIGITAL MODULE 7-9-1 THEORY OF OPERATION (Refer to Figure 7-10 and Digital Counter and Digital Reference Circuit Schematics in Section 10) A. GENERAL As a signal source, the Digital Module divides the 1 MHz refer ence signal from the Frequency Standard into frequencies of 10 Hz, 100 Hz, 1 kHz and 10 kHz.
- Page 210 C. TIMING AND SIGNAL SELECTOR CIRCUIT (On Digital Counter PC Board) In the timing circuit, counter U4411 divides the time-base fre quency by 10. Dual master-slave flip-flop U4412A and U4412B provide timed control signals. Triple multipleier U4401A, U4401B and U4401C provides signal selection. Dual one-shot multivibrator U4413A and U4413B resets the system.
- Page 213 7-9-2 PREPARATION FOR TESTING A. REMOVAL AND DISASSEMBLY If repair is required, remove and disassemble the Digital Module in accordance with instructions provided in Section 6 for Enclosed Module Removal. REQUIRED TEST EQUIPMENT ... . Oscil 1 oscope 30 MHz Bandwidth .
- Page 214 2 . Disconnect the following connectors: P/J4401, P/J4501, P/J4502 and P/J4503 ( Refer to Digital Reference PC Board Drawings in Section 9 ) . 7-9-3 TESTING ( Refer to Digital Counter and Digital Reference PC Board Drawings in Section 9 and Circuit Schematics in Section 10 ) 1.
-
Page 215: Digital Module Input Signals
5. Using DVM, verify the voltage on each pin of J4501 is within ±0.3 V of that given below for each position of the VAR TONE FREQ Thumbwheels: Thumbwheel Setting Pin 13 Pin 15 0000.0 0100.0 1000.0 1100.0 6. Using the Oscilloscope, verify the signals shown in Figure 7-11 are present. - Page 216 12. Rotate GEN/LOCK Control to "LOCK". 13. Remove coax "T" connector and connect P4502 to J4502. 14. Set GEN/REC Switch in "REC" position. 15. Connect coax between EXT 10 MHz Connector and ANTENNA Con nector. 16. Make the following control settings: CONTROL SETTING 9 Modulation Mode Selector...
-
Page 217: Audio 300
24. Rotate SQUELCH Control fully cw to verify squelch operation. Frequency Error Meter should indicate O ±100 Hz. Return the SQUELCH Control fully ccw. 25. Modulate the Signal Generator with a 1 kHz tone from FM/AM- 500A, at 15 kHz deviation. 26. -
Page 218: Reassembly
7-9-4 REASSEMBLY With all power "OFF", disconnect test equipment. If module was dis assembled for repair, reassemble in reverse order of removal and dis assembl y procedures outlined in Section 6. 7-56... - Page 219 7-10 RECEIVE AUDIO MODULE 7-10-1 THEORY OF OPERATION (Refer to Figure 7-12 and Receive Audio Circuit Schematic in Section 10) A. GENERAL Demodulated AM and FM audio signals from the Receiver/Generator are fed into a mode selector which is controlled by the Modula tion Mode Selector Switch on the Front Panel.
- Page 220 A DC signal from the Power Detector Circuit in the Output Ampli fier Module, which is representative of the signal level enter ing the T/R jack, passes through the Power Monitor Circuit. The Power Monitor Circuit sends two samples of the power detec tor signal, one of which is amplified for the low power level, to the function select multiplexer U3313 for Power Meter read...
-
Page 221: Receive Audio Module Block Diagram
... - L�r.N AUDIO MODULE7 � FROM ETERNAL MOD/SINAD JACK • " FROM VAR TONE GEN r� LREC AUDIO MODULE7 250 Hz � LOW PASS MODULATION {> TO DIGITAL MODE S �f4f H FM FROM MODULE SELECTOR REC/GEN LOW PASS �... - Page 222 strength. The other output is fed to op amp U3302B for com parison against the DC level established by the SQUELCH Control on the Front Panel. The audio signal passing through either the 8 kHz or 80 kHz lowpass filter, as selected by multiplexer U3322C, is amplified by op amp U3318A.
- Page 223 U3311 and associated components, a buffer using op amp U3314B and related resistors and, on the FM/AM-500A only, multiplexer U3324B. On the FM/AM-500, the output of U3323B goes to the peak detec tor, then to multiplexer U3313. The input signal to U3313, which is selected by the Modulation Meter Range Switch, is coupled to the amplifier, whose output drives the meter.
- Page 224 On the FM/AM-500A, the output of U3323B is connected to multi plexer U3313. The input signal to U3313, which is selected by the Modulation Meter Range Switch, is then connected directly to multiplexer U3324B and, normally, through U3314B to the meter.
- Page 225 2. Install Extender Cable between connector JS on the Mother Board and J3301 on the Receiver Audio PC Board (Refer to Mother Board and Receive Audio PC Board Drawings in Section 9 ). 7-10-3 TESTING (Refer to Controls, Indicators and Connectors Drawing in Section 1, Receive Audio PC Board Drawing in Section 9 and Circuit Schematic in Section 10) 1.
- Page 226 7. Rotate the Modulation Mode Select 'switch to and confirm the following voltages on the extender cable male connector: Voltage Tolerance Pin No. ±0.3 V +5.0 V ±0.3 V +11. 5 V ±0.3 V ±0.3 V +12.0 V -3.5 V ±0.3 V 8.
- Page 227 18. Using the Oscilloscope, rotate 1 kHz TONE Level Control to obtain a 1 kHz sinewave approximately 2 Vp-p at P3301, pin 6. 19. Using Oscilloscope, confirm a 1 kHz sinewave is present at P3301, pin 17. The amplitude of this sinewave is not criti cal because it is partially dependent upon the 1 kHz tone level.
- Page 228 37 . Rotate Modulation Meter Range Switch to "2" and confirm the meter indicates 1 kHz ±100 Hz. 38. Rotate Modulation Meter Range Switch to "BATT TEST" and adjust R3303 until the meter indication is within ±5% of the reading recorded in Step 3. 39.
- Page 229 7-11 GENERA TE AUDIO MODULE 7-11-1 THEORY OF OPERATION (Refer to Figure 7-13 and Generate Audio Circuit Schematic in Section 10) A. GENERAL The Generate Audio Module receives audio signals from any or all of four sources: (1) 1 kHz fixed frequency from the Digital Module;...
-
Page 230: Generate Audio Module Block Diagram
Control on the Front Panel. When the appropriate frequency in each Synthesizer is equal to and in phase with its reference, neither grounding circuit conducts and the voltages applied to the inputs of the first gate in the indicator logic circuit are high. - Page 231 C. SIGNAL SWITCHING All audio signals supplied to the Generate Audio Module for modulation are combined and applied to the audio modulation amplifier, op amp U32O3B. The 1 kHz fixed tone from the Digital Module and any signal applied through the EXT MOD/SINAD connector on the Front Panel go directly to the amplifier.
- Page 232 applying the REC command (+12 VDC) to the receive circuits, while the voltage applied to the base of transistor Q3201 pre vents it from conducting. Op amp U3207 applies a low voltage to the base of transistor Q3203, allowing it to conduct, pulling down the voltage to the base of transistor Q3204.
- Page 233 REQUIRED TEST EQUIPMENT ..Oscilloscope Single Tr ace, 1 MHz ..Digital Multimeter 100 Krl/V ..26 Pin M/F Connectors Extender Cable .
- Page 234 Using DVM, confirm the f o 11 owing resistances: FROM EXTENDER REQUIRED CABLE CONNECTOR RESISTANCE Pin 21 Ground exceeds 100 Kn Pin 21 MIC/ACC Jack Pin 1 less than lOn Pin 31 Ground exceeds 100 Kn Pin 31 MIC/ACC Jack Pin 3 less than lOn 2 .
- Page 235 1 4. Rotate GEN/LOCK Control out of "LOCK" detent. Verify Oscilloscope displays a 2.0 V (±0.5 V) squarewave at approxi m ately 2 Hz. 1 5. Rotate GEN/LOCK Control into "LOCK" detent. 16. Disconnect P/J4101, verify Oscilloscope again displays a 2 Hz, 2.0 V squarewave, then reconnect P/J41 01 .
- Page 236 7-11-4 REASSEMBLY With all power "OFF", disconnect all test equipment. Reinstall the Generate Audio PC Board in the reverse order of removal procedure outlined in Section 6. 7-7 4...
-
Page 237: Output Amplifier Module Block Diagram
7-12 OUTPUT AMPLIFIER MODULE 7-12-1 THEORY OF OPERATI ON {TH RU S/N 3224) Refer to Figure 7-14 and Output Amplifier Circuit Schematics in S ec ti on 10 A. GENERAL In the Generate mode, the Output Amplifier receives the RF output signal from the IF Module. - Page 238 C. LEVEL DETECTOR CIRCUIT The output level from the si gna1 amplifier circuit is sensed by a level detector circuit to provide feedback to the modulator/ leveler circuit in the Generate Audio Module. Diode CR5102 and capacitor C5116 form a level detector; and op amp U5103, with diode CR5106 and capacitors C5117 and C5118, functions as an amplifier.
- Page 239 + 2V ON GEN TO ATTEN MONA;£ RELAY GEN LVL OET FIXED 11.TTEH FROM DUPLEX FROM ATTEN ---"'I POWER POWER T/R CON PWR OET DETECT TERMINAT Figure 7-14a Output Amplifier Module Block Diagram (S/N 3225 and On) A. RECEIVE MODE All signa1s received through the T/R Connector are attenuated 20 dB by RN5101.
- Page 240 Coax Cables ••••••••••••• BNC/SMA 2 - 50'1 PREPARATION (Refer to Output Amplifier Module Drawing in Section 9) Remove Output Amplifier Module from FM/AM-500 A chassis. Connect Tracking Generator output to J5104 and the Spectrum Analyzer input to J5101. Connect Power Supply as follows: common lead to chassis of Output Amplifier;...
- Page 241 7 -12 -4 TESTING (Refer to Output Amplifier Module Drawing in Section 9 and Circuit Schematic in Section 10) 1. Apply power to Power Supply and adjust outputs to +12 voe and -12 VDC. 2. Apply power to the Spectrum Analyzer and Tracking Generator and set the controls as follows: EQUIPMENT CONTROL...
- Page 242 7-13 VARIABLE TONE GENERATOR THEORY OF OPERATION (Refer to Figure 7-15 and Variable Tone 7-13-1 Generator Circuit Schematic in Section 10) A. GENERAL The Variable Tone Generator consists of an adder system, a crystal oscillator circuit, a ROM/DAC signal generator to pro duce the audio frequency sinewave, and an output amplifier/ lowpass filter circuit.
- Page 243 1 KHz TO DIGITAL COUNTER 400 KHz TO DIGITAL COUNTER 100 KHz TO RECEIVER AUDIO THUMBWHEEL ADDERS L ATCHES SWITCHES CL OCK � � '� COUNTER � L ATCH REFERENCE FREQUENCY TO DIGITAL COUNTER ----{>-- 1 KHz 10 KHz LOW PASS LOW PASS TO AUDIO GENERATOR...
- Page 244 D. AUDIO SIGNAL GENERATOR Buffers U3111A, U3111D, U3111E, U3111F, U3112A, U3112B and U3112C shift the binary count signals received from the adder voe. system from a +12 level to +5 Buffer U3111B shifts the ROM enable pulse and U3112F shifts the latch pulse levels similarly.
- Page 245 8. REQUIRED TEST EQUIPMENT 1 - Frequency Counter ••••••••••• Capable of counting from 10 Hz to 300 kHz with 0.1 Hz resolution 1 - Oscilloscope •••••••••••••••• 10 MHz bandwidth, single trace 1 - Digital Voltmeter (DVM} ••••• 100 KO/V, 3� digit 1 - Extender Cable ••••••••••••••...
- Page 246 7-13-4 REASSEMBLY With all power "OFF", disconnect all test equipment. Replace the Variabl� Tone Generator in the reverse order of the removal procedure outlined in Section 6. 7-83/7-84 Blank...
-
Page 247: Generate Amplifier Block Diagram
7-14 OPTIONAL GENERATE AMPLIFIER 7-14-1 THEORY OF OPERATION (Refer to Figure 7-16 and Generate Ampli fier Circuit Schematic in Section 10) A. GENERAL The Generate Amplifier is a plug-in accessory which boosts the output signal level by 30 dBm. In the Generate mode, +12 supplied at the accessory power jack enables a three-stage amplifier and energizes the transmit relay. - Page 248 7-14-2 PREPARATION FOR TESTING A. REMOVAL AND DISASSEMBLY If installed, unplug the Generate Amplifier from the accessory power and T/R jacks. Disassemble the Module per instructions in Section 6. B. REQUIRED TEST EQUIPMENT 1 - Tracking Generator •••••••••• 10 kHz to 1 GHz span voe, 1 - Power Supply ••••••••••••••••...
-
Page 249: Section 8 - Preventive Maintenance
SECTION 8 - PREVENTIVE MAINTENANCE 8-1 PREVENTIVE MAINTENANCE (POWER •oFF") This section contains routine maintenance instructions for cleaning and inspecting the FM/AM-500A Communication Service Monitor. 8-1-1 EXTERNAL CLEANING 1. Clean Front Panel, switches and meter covers with a soft, lint-free cloth. If dirt is difficult to remove, dampen cloth with water, using liquid detergent if necessary. - Page 250 2. Inspect capacitors for: a. Loose mounting, deformities or obvious physical damage. b. Leakage or corrosion around leads. 3. Inspect connectors for: a. Loose or broken parts, cracked insulation and damaged con tacts. DO NOT disassemble connectors solely for inspec tion and cleaning.
-
Page 251: Section 9 - Pc Board Assemblies
SECTION 9 • PC BOARD ASSEMBLIES 9-1 GENERAL This section contains component layout drawings for all PC Boards con tained within the FM/AM-500. These drawings provide the locations and identification of discrete components, connectors, test points, etc., which are referenced in other sections of this manual. -
Page 252: Rf Thumbwheel Switch Pc Board
• • • . . . • . • • • • • • • • • . • • • • • . . • • • • . • • • ..Rev. C9) Pow er Supply PC Board (7010-5235-200 Rev. F2) •. •• Receive Audio PC Board ( FM/AM-500) (7010-5233-300 Rev. B) 9-15... - Page 272 E xcept when specifically identified, the drawings apply to both , the FM/AM-500 and FM/AM-500A. Although s ome modules include multiple PC boards and /or components i nstal 1 ed directly in an enclosure block or on the chassis, the entire circu it is shown in the related schematic.
-
Page 273: (Sn 1001 Thru 3224)
(SN 3225 and On) •••••••••••••••••••••••••••••••• 10-12A 10 -5 Power Supply/Rear Panel (0000-5215-200 Rev. G) •••. 10-8 Receive Audio Module (FM/AM-500) (0000-5213-300 Rev. Al) (SN 1001 thru 2215} ••••••••••••••••••.. 10-18 l 0-2 2 Receive Audio Module (FM/AM-500A} (SN 2216 and On) - Page 307 APPENDICES APPENDIX A: SPECIFICATIONS OF FM/ AM-SOOA A-1 RF SIGNAL GENERATOR Frequency Range: 250 kHz to 999.9999 MHz in 100 Hz increments Frequency Accuracy: Same as Master Oscillator Variable Generate: Continuous tuning ±10 kHz from selected frequency Residual FM: <100 Hz peak, 300 Hz to 3 kHz bandwidth RF Output Power: -127 dBm to -20 dBm (10 dB steps with 11 dB range continuous vernier}...
- Page 308 O to 2.5 VRMS minimum either tone into load Frequency Range (Variable): 10 Hz to 9999.9 Hz in 0.1 Hz increments * Variable Tone Generator is optional on FM/AM-500, standard on FM/AM-500A A-3 GENERATE AMPLIFIER (Optional) Gain: 30 ±2 dB typical, 100 kHz to 1000 MHz...
- Page 309 ±3 ±1 ±300 ±100 Hz, Hz full scale ±30 Audio Counter: FM/AM-500 (with variable tone generator option only) FM/AM-SODA Accuracy: ±0.01% of frequency ±6% of full scale Hz full scale Ranges: ±300 ±30 ±3 A-7 MODULATION METER (Monitor Mode)
- Page 310 240 VAC Operation:½ A, 250 V Slow Blow Battery: 3 Amp Slow Blow External DC ( in cord ) : 3 Amp Slow Blow Microphone Jack: Special, IFR P/N 5106-4900-125 Power Requirements: Line: 105-130/210-260 VAC, 50-400 Hz at 30 Watts typical Ext.
- Page 312 TYPE MANUFACTURER & SPECIFICATIONS MODEL Signal Generator Wavetek 3000 Frequency Range: 1 to 520 MHz Resolution: 1 kHz Accuracy: 0.001% RF Output: +13 to -137 dBm Sweep Signal Generator Wavetek 2002A Frequency Range: 1 to 1389 MHz Calibrated RF Output: +13 to -77 dBm Wattmeter Sierra 174A-1...
- Page 313 TYPE MANUFACTURER & SPECIFICATIONS MODEL RF Power Meter with Power Detector Boonton RF Microwatt- Frequency Range: 200 kHz to 18 GHz meter Power Range: LO nW to 10 mW Model 42 BO Accuracy: ±0.25% fs ±0.15 dB > 10 nW Boonton Power Sensor Frequency Range: 200 kHz to 7 GHz Model 41-4A...
- Page 316 C-2 ATTENUATOR KNOB SPACER Material: .005 Brass Shimstock 1.850 ±.1 X .375 ±.1 Fabrication: Cut material to size and form into arc as shown in Figure C-2. I .____ __ _____.I { · ... r-----1. a ,t.1 _____ ,._, Figure C-2 Attenuator Knob Spacer...
- Page 317 APPENDIX D: ABBREVIATIONS & SYMBOLS D-1 GENERAL Defined below are various abbreviations and symbols which are commonly used throughout the FM/AM-SODA Maintenance Manual Text. D-2 GENERAL ABBREVIATIONS - Alternating Current - adjustment - Automatic Gain Control - Automatic Leveling Control - Amplitude Modulation - Antenna Assy...
- Page 318 - pounds per square inch - percent - Reference - Radio Frequency - Read Only Memory - Switch - Test Point trimcap - trimming capacitor trim pot - trimming potentiometer - Transistor-Transistor Logic - Unit Under Test - Volt - Volts peak - Volts peak to peak Vp-p - Voltage Alternating Current...
- Page 319 APPENDIX E: REPACKING FOR SHIPMENT E-1 SHIPPING ·INFOFiM4 TION IFR test sets returned to factory for calibration, service or repair must be repackaged and ship�ed subject to the following conditions: Do not return any products to factory without first receiving authorizati6n from IFR Cuitomer Service Department.
Need help?
Do you have a question about the FM/AM-500 and is the answer not in the manual?
Questions and answers