
Related Manuals for La Crosse Technology S75617


Summary of Contents for La Crosse Technology S75617
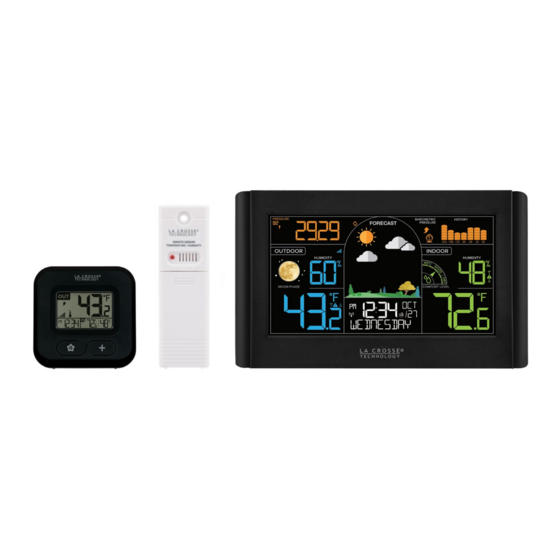
- Page 1 Wireless Weather Station with Atomic Time + Date SET UP GUIDE MODELS: S75617 & 308-147...
-
Page 2: Table Of Contents
Table of Contents MAIN WEATHER STATION BONUS STATION POWERUP & TROUBLE SHOOTING Power Up Setting Menu Settings Menu Outdoor Sensor Search Atomic Time HI/LO Temp Records Low Battery Indicator Adjustable Backlight Button Function Auto-Dim Settings Indoor Comfort Level Moon Phase APPENDIX Seasonal Foliage Forecast Icons... -
Page 3: Power Up
3. Insert 2 “AAA” batteries into you Bonus Station. 4. Once the sensor is reading to both stations, place it outside in a shaded location to protect it from the sun’s heat. Watch our sensor mounting video: bit.ly/th_sensor_mounting Outdoor Sensor Weather Station TX141TH-Bv3 S75617 Bonus Station 308-147... -
Page 4: Main Weather Station
Main Weather Station Settings Menu 1. Hold the button to enter the Settings Menu. 2. Use the buttons to adjust values. 3. Press to confirm values and move to the next setting. 4. Press the LIGHT button at any time to save and exit. Settings Menu Order: •... -
Page 5: Atomic Time
Language: The language selected in this menu will control other menu items, as well as your full weekday readout. Atomic OFF: When Atomic OFF is selected, you will move directly to 12/24 Hour setting. DST: Select Automatic ON for correct daylight saving time adjustments. Weekday: Will set automatically when your Year, Month, and Date are set. -
Page 6: Auto-Dim Settings
Auto-Dim Settings Program your display to automatically dim during preselected times. 1. Hold the LIGHT button to enter the Auto-Dim Settings Menu. 2. Press the buttons to turn the Auto-Dim feature on or off. Press LIGHT to confirm. 3. Press the buttons to adjust the starting hour. -
Page 7: Moon Phase
Moon Phase The moon phase is based on the Lunar Calendar and the year, month, and date settings. Small Waxing Large Waxing First Small Waxing Large Waxing Moon Crescent Crescent Quarter Gibbous Gibbous Full Large Waning Small Waning Last Large Waning Small Waning Moon Gibbous... -
Page 8: Forecast Icons
Forecast Icons FORECAST • The forecast icons use the station’s internal barometer to predict conditions to come within the next 12 hours. • The Snow Icon will show when temperatures are below 32°F (0°C) and rain or storms are predicted. •... -
Page 9: History Records
History Records From normal time display, press and release the HISTORY button to toggle through indoor/outdoor temperature and humidity records with time and date stamps. Records Viewing Order BAROMETRIC PRESSURE • Outdoor High Temperature HUMDITY HUMDITY • Outdoor Low Temperature •... -
Page 10: Customizable Alerts
Customizable Alerts Setting Custom Alerts BAROMETRIC PRESSURE 1. Hold the ALERTS button to enter the Alert Settings Menu. HUMDITY HUMDITY 2. Use the buttons to activate/deactivate MOON PHASE COMFORT LEVEL and adjust alerts settings. Press ALERTS confirm your selection. 3. Your programmed alerts are active when the and / icon appear on the LCD. -
Page 11: Extra Sensor Area
Extra Sensor Area This station can display data for an add-on Rain Gauge as well as up to three additional Temp & Humidity Sensors. These readings will all appear in the upper left section of the LCD. Pressure (default) Rain Temperature/Humidity Add Extra Sensors: 1. -
Page 12: Outdoor Sensor Search
Troubleshooting Search for Outdoor Sensor If you are seeing “NO” or dashes for your outdoor readings, please try the following steps: 1. Hold the button to search for your outdoor sensor. The Reception Indicator will begin to animate. 2. If after 3 minutes the sensor still isn’t connected, bring the sensor inside next to the display and remove power from both the sensor and station. -
Page 13: Button Functions
Button Functions Hold to enter Alert Settings. ALERTS Alerts: Press to move to next item. Press to view Pressure or Extra Sensors (if added). EXTRA Hold to search for all Extra Sensors. Hold to search for sensor in Outdoor Sensor Area. + (PLUS) Settings: Press to increase values. -
Page 14: Bonus Station
Bonus Station Settings Menu 1. Hold the button to enter the Settings Menu. 2. Use button to adjust and the button to confirm and exit. Settings Menu Order: 12/24 Hour Format • Hour • Minutes • Fahrenheit or Celsius • HI &... -
Page 15: Appendix
Stay in Touch! Ask questions, watch setup videos, and provide feedback on our social media outlets. Follow La Crosse Technology on YouTube, Twitter, Facebook and Instgram. We’re Here to Help If you require additional assistance, get in touch with our friendly customer support team based in La Crosse, WI. -
Page 16: Specifications
Specifications Weather Station (S75617) Outdoor Sensor (TX141TH-Bv3) Temperature Range: 32ºF to 122ºF Temperature Range: -40°F to 140°F (0ºC to 50ºC) (-40°C to 60°C) Humidity Range: 10% - 99% RH Humidity Range: 10% - 99% RH Relative Pressure Range: Transmission Range: Over 330 feet 23.62 to 32.48 inHg (800 to 1100 hPa) -
Page 17: Warranty Info
Warranty Info La Crosse Technology, Ltd. provides a 1-year limited time warranty (from date of purchase) on this product relating to manufacturing defects in materials & workmanship. La Crosse Technology, Ltd, 2830 S. 26th St. La Crosse, WI 54601 For Full Warranty Details, Visit: www.lacrossetechnology.com/pages/warranty...
Need help?
Do you have a question about the S75617 and is the answer not in the manual?
Questions and answers