Advertisement
Quick Links
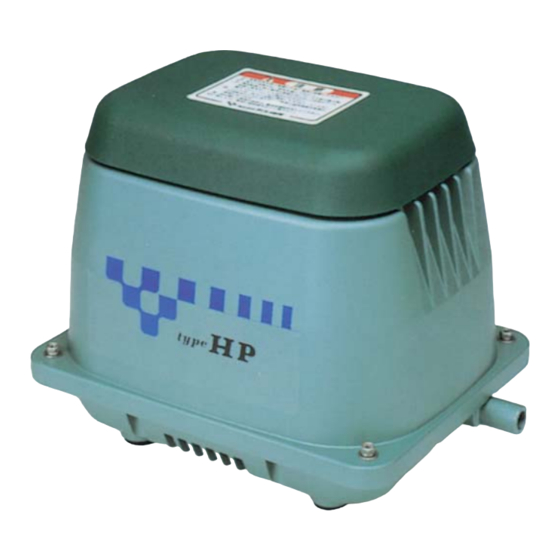
HP Series
HP-100/120
Air pump
Start of production
HP-100
1997/10
HP-120
1997/10
STRUCTURE AND PART NAMES
HP-100/120
漓 Filter Cover
滷 Semi Cover Packing
澆 Filter
潺 Fitting Boss
潸 Upper Housing
澁 Sound Absorber (Lap)
澀 Casing Block A
潯 Valve Chamber packing
潛 Casing Block B
濳 Valve
潭 Diaphragm Ring
澂 Diaphragm
潼 Diaphragm Base
潘 Frame Cover
澎 SP Switch
澑 Safety pin+Locking collar
濂 Electromagnet
潦 Actuating Rod
澳 L-Tube
澣 Hose Band
澡 Frame
澤 Vibration Control Rubber
澹 Center Plate
濆 Gasket
澪 Sound Absorber (Filter)
濟 Lower Housing
濕 Power Cord
Discontinuance of production
─
─
1
Advertisement

Related Manuals for HIBLOW HP Series


Summary of Contents for HIBLOW HP Series
- Page 1 HP-100/120 Air pump Start of production Discontinuance of production ─ HP-100 1997/10 HP-120 1997/10 ─ HP Series STRUCTURE AND PART NAMES HP-100/120 漓 Filter Cover 滷 Semi Cover Packing 澆 Filter 潺 Fitting Boss 潸 Upper Housing 澁 Sound Absorber (Lap) 澀 Casing Block A 潯 Valve Chamber packing 潛 Casing Block B 濳 Valve 潭 Diaphragm Ring 澂 Diaphragm 潼 Diaphragm Base 潘 Frame Cover 澎 SP Switch 澑 Safety pin+Locking collar 濂 Electromagnet 潦 Actuating Rod ...
- Page 2 HP- 100 / 120 REPLACING THE CHAMBER BLOCK AUTION ! ●Be sure to unplug the pump unit. ●Replace the diaphragms and the valves with new ones at least once a year to one and a half year regularly in order to maintain their initial performance. ●For chamber block replacement, be sure to change both chamber blocks at the same time. ●The rod employs powerful permanent magnets. Therefore, be sure to remove your watch and any other precision machines before operation as they may be affected by the strong magnetic force. ●Do not put the actuating rod close to a magnetic card, magnetic disk or other magnetic media as the data may be destroyed. STEP STEP REMOVAL OF THE CHAMBER BLOCKS To remove the upper housing. REMOVING UPPER HOUSING (Refer to ) ...
-
Page 3: Replacing The Diaphragm
HP- 100 / 120 REPLACING THE CHAMBER BLOCK STEP STEP Remove the 4 screws holding the chamber block and the casing block. (4 screws on each side) STEP STEP Remove 1 U-lock nuts from one side holding the diaphragm mounting block to the rod. ●Use the nut driver to loosen (or tighten) the U-lock nut. STEP STEP Remove one of the diaphragm mounting blocks from the actuating rod and pull out the other diaphragm mounting block with the rod. After that, separate the ... -
Page 4: Replacing The Valve
HP- 100 / 120 REPLACING THE CHAMBER BLOCK STEP STEP Fit a new diaphragm and diaphragm ring in the diaphragm base. ●Be sure not to leave a gap between them. STEP STEP REPLACING THE VALVE In case of replacing the whole diaphragm casing STEP 12 block, move straight to . Separate casing A and casing B. Remove the valves from the casing B. ●If ... - Page 5 HP- 100 / 120 REPLACING THE CHAMBER BLOCK STEP STEP FITTING THE CHAMBER BLOCKS Fit the actuating rod by aligning it with the groove and tighten U-lock nut and flat washer by the nut driver. ●Use new U-lock nut and washer, otherwise, U-lock nut may work loose and cause malfunction. STEP STEP Insert the actuating rod into the machine body. Be sure to fit the positioning boss on the diaphragm base into the concave part of the frame stay. Secure the diaphragm mounting block on the other side and tighten washers and U-lock nuts with the nut driver. ...
- Page 6 HP- 100 / 120 REPLACING THE CHAMBER BLOCK STEP STEP Insert a new safety pin through the hole on the terminal side. (Please Insert safety pin through the spring electrode, L-shaped lever in such order.) STEP STEP Install the locking collar from the other side of the terminal and insert it until it clicks. STEP STEP This completes the replacement of the safety pin procedure. ...
- Page 7 HP- 100 / 120 REPLACING THE CHAMBER BLOCK STEP STEP Install the sound absorber. STEP STEP Place the upper housing back on body. ●Be extremely careful not to catch the sound absorber on the upper housing. Fasten it with the bolts. Then, place the filter and filter cover on the upper housing. (Refer to FILTER CLEANING AND REPLACEMENT )
- Page 8 HP- 100 / 120 REPLACING THE ELECTROMAGNET CAUTION ! ●Be sure to unplug the pump unit. ●When performing replacement work, the pump body may still be hot and you could get burned. So please wait until the pump has cooled before handling. ●Be sure to remove the chamber block and the actuating rod before replacing the electromagnet. ●It ...
- Page 9 HP- 100 / 120 REPLACING THE ELECTROMAGNET STEP STEP FITTING THE ELECTROMAGNET Mount new the electromagnets in the unit. Tighten up nuts with nut driver. STEP STEP Install the SP switch to the frame with the screws. ●Be careful of the direction of switch lever. (Refer to the pictures) STEP STEP Insert the wire into the silicon tube, and tie up in a bundle. Strip the coating off each wire. (5-7mm from the end) Connect the wires to the terminals. Solder the wires to the terminals. The wire requires a soldered connection. STEP STEP This completes the electromagnet replacement procedure.
Need help?
Do you have a question about the HP Series and is the answer not in the manual?
Questions and answers