
Related Manuals for Veridian Healthcare ProKit 02-127 Series


Summary of Contents for Veridian Healthcare ProKit 02-127 Series
- Page 1 ProKit™ Combo with Attaché Case Model 02-127 Series Please read this instruction manual completely before operating this unit.
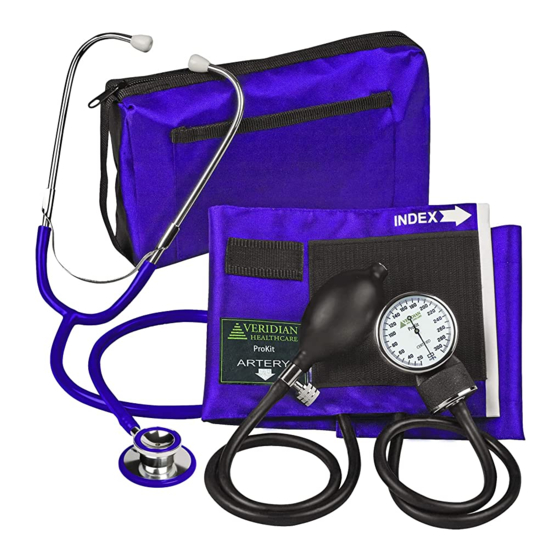
- Page 2 STOP! PLEASE ENSURE YOU HAVE ALL OF THE FOLLOWING COMPONENTS BEFORE USING YOUR PROKIT COMBO. ™ Unassembled, Gauge Squeeze Bulb Adult 3-piece Arm Cuff Stethoscope Instruction Manual Storage Case IF YOU ARE MISSING ANY PARTS, INCLUDING INSERTS OR INSTRUCTION MANUALS, DO NOT RETURN TO PLACE OF PURCHASE.
-
Page 3: Table Of Contents
Instrucciones en Español ....................17-32 Toll-Free Customer Care Help Line: 1-866-326-1313 Monday – Friday 8:30 a.m. – 4:30 p.m. CST Manufactured for Veridian Healthcare 1175 Lakeside Drive Gurnee, IL 60031 www.veridianhealthcare.com Made in China #93-1335 10/19 ©2019 Veridian Healthcare, LLC ENGLISH • 3... -
Page 4: Care & Safety Information
CARE & SAFETY INFORMATION CAUTION: Failure to read and observe all precautions could result in personal injury or equipment damage. Improper care or use of your sphygmomanometer may result in injury, damage to the unit or ineffective treatment. Following these instructions will ensure the device efficacy and long life. GENERAL CAUTIONS AND WARNINGS •... - Page 5 CARE & SAFETY INFORMATION inflammatory diseases, intravascular therapy, arteriovenous shunts or if a mastectomy has been performed. • Motion, trembling and shivering may affect measurement reading. • If you are allergic to plastic or rubber, consult with your medical professional before using this device.
-
Page 6: Introduction
INTRODUCTION It is recommended that you first seek the advice and recommendation of your physician or healthcare professional when using home diagnostic devices, including blood pressure monitors. Thank you for purchasing a ProKit™ Combo. With proper care and use, your kit will provide you with many years of reliable measurements. -
Page 7: Getting Started
GETTING STARTED Before Taking a Measurement Your readings should only be interpreted by your physician or healthcare professional with access to your individual medical history. Regular home blood pressure monitoring will allow you to track and record your readings for discussion with your physician. Conduct your measurement in a quiet place while seated in a relaxed position. -
Page 8: Features & Assembly
FEATURES & ASSEMBLY Arm Cuff Inflation Bulb Ear Tips Air Release Valve Binaural Metal D-Ring Y-Tubing Chestpiece Aneroid Gauge Simple Assembly - Stethoscope: Insert the single end of the “Y” tubing into the stem of the chestpiece; Insert the ends of the metal binaurals from the polybag and insert the ends into the “Y” tubing. Cuff, Bulb and Gauge: Attach the gauge and bulb to the tubing as shown above. -
Page 9: Applying Your Blood Pressure Cuff
APPLYING YOUR BLOOD PRESSURE CUFF Before applying your blood pressure cuff, be sure you have selected the appropriate size cuff: Adult Cuff fits arm circumference 11” - 16.375” (27.9-41.7 cm) If for any reason you are unable to or should not use your left arm, please modify the instructions for cuff application to your right arm. -
Page 10: Proper Stethoscope Use And Fit
PROPER STETHOSCOPE USE & FIT The earpieces on your stethoscope have been carefully calibrated to provide clear and audible acoustics. To best hear the sounds to be analyzed, please keep the following tips in mind: The earpieces should point forward when in use, Fig1. -
Page 11: Taking Your Blood Pressure Reading
TAKING YOUR BLOOD PRESSURE READING Before taking a reading, review the section under Features & Assembly of your unit and ensure every piece is properly assembled. Reminder, it is important to avoid smoking, eating, taking medication, alcohol consumption or physical activity 30 minutes prior to taking a reading. NOTE: For the purposes of these instructions, the individual taking the reading will be referred to as the CAREGIVER, the person receiving the reading will be referred to as the PATIENT. - Page 12 TAKING YOUR BLOOD PRESSURE READING Begin inflating the cuff slowly and steadily by pumping the Note First Sound inflation bulb until the gauge reads 30 mmHG ABOVE the last SYSTOLIC measurement. If you do not know the last SYSTOLIC measurement, inflate to approximately 180-200 mmHg. NEVER INFLATE THE CUFF ABOVE 280 mmHg.
-
Page 13: Care & Maintenance
CARE & MAINTENANCE Care & Maintenance • The stethoscope may be cleaned with either soap and water or isopropyl alcohol. The earpieces may be removed from the binaurals to facilitate cleaning. After each cleaning, all parts should be thoroughly rinsed and dried completely. Never immerse any part of the stethoscope in liquid. -
Page 14: Device & Label Symbols
DEVICE & LABEL SYMBOLS These symbols may appear on your device, instructions or packaging and may vary by make and model. Symbol Meaning Read This Manual—All included manuals should be read prior to first use. (Background color will be blue; reading symbol will be white) Warning—Symbol indicates a warning, prohibition or mandatory action that mitigates a risk that is not necessarily obvious to the device operator. -
Page 15: Sphygmomanometer Warranty
This Twenty-Year Limited Calibration Warranty is limited to the accuracy of the manometer gauge only. During the term of the warranty, Veridian Healthcare will repair or replace (at our option) any gauge found to be inaccurate due to normal use. This does not include gauges that have been misused or abused. -
Page 16: Stethoscope Warranty
This stethoscope lifetime limited warranty covers the stethoscope and component parts. During the term of this warranty, Veridian Healthcare will repair or replace (at our option) any stethoscope component(s) found to be defective in materials or workmanship. -
Page 17: Instrucciones En Español
ProKit™ Combinado con el caso de Attaché Modelo 02-127 Serie Por favor lea este manual de instrucciones completamente antes de operar esta unidad. - Page 18 ¡ALTO! ASEGÚRESE DE TENER LA TOTALIDAD DE LOS SIGUIENTES COMPONENTES ANTES DE USAR SU KIT DE USO DOMÉSTICO . Estetoscopio de Indicador Bulbo de Brazalete adulto 3 Piezas Inflado del brazo Instruction Manual Manual Detallado SI FALTA ALGUNO DE LOS ELEMENTOS, INCLUIDOS LOS INSERTOS O LOS MANUALES DE INSTRUCCIONES, NO HAGA LA DEVOLUCIÓN EN EL LUGAR DONDE EFECTUÓ...
- Page 19 Línea de ayuda gratuita de asistencia al cliente: 1-866-326-1313 De lunes a viernes de 8:30 a 16:30 (hora central del Este) Manufactured for Veridian Healthcare 1175 Lakeside Drive Gurnee, IL 60031 www.veridianhealthcare.com Made in China #93-1335 10/19 ©2019 Veridian Healthcare, LLC ESPAÑOL • 19...
-
Page 20: Información Sobre Cuidado Y Seguridad
INFORMACIÓN SOBRE CUIDADO Y SEGURIDAD PRECAUCIÓN: Si no se leen y respetan todas las precauciones podrían provocarse lesiones personales o daños al equipo. El cuidado o uso del esfigmomanómetro puede ocasionar lesiones, daños a la unidad, o resultar en un tratamiento ineficaz. Si sigue estas instrucciones, se garantizará... - Page 21 INFORMACIÓN SOBRE CUIDADO Y SEGURIDAD terapia intravascular, derivaciones arteriovenosas o si se ha realizado una mastectomía. • El movimiento, los escalofríos y los temblores pueden afectar la lectura de la medición. • Si es alérgico al plástico o al caucho, consulte con su profesional médico antes de usar este dispositivo.
-
Page 22: Introducción
INTRODUCCIÓN Se recomienda que primero consulte y se asesore con su médico o profesional del cuidado de la salud cuando use dispositivos de diagnóstico de uso doméstico, entre ellos el monitor de presión arterial. Gracias por comprar un cuidado médico ProKit™ Combinado de Veridian. Con el debido cuidado y uso, su monitor le brindará... -
Page 23: Cómo Comenzar
CÓMO COMENZAR Antes de tomarse la presión Sus lecturas sólo deben ser interpretadas por su médico o profesional de cuidados médicos con acceso a su historia clínica individual. El uso periódico de un monitor en el hogar le permitirá rastrear y registrar sus lecturas para comentarlas con su médico. Tómese la presión en un lugar tranquilo y sentado en una posición relajada. -
Page 24: Características Y Montaje
CARACTERÍSTICAS Y MONTAJE Brazalete Bulbo de Inflado Las Olivas La Válvula de Aire Binaurales La D-Barra de Metal Y-Tubo Campana Indicador Fácil armado - Estetoscopio: Inserte el extremo del tubo “Y” en el vástago de la campana; inserte los extremos de los binaurales metálicos de la bolsa de polietileno e inserte los extremos en el tubo “Y”. -
Page 25: Colocación Del Brazalete
COLOCACIÓN DEL BRAZALETE Antes de colocarse el brazalete de presión arterial, asegúrese de haber seleccionado el tamaño de brazalete adecuado: El brazalete grande para adultos (incluido) se adapta a una circunferencia de brazo de: 11” - 16.375” (27.9-41.7 cm) Si por algún motivo no puede o no debe usar el brazo izquierdo, modifique las instrucciones para la aplicación del brazalete en el Fig. -
Page 26: Uso Y Ajuste Apropiados Del Estetoscopio
USO Y AJUSTE APROPIADOS DEL ESTETOSCOPIO Las olivas de su estetoscopio de Veridian Healthcare han sido cuidadosamente calibradas para proporcionar acústicas claras y audibles. Para escuchar mejor los sonidos que se van a analizar, recuerde los siguientes consejos: Se incluye olivas múltiples. Seleccione el par que le resulte más cómodo y efectivo. -
Page 27: Cómo Tomar La Lectura
CÓMO TOMAR LA LECTURA Antes de tomar la lectura, lea la sección Características y montaje de su kit de presión arterial de uso doméstico y verifique que cada pieza esté correctamente colocada y que las olivas estén bien sujetas. NOTA: Para los fines de estas instrucciones, a la persona que tome la lectura se le denominará... - Page 28 CÓMO TOMAR LA LECTURA Sostenga la pera para inflar con la mano que tiene libre y gire la Escuche el primer sonido válvula de liberación de aire en el sentido de las agujas del reloj para cerrar, Fig 3. Comience a inflar el brazalete lenta y continuamente bombeando la pera para inflar hasta que el indicador marque 30 mmHG ENCIMA de la última medición SISTÓLICA.
-
Page 29: Cuidado Y Mantenimiento
CUIDADO Y MANTENIMIENTO Care & Maintenance • El estetoscopio se puede limpiar con agua y jabón o alcohol isopropílico. Las olivas se pueden quitar de los binaurales para facilitar la limpieza. Después de cada limpieza, enjuague y seque con cuidado y por completo todas las partes. Nunca sumerja en líquido ninguna de las partes del estetoscopio. -
Page 30: Símbolos De Dispositivo Etiqueta
SÍMBOLOS DE DISPOSITIVO Y ETIQUETA Estos símbolos pueden aparecer en su aparato, instrucciones o embalaje y pueden variar según la marca y el modelo. SÍMBOLO SIGNIFICADO Lea este Manual—Antes del primer uso se deben leer todos los manuales que se incluyen. Advertencia - El símbolo indica una advertencia, prohibición o acción obligatoria que mitiga un riesgo que no es necesariamente obvio para el operador del aparato. -
Page 31: Garantía De Esfigmomanómetro
Veridian Healthcare hubiere o no sido notificado del uso o propósito en especificaciones, planos u otro tipo, e independientemente de que los productos de Veridian Healthcare hubieren o no sido diseñados y/o fabricados específicamente por Veridian Healthcare para uso o propósitos del comprador, con... -
Page 32: Garantía De Estetoscopio
Veridian Healthcare hubiere o no sido notificado del uso o propósito en especificaciones, planos u otro tipo, e independientemente de que los productos de Veridian Healthcare hubieren o no sido diseñados y/o fabricados específicamente por Veridian Healthcare para uso o propósitos del comprador, con...
Need help?
Do you have a question about the ProKit 02-127 Series and is the answer not in the manual?
Questions and answers