
Subscribe to Our Youtube Channel
Related Manuals for BMC YH-600B Pro


Summary of Contents for BMC YH-600B Pro
- Page 1 Sleep Apnea Diagnosis Device and Accessories Portable Sleep Diagnostic System YH-600B Pro User Manual...
-
Page 2: Table Of Contents
YH-600B Pro User Manual V3.0 Table of Contents CHAPTER 1: DEVICE INTRODUCTION AND OPERATION ..1 1. Symbols ..................1 1.1 Control Buttons ..............1 1.2 Device Symbols ............... 1 2. Warnings, Cautions and Important Tips ........2 3. Contraindications ..............2 4. - Page 3 YH-600B Pro User Manual V3.0 2. Co-use of the Software with Sleep Diagnostic Device .... 43 2.1 Run the Software ............43 2.2 Data Management Application ........44 2.2.1 Data Unfolding ........... 44 2.2.2 Data Download .......... 50 2.2.2.1 Poly Watch ........50 2.2.2.2 TF Card Data Transmission ....
-
Page 4: Chapter 1: Device Introduction And Operation
The information in this manual has been carefully checked and is believed to be accurate. In the interest of continued product development, BMC Medical Co., Ltd. reserves the right to make changes and improvements to this manual and the products it describes at any time, without notice or obligation. -
Page 5: Warnings, Cautions And Important Tips
YH-600B Pro User Manual V3.0 Lot number Manufacturer Authorized Representative in the European Community European Union Approval No SpO Alarms 2. Warnings, Cautions and Important Tips WARNING! Indicate the possibility of injury to the user or operator. CAUTION! Indicate the possibility of damage to the device. -
Page 6: Specifications
YH-600B Pro User Manual V3.0 4. Specifications Range 0% ~ 100% ≤ ±3% (70% ~ 85%), ≤ ±2% (85% ~ Accuracy 100%) Pulse rate Range 30 ~ 250 bpm ≤ 2 bpm (30 ~ 100 bpm) Accuracy ≤ 2% (100 ~ 250 bpm) - Page 7 YH-600B Pro User Manual V3.0 Temperature Operation 5° C ~ 35° C Storage / -20° C ~ 55° C Transportation Humidity ≤ 80% (non-condensing) Operation ≤ 93% (non-condensing) Storage / Transportation Atmospheric pressure Operation 860 ~ 1,060 hPa Storage /...
-
Page 8: Intended Use
• No modification of this equipment is allowed. CAUTIONS! • YH-600B Pro cannot be used on a water bed or a bed with an electric blanket, because these electrical equipment will disturb the operation of YH-600B Pro. • Federal law restricts these devices to sale by or on the order of a physician. - Page 9 YH-600B Pro User Manual V3.0 operation of other electrical equipments, such as televisions, radios and mobile phones, or if YH-600B Pro does disturb the operation, you should move YH-600B Pro far away from these equipment. • YH-600B Pro must be able to measure the pulse properly to obtain accurate SpO measurement.
-
Page 10: Glossary
YH-600B Pro User Manual V3.0 6. Glossary Because of the respiratory tract’s airway Snore limitation, sound is made when respiratory airflow gets through the narrow respiratory tract, which usually indicates that the patient is likely to have suffered in years from sleep apnea syndrome along with the increase of age. - Page 11 YH-600B Pro User Manual V3.0 The AI means the number of apneas per hour, which is equal to the number of times apnea has occurred the whole night divided by the sleep time of whole night (awakening and invalid time are not contained). The unit of time is hour.
-
Page 12: Model
YH-600B Pro User Manual V3.0 7. Model Table 1-1 Monitoring Parameters and Components Monitoring Model Components Parameters Main Device, Respiration Kit, Respiration Effort Belt, , pulse rate, airflow Effort Lead Cable, USB waveform, thorax / Data Cable and Bluetooth abdomen effort, body... -
Page 13: Package Contents
YH-600B Pro User Manual V3.0 8. Package Contents Table 1-2 shows package contents. Table 1-2 Package Contents Pulse Main Oximeter Device Sensor USB Data Respiration Cable Airflow Respiration Cannula Effort Belt CPAP Effort Lead Pressure Cable Tube Quick Quick Operation... - Page 14 ② The finger sheath and cannula are CE marking approved, indicating compliance to the Medical Device Directive. ③ Several accessories are available for using YH-600B Pro. To ensure a safe and effective therapy, adopt only BMC accessories. 11 / 88...
-
Page 15: System Features
The performance and functional characteristics of YH-600B Pro include all the user-friendly features of the predicate device. YH-600B Pro is powered by one 1.5 V AA battery. Testing was performed to demonstrate that the performance of YH-600B Pro in its intended environment is as safe and effective as that of the legally marketed predicate devices. -
Page 16: Main Device Structure
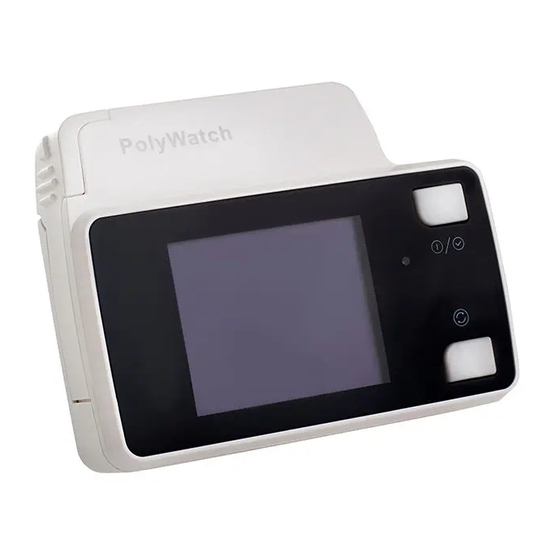
YH-600B Pro User Manual V3.0 9.2 Main Device Structure Port On-Off / OK Button Flow / COM Port Display Screen Shift Button Fig 1-1 Main device structure Table 1-3 shows Component and Function. Table 1-3 Component and Function Component Function... -
Page 17: Instructions For Use
BMC. 10.1 Setting up and Wearing the Device Fig 1-2 shows a user wearing YH-600B Pro. Please don’t directly expose the patient’s skin to the device, which had better been placed outside the patient’s pajama. See sections 10.1.1 ~ 10.1.6 for detailed wearing instructions. -
Page 18: Installing The Tf Card And Battery
YH-600B Pro User Manual V3.0 10.1.1 Installing the TF Card and Battery Push and pull the battery door according to Step 1. Insert the TF card into the slot and put a new AA battery with the positive and negative terminals on the correct sides according to Step 2. Close the battery door according to Step 3 (Fig 1-3). - Page 19 YH-600B Pro User Manual V3.0 WARNING! • The battery may leak or explode if used or disposed of improperly. When the TF card and battery are correctly inserted into the device, a symbol indicating correct insertion of the TF card will appear in the standby interface, as shown in Fig 1-4.
-
Page 20: Wearing The Main Device
YH-600B Pro User Manual V3.0 before recording. Use only the specified types of battery or rechargeable battery. • Replace the battery when the battery quantity drops below 1.2 V, as the icon shows or when the screen flickers. • If the device has not been used for a long time, remove and put away the battery to prevent electrolyte leakage from damaging the device. -
Page 21: Wearing The Airflow Cannula
YH-600B Pro User Manual V3.0 Respiration Effort Belt Effort Lead Cable Respiration Box Fig 1-7 Connecting the respiration kit Step 1: Connect the effort lead cable and respiration effort belt; Step 2: Fasten the respiration effort belt around the body;... -
Page 22: Wearing The Pulse Oximeter Sensor
YH-600B Pro User Manual V3.0 Thread Slipping of Airflow Cannula Fig 1-8 Wearing the Airflow Cannula WARNINGS! • Please read the attached product literature carefully before using the device and accessories. • The Airflow Cannula is for one time use only, and only Airflow Cannula with original and intact packaging should be used. - Page 23 YH-600B Pro User Manual V3.0 WARNINGS! • Change the measured finger regularly according to the patient's conditions after prolonged use. It must be moved every 4 hours or more often and reapplied to another site according to the user’s skin integrity and circulatory status.
-
Page 24: Connecting The Main Device With The Respiration Kit
YH-600B Pro User Manual V3.0 10.1.6 Connecting the Main Device with the Respiration Kit Connect the main device with the respiration kit by inserting the data connector of the kit into the Flow / COM port on the right side of the device. -
Page 25: Accessing The Standby Interface
YH-600B Pro User Manual V3.0 CAUTIONS! • If the device is not used for a long time, a time setting window will automatically pop up when you reuse it. Users need to update the date and time according to actual time, then choose “Save and Exit”... -
Page 26: Accessing The "Record" Interface
YH-600B Pro User Manual V3.0 five minutes to light up the screen. The device will shut off automatically if there is no operation for five minutes. 10.2.3 Accessing the “Record” Interface 10.2.3.1 Wearing Alert Messages From the standby interface, press the Shift Button to switch the yellow frame to the “Record”... - Page 27 YH-600B Pro User Manual V3.0 Wear the SpO finger When recording cot properly or starts, the device long-press the can detect the probe, but On-Off / OK Button fails to collect to start information recording compulsorily When recording Wear the Airflow...
-
Page 28: Record" Interface
When recording is completed, press the On-Off / OK Button and Shift Button simultaneously to exit the “Record” interface and return to the standby interface. The “Record” interface of YH-600B Pro, as shown in Fig 1-12. Body position Recording time CPAP pressure Airflow waveform... -
Page 29: Accessing The "Setup" Interface
The waveform of the signal is non-normalized so that the software can provide to the operator that the pulse rate value displayed is potentially incorrect. However, YH-600B Pro which does not store the waveform data just keeps waveform updating to give the implication of the detector in working state. - Page 30 YH-600B Pro User Manual V3.0 to enter the “Setup” interface. The user can adjust Button settings, and press the On-Off / OK Button to confirm the adjustment, as shown in Fig 1-13. Display(s): Auto Start(min): Record Setup Auto Stop(h): Date Setup...
-
Page 31: Accessing The "Data" Interface
YH-600B Pro User Manual V3.0 • Countdown Setup, allowing users to set the device to start recording at a certain time according to their needs. The maximum countdown time is 14 hours. When the countdown reaches 0:00:00, the device will enter the Wearing Alert interface. -
Page 32: Accessing The "Tools" Interface
YH-600B Pro User Manual V3.0 24 00:02:00 23 00:01:54 No records. 22 07:01:00 21 06:00:00 Figure 1-16 “Records” interface-List of records Figure 1-17 “Records” interface-No Records Select a record in the list of records, and press the On-Off / OK Button . - Page 33 YH-600B Pro User Manual V3.0 data transmission. If there are no data records, the screen will display “No records.”, but Bluetooth pairing will not be affected, shown in Fig 1-19 PolyWatch 24 00:02:00 23 00:01:54 No records. 22 07:01:00 21 06:00:00 Fig 1-19 “Transfer Data (BT)”...
-
Page 34: Turning Off The Device
YH-600B Pro User Manual V3.0 Erasing records... Erasing records... 100% Erase complete! Fig 1-21 “Erase” interface The “About” interface shows the information, software version and battery power are included, as shown in Fig 1-22. Press any key to exit. PolyWatch... -
Page 35: Troubleshooting
YH-600B Pro User Manual V3.0 11. Troubleshooting Table 1-5 shows troubleshooting. Table 1-5 Troubleshooting Problem Possible Cause Solution (s) Battery installed Check battery Device won’t start incorrectly installation Battery exhausted Replace battery Screen flickers Low battery voltage Replace battery TF card is not inserted,... -
Page 36: Cleaning And Disinfection
YH-600B Pro will operate reliably with good care and regular maintenance. Cleaning instruction: Clean YH-600B Pro Main Device ① Turn off YH-600B Pro and take battery out of YH-600B Pro main device. ② Scrub YH-600B Pro main device gently with a damp gauze pad. - Page 37 YH-600B Pro User Manual V3.0 with a solution, such as 70% isopropyl alcohol. ① Detach the pulse oximeter sensor from YH-600B Pro main device. ② Saturate a clean, dry gauze pad with the cleaning solution. Wipe all surfaces of the pulse oximeter sensor with this gauze pad.
-
Page 38: Disinfection
Disinfect the Pulse Oximeter Sensor The pulse oximeter sensor may be surface-cleaned by wiping it ® with CaviCide solution. ① Detach the pulse oximeter sensor from YH-600B Pro main device. ® ② Saturate a clean, dry gauze pad with the CaviCide solution. - Page 39 YH-600B Pro User Manual V3.0 ③ Saturate another clean, dry gauze pad with potable water. Wipe all surfaces of the pulse oximeter sensor with this gauze pad. ④ Discard the used potable water. Always use fresh volumes of water for each wipe. Do not reuse the water for wipe or any other purpose.
-
Page 40: Disposal
YH-600B Pro User Manual V3.0 Disinfect the Wrist Belt ① Detach the wrist belt from the main device. ® ② Immerse the wrist belt completely in CaviCide solution for a minimum of 5 minutes at 20° C (68˚F) or higher to destroy all pathogenic microorganisms. -
Page 41: Emc Requirements
YH-600B Pro User Manual V3.0 14. EMC Requirements Guidance and Manufacturer’s Declaration - Electromagnetic Emissions This device is intended for use in the electromagnetic environment specified below. The user of the device should assure that it is used in such an environment. - Page 42 YH-600B Pro User Manual V3.0 Guidance and Manufacturer’s Declaration - Electromagnetic Immunity This device is intended for use in the electromagnetic environment specified below. The user of the device should assure that it is used in such an environment. Immunity...
- Page 43 YH-600B Pro User Manual V3.0 Guidance and Manufacturer’s Declaration - Electromagnetic Immunity This device is intended for use in the electromagnetic environment specified below. The user of the device should assure that it is used in such an environment. Immunity...
- Page 44 YH-600B Pro User Manual V3.0 Note 1: At 80 ~ 800 MHz, the higher frequency range applies. Note 2: These guidelines may not apply in all situations. Electromagnetic propagation is affected by absorption and reflection from structures, objects and people.
- Page 45 YH-600B Pro User Manual V3.0 Recommended Separation Distance Between Portable and Mobile RF Communication Equipment and the Device. The device is intended for use in the electromagnetic environment in which radiated RF disturbances are controlled. The user of the device...
-
Page 46: Chapter 2: Analysis Software For Portable Sleep Diagnostic System
After the installation, a shortcut icon will appear on the desktop of the computer. Double-click the icon to run the BMC Polypro S1 data analysis software. 2. Co-use of the Software with Sleep Diagnostic Device 2.1 Run the Software... -
Page 47: Data Management Application
YH-600B Pro User Manual V3.0 main panel of the software is shown in Fig. 2-1. Fig. 2-1 2.2 Data Management Application 2.2.1 Data Unfolding (1) In the pop-up dialog box of “Case library”, the file unfolding analysis can be selected. In this interface, the display amount of patient information and related information can be enquired, such as: Name, Gender, as shown in Fig. - Page 48 YH-600B Pro User Manual V3.0 Fig. 2-3 Fig. 2-4 (2) Click the “drop-down” icon to pop up more settings, as shown in Fig. 2-5. Settings of patient data such as “Import”, “Export”, “Backup”, “Restore” and “Delete” can be conducted. And the path for displaying data file can be selected as shown in Fig.
- Page 49 YH-600B Pro User Manual V3.0 Fig. 2-6 (a) Click “Import” icon to pop up the interface as shown in Fig. 2-7. In this interface, the data can be migrated to the software for management. Fig. 2-7 (b) The “Export” function is to transfer downloaded data to other locations for easy archiving and file transferring of users.
- Page 50 YH-600B Pro User Manual V3.0 Fig. 2-8 (c) The “Backup” function is to save the downloaded and analyzed data to the desired location by “Compress”, “Encrypt” and “Remove old files”, so as to facilitate the storage and transmission of data, as shown in Fig. 2-9.
- Page 51 YH-600B Pro User Manual V3.0 (d) The “Restore” function is to restore the backup data to the same software to facilitate the collaborative analysis by users and doctors, as shown in Fig. 2-10.The password is the password that is encrypted during data backup.
- Page 52 YH-600B Pro User Manual V3.0 (4) Click the “New” button , to pop up the “New Analysis” interface, as shown in Fig. 2-12. Fig. 2-12 (5) After input the name of the new analysis, click “OK”, to pop up the interface as shown in Fig. 2-13. The interface can display the waveforms or values of all recorded signals.
-
Page 53: Data Download
YH-600B Pro User Manual V3.0 2.2.2 Data Download 2.2.2.1 Poly Watch (1) Click the “Download” icon on the main interface of “Data Management”, to pop up the interface as shown in Fig. 2-14. From the “Select Device” drop-down menu, select “Poly Watch”, and then select the “USB”... - Page 54 YH-600B Pro User Manual V3.0 in Fig. 2-16 will pop up. Fig. 2-15 Fig.2-16 (3) Repeat step 1, then double click the communication mode “USB”, click “Connect” button to pop up the interface of “Select Record” as shown in Fig. 2-17.
- Page 55 YH-600B Pro User Manual V3.0 Fig. 2-17 (4) Select a record and click “OK”, to pop up the “Patient Information” interface, as shown in Fig. 2-18. Fig. 2-18 (5) In the “Patient Information” dialog box, the user can manually enter the patient information, or click “Find” to find the patient...
- Page 56 YH-600B Pro User Manual V3.0 information in the pop-up “Find Patient” dialog box Fig. 2-19 and enter the patient information automatically; After patient information input, click “OK” to download data. After data downloading, a message prompt box as shown in Fig. 2-20 will pop up.
-
Page 57: Tf Card Data Transmission
YH-600B Pro User Manual V3.0 Fig. 2-19 Fig. 2-20 2.2.2.2 TF Card Data Transmission (1) Remove the TF card from the device when it is turned off. Insert the TF card to a card reader, and connect it to a computer for data analysis. -
Page 58: Bluetooth Data Transmission
YH-600B Pro User Manual V3.0 select “Poly watch TF card”. Click the “Select Path” icon select the local storage path of undownloaded TF card data, as shown in Fig. 2-21. Fig. 2-21 (3) Click “OK”, to pop up the interface of “Select Record” as shown in Fig. - Page 59 YH-600B Pro User Manual V3.0 to select the “Tools” icon (Fig. 2-22). Button Fig. 2-22 (b) After the “Tools” interface is accessed, the first option “Transfer Data (BT)” turns green. Press the On-Off / OK Button directly to enter the “Transfer Data (BT)” interface as shown in Fig.
- Page 60 YH-600B Pro User Manual V3.0 (2) Bluetooth pairing (a) Insert the Bluetooth adapter into the USB port of the computer. (b) Double-click the Bluetooth shortcut to enter the classic Bluetooth interface (Fig. 2-24) (If it is not the classic Bluetooth...
- Page 61 YH-600B Pro User Manual V3.0 Fig. 2-25 (d) Double-click the BF10 icon to highlight the serial port icon on the top of the classic interface, as shown in Fig. 2-26 below. Fig. 2-26 58 / 88...
- Page 62 YH-600B Pro User Manual V3.0 (e) Double-click the serial port icon . If connection succeeds, the serial port icon and Bluetooth device icon will turn green, as shown in Fig. 2-27. At the same time, a virtual COM port will be created in the computer.
- Page 63 YH-600B Pro User Manual V3.0 Fig. 2-28 (3) Data transmission Data transmission via Bluetooth is basically the same as that via a USB data cable, except that the user must select the virtual COM port for Bluetooth pairing in “Serial Port” (Fig. 2-29).
-
Page 64: Data Import
YH-600B Pro User Manual V3.0 Note: The Bluetooth download in this manual is based on Windows XP system, which is only for reference. The operation steps of Bluetooth download vary with different computer operating systems. 2.2.3 Data Import Click “Import” icon to pop up the interface as shown in Fig. -
Page 65: Analysis Application
YH-600B Pro User Manual V3.0 2.4 Analysis Application Select the file in the dialog box of new analysis case database (see section 2.2.1 for details) and enter the interface of the analysis module. As shown in Fig. 2-31 the “Analysis” module... -
Page 66: Patient
YH-600B Pro User Manual V3.0 EDF Data Export. Open: See 2.2.1 data opening for details. Download: See 2.2.2 data download for details. Import: See 2.2.3 data import for details. Export: See 2.2.1 data export for details. -
Page 67: Read Only
YH-600B Pro User Manual V3.0 Fig. 2-33 2.4.1.3 Read Only Click to lock the data. In the locked state, the data cannot be changed or marked, such as adding and deleting events and adding labels, the data can only be viewed. Click... -
Page 68: Print
YH-600B Pro User Manual V3.0 and select report template, click ‘Create’ to generate “WORD” report; Click to generate the PDF report directly. 2.4.1.5 Print Print includes “print” and “Preview” It is able to print and preview the waveform of the current screen. -
Page 69: Skip
YH-600B Pro User Manual V3.0 Fig. 2-34 Based on this function, the software can also realize the function of multi-screen marking sleep staging. Right click a certain section of the sleep staging navigation bar, to pop up a dialog box. In this dialog box, the user can set the “Start Epoch”, “End Epoch”... -
Page 70: Left Actual Time
YH-600B Pro User Manual V3.0 button in the skip bar and observe the record waveform and parameters of this period. Click “First”, “Previous”, “Next” and “Last” to reach the corresponding epoch, or input the epoch to directly locate it, as shown in Fig. 2-36. -
Page 71: Auto Play
YH-600B Pro User Manual V3.0 Fig. 2-38 2.4.2.5 Auto Play The Auto Play includes “Auto Scroll” and “Auto Flip” Click the “Auto Scroll” above , make analysis interface automatically scroll forward or backward at the speed of ×1 per second, to continuously display waveforms from the beginning of the recorded data. -
Page 72: Tool
YH-600B Pro User Manual V3.0 Click the “Auto Flip” below , make analysis interface automatically flip forward or backward at the speed of ×1 per second, to continuously display waveforms from the beginning of the recorded data. When the first or last epoch be reached, or click the arrow again, the screen will stop flipping forward or backward. -
Page 73: Default Event
YH-600B Pro User Manual V3.0 Auto-scale: When the “Auto-scale” function in the waveform properties window is on, click icon to display the waveform to the best. Restore: Click to restore the waveform after using the “Auto-scale” function. ... -
Page 74: Analysis
YH-600B Pro User Manual V3.0 2.4.3 Analysis 2.4.3.1 analysis rules Click the icon to pop up the interface as shown in Fig. 2-43. Fig. 2-43 Analysis rules include display settings and analysis settings. (1) Display Settings Display Settings include sleep staging, event, label. - Page 75 YH-600B Pro User Manual V3.0 Fig. 2-44 Events includes bad data, Respiratory Event, SpO Event, Snore Event, click the drop-down menu to change the label color as shown in Fig. 2-45. Fig. 2-45 72 / 88...
- Page 76 YH-600B Pro User Manual V3.0 Label includes Technician Notes, click the drop-down menu to change the label color as shown in Fig. 2-46. Fig. 2-46 (2) Analysis Settings Analysis Settings include Input and Parameter Settings. Input includes airflow SPO Snore, as shown in Fig.
- Page 77 YH-600B Pro User Manual V3.0 Fig.2-47 Airflow includes “Pressure Airflow Sensor” and “Chest Effort Movement”. includes “SpO ”. Snore includes “Snore”. For the selection of the above signals, if there is no signal in the corresponding channel in the waveform, the channel shall be selected as empty at this time to avoid bad signals which may disturb the analysis results.
- Page 78 YH-600B Pro User Manual V3.0 Fig. 2-48 Analysis range input is yes, default entire file (light on to light off). As the input is no, users can manually input the strat frame and end frame. The automatic analysis range is from...
-
Page 79: Automatic Analysis
YH-600B Pro User Manual V3.0 desaturation events, which are not in the setting range and will be marked as artifact. Snoring Event includes the ‘Sensitivity’ setting which will affect the determination of snoring events. Sleep Staging includes “Setting value” that can be manually set to a fixed value for the entire analysis results”. -
Page 80: Window
YH-600B Pro User Manual V3.0 Fig. 2-50 2.4.5 Window 2.4.5.1 View After opening a patient data, under “View” bar, click the checkbox to display “Event Window”, “Properties Window”, “Tendency Window”, “Technician Notes Window”, “Epoch Summary”, “Impedance Window”, etc., as shown in Fig. 2-51. To hide these windows, uncheck the relevant checkboxes. - Page 81 YH-600B Pro User Manual V3.0 (1) Event Window Tick the checkbox of the event window to display the event window on the left of the interface, as shown in Fig. 2-52. Fig. 2-52 The event window can display all types of events, or choose to display one or several types of events.
- Page 82 YH-600B Pro User Manual V3.0 Fig. 2-53 The property window is used to set the display properties of the waveform, change the name and label of the channel, view data type, scaling, change curve color, reserve the curve, turn on the voltmeter, auto-scale, wave cutting.
- Page 83 YH-600B Pro User Manual V3.0 Fig. 2-54 Fig. 2-55 (4) Technician Notes Window Tick the checkbox of “Technician Notes Window” to display the technician notes on the left of the interface, as shown in Fig. 2-56.The technician notes window displays biological calibration, technician notes, customization and other labels.
- Page 84 YH-600B Pro User Manual V3.0 Fig. 2-56 (5) Epoch Summary Tick the checkbox of the “Epoch Summary” to display the epoch summary window on the right of the interface, as shown in Fig. 2-57. The epoch summary interface displays the current epoch number, the maximum, minimum and average value of pulse oxygen saturation, pulse rate and the current body position.
-
Page 85: Help
YH-600B Pro User Manual V3.0 2.4.5.2 Help The data help function is the same as 2.3 help. 2.5 Data Manual Analysis 2.5.1 Technician Annotation Place the cursor at the time point to be marked, and pop up the annotated menu by right-clicking. Annotation types include Technician Notes Window, Customize, Analysis. -
Page 86: Add, Delete, And Move Channels
YH-600B Pro User Manual V3.0 Fig. 2-59 2.5.2 Add, Delete, and Move Channels Add Channels: (1) Right click the channel title bar on the left of the waveform display interface, click “Add”, pop up the “Add Channel” dialog box, as shown in Fig. 2-60. -
Page 87: Add And Delete Events
YH-600B Pro User Manual V3.0 Fig. 2-60 (2) Select the channel to be added under the “input” bar and click “OK” to add the channel. The newly added channel will be displayed above the channel title bar. Delete Channels: Right click the corresponding channel name in the channel title bar, click “Delete”, or left click the channel... - Page 88 YH-600B Pro User Manual V3.0 Fig. 2-61 Change Events: Select the event and right-click to select the appropriate event, as shown in the Fig. 2-62. Fig. 2-62 Delete Events: Select the event, right click it and select “Delete”.
-
Page 89: Exit Program
YH-600B Pro User Manual V3.0 3. Exit Program Click in the upper right corner of each application program window to exit the current application program. 4. Software Uninstall Click in the Windows desktop, select , and then enter , find... -
Page 90: Chapter 3: Service
(1) year for main unit and three (3) months for all accessories from the date of sale by BMC Medical Co., Ltd. to the dealer. During the warranty period, BMC Medical Co., Ltd. will correct any defects in material or workmanship to conform to specifications, free of charge. - Page 91 YH-600B Pro User Manual V3.0 MANUFACTURER: BMC Medical Co., Ltd. Room 110 Tower A Fengyu Building, No. 115 Fucheng Road, Haidian, 100036 Beijing, PEOPLE’S REPUBLIC OF CHINA URL: en.bmc-medical.com E-mail: intl@bmc-medical.com Tel: +86-10-51663880 Fax: +86-10-51663880 Ext. 810 EU AUTHORISED REPRESENTATIVE: Shanghai International Holding Corp.
- Page 92 390399...
Need help?
Do you have a question about the YH-600B Pro and is the answer not in the manual?
Questions and answers