Advertisement
Quick Links
Thank you for purchasing our Studio Designs, Inc.
Gracias por comprar nuestro mueble Studio Designs, Inc.
Merci d'avoir acheté un meuble Studio Designs, Inc.
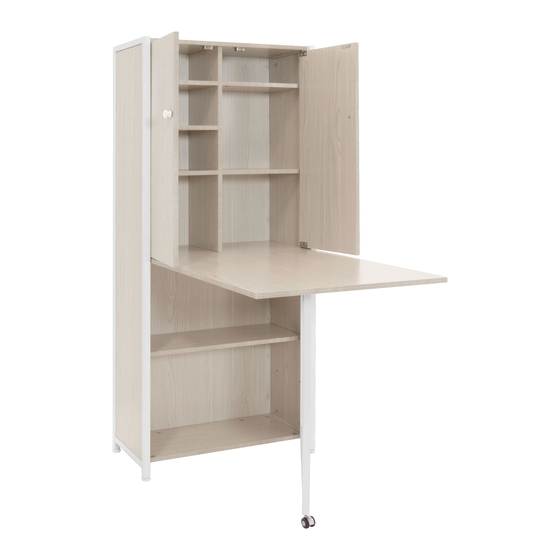
CRAFT ARMOIRE
#13375 White/Birch • Blanco/Abedul • Blanc/Bouleau
Office: 562.942.0492
Product Support Line: 866.942.0492
www.studiodesigns.com
Rev. 3.14.2018
Advertisement

Subscribe to Our Youtube Channel
Related Manuals for Studio Designs 13375


Summary of Contents for Studio Designs 13375
- Page 1 Thank you for purchasing our Studio Designs, Inc. Gracias por comprar nuestro mueble Studio Designs, Inc. Merci d’avoir acheté un meuble Studio Designs, Inc. CRAFT ARMOIRE #13375 White/Birch • Blanco/Abedul • Blanc/Bouleau Office: 562.942.0492 Product Support Line: 866.942.0492 www.studiodesigns.com Rev. 3.14.2018...
- Page 2 ASSEMBLY INSTRUCTIONS - IMPORTANT: Carefully unpack and identify each component before attempting to assemble. Refer to parts list. Please take care when assembling the unit and always set the parts on a clean, soft surface. Do not use power tools to assemble.
- Page 3 PARTS LIST / LISTA DE PARTES / LISTE DES PIÈCES DÈTACHÉES DESCRIPTION / DESCRIPCIÓN / DESCRIPTION QTY / CANT/ QTÉ PICTURE / DIBUJO / IMAGE Left Frame Armazón Izquierdo Cadre Gauche Right Frame Armazón Derecho Cadre Droite Pata Jambe Rear Panel Panel Trasero Panneau Arrière Top Panel...
- Page 4 PARTS LIST / LISTA DE PARTES / LISTE DES PIÈCES DÈTACHÉES DESCRIPTION / DESCRIPCIÓN / DESCRIPTION QTY / CANT/ QTÉ PICTURE / DIBUJO / IMAGE 16. Phillips Screw - 1/2" Tornillo de Cruz - 14mm Vis Cruciforme - 14mm 17. Cam Lock Cerradura de Leva Serrure à...
- Page 5 Set Left Frame (1) and Right Frame (2) aside for now. Deje el Armazón Izquierdo (1) y el Armazón Derecho (2) a un lado por el momento. Laissez le Cadre Gauche (1) et le Cadre Droite (2) mettre de côté pour l’instant. Craft Armoire...
- Page 6 18 27 Flip over. De veulta. Tourner. Cam Lock Instructions Instalación de Cerradura de Leva Installation de Serrure à Came Arrow on Cam Lock faces the Bolt. Flecha en Cerradura da hacia el Perno. Flèche dans Serrure pointant au Boulon. Craft Armoire...
- Page 7 The vinyl finish faces up. El acabado de vinilo da hacia arriba. La finition de vinyle fait face le haut. The vinyl finish faces up. El acabado de vinilo da hacia arriba. La finition de vinyle fait face le haut. Craft Armoire...
- Page 8 Slide Bolts on Panel (5) into holes first, then lift Panel (9) onto two Bolts. Primero deslice los Pernos en Panel (5) adentro de los agujeros, luego levante el Panel (9) y coloque sobre dos Pernos. Glissez d’abord les boulons du Panneau (5) dans les trous, puis soulevez le Panneau (9) et placez-le sur deux boulons.
- Page 9 Make sure all Bolts and Dowels go into holes. Lift Rear Panel (4) slightly to help align holes with Bolts. Asegúrese de que todos los Pernos y Clavijas entren en los agujeros. Levante el Panel Trasero (4) ligeramente para ayudar a alinear los agujeros con los Pernos. Assurez-vous que tous les Boulons et Goujons entrer dans les trous.
- Page 10 Craft Armoire p.10...
- Page 11 Close Leg and Table, then carefully lift Armoire upright. Cierre la Pata y la Mesa, luego levante cuidadosamente el mueble en posición vertical. Fermez la Jambe et la Table, puis soulevez délicatement l’armoire. CAUTION!: Use two people. ¡PRECAUCIÓN!: Use dos personas. PRÉCAUTION: Utilisez deux personnes.
- Page 12 Two people are recommended. Dos personas son recomendadas. Deux personnes sont recommandées. Insert Bracket on Door into bottom hole, then insert another Bracket into the top hole and attach Door - see arrow. Inserte el Soporte en la Pueta en el agujero de fondo, luego inserte otro Soporte en el agujero superior y fije la Puerta - vea la flecha.
-
Page 13: Limited Warranty
GARANTIE LIMITÉE Studio Designs (la « Compagnie ») garantit à l’acheteur original que ce produit sera exempt de tout défaut de fabrication et matériel s’il est utilisé à la maison et dans des conditions d’exploitation normales, tel que décrit à la présente. La Compagnie réparera ou remplacera, à...
Need help?
Do you have a question about the 13375 and is the answer not in the manual?
Questions and answers