Advertisement
Quick Links
Thank you for purchasing our Studio Designs, Inc.
Gracias por comprar nuestro mueble Studio Designs, Inc.
Merci d'avoir acheté un meuble Studio Designs, Inc.
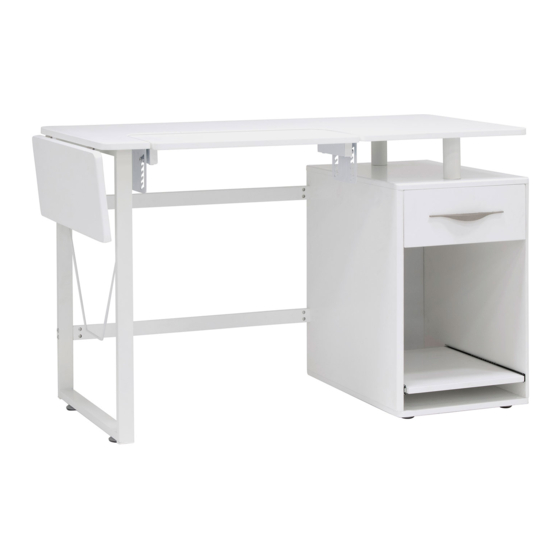
PRO-LINE SEWING TABLE WITH SIDE PANEL
#13397 White/White • Blanco/Blanco • Blanc/Blanc
Office: 562.942.0492
Product Support Line: 866.942.0492
www.studiodesigns.com
Rev. 8.12.2019
Advertisement

Related Manuals for Studio Designs Sew Ready PRO-LINE 13397


Summary of Contents for Studio Designs Sew Ready PRO-LINE 13397
- Page 1 Thank you for purchasing our Studio Designs, Inc. Gracias por comprar nuestro mueble Studio Designs, Inc. Merci d’avoir acheté un meuble Studio Designs, Inc. PRO-LINE SEWING TABLE WITH SIDE PANEL #13397 White/White • Blanco/Blanco • Blanc/Blanc Office: 562.942.0492 Product Support Line: 866.942.0492 www.studiodesigns.com...
- Page 2 ASSEMBLY INSTRUCTIONS - IMPORTANT: Carefully unpack and identify each component before attempting to assemble. Refer to parts list. Please take care when assembling the unit and always set the parts on a clean, soft surface. Do not use power tools to assemble.
- Page 3 PARTS LIST / LISTA DE PARTES / LISTE DES PIÈCES DÈTACHÉES DESCRIPTION / DESCRIPCIÓN / DESCRIPTION QTY / CANT/ QTÉ PICTURE / DIBUJO / IMAGE A. Desktop Mesa Table B. Sewing Platform Plataforma de Costura Plateforme de Couture C. Bar for Sewing Platform Barra para Plataforma de Costura Barre pour Plate-form de Couture D.
- Page 4 PARTS LIST / LISTA DE PARTES / LISTE DES PIÈCES DÈTACHÉES DESCRIPTION / DESCRIPCIÓN / DESCRIPTION QTY / CANT/ QTÉ PICTURE / DIBUJO / IMAGE K. Handle Manija Poignée L. Top Frame Armazón Superior Cadre Supérieure M. Left Frame Armazón Izquierdo Cadre Gauche N.
- Page 5 PARTS LIST / LISTA DE PARTES / LISTE DES PIÈCES DÈTACHÉES DESCRIPTION / DESCRIPCIÓN / DESCRIPTION QTY / CANT/ QTÉ PICTURE / DIBUJO / IMAGE U. Rear Crossbars Barras Traseras Barres Arrière Support for Side Shelf Soporte para Estante Lateral Support pour Étagère Latarale W.
- Page 6 PARTS LIST / LISTA DE PARTES / LISTE DES PIÈCES DÈTACHÉES DESCRIPTION / DESCRIPCIÓN / DESCRIPTION QTY / CANT/ QTÉ PICTURE / DIBUJO / IMAGE 6. Allen Bolt - 1/4" x 1-1/8" Perno Allen - 6mm x 30mm Boulon Allen - 6mm x 30mm 7.
- Page 7 Slot faces in. Ranura hacia adentro. Rainure vers l’intérieur. Insert Cam Lock (3) into hole with arrow pointing towards the bolt. Turn with screwdriver until firm, but do not overtighten. Inserte la Cerradura de Leva (3) en el agujero con la flecha apuntando hacia el perno. Apriete con un destornillador hasta que esté...
- Page 8 Holes face out and are located near the top. Agujeros dan hacia afuera y están ubicados cerca de la cima. Trous vers l’extérieur et sont situés près du sommet. Pro-Line Sewing Table with Side Panel...
- Page 9 Slot faces in. Ranura hacia adentro. Rainure vers l’interieure. Pro-Line Sewing Table with Side Panel...
- Page 10 Round corner. Make sure all bolts and Esquina redonda. dowels go into holes. Coin rond. Asegúrese de que todos los pernos y clavijas entren en los agujeros. Assurez-vous que tous les boulons et les goujons entrent dans les trous. Pro-Line Sewing Table with Side Panel p.10...
- Page 11 Pro-Line Sewing Table with Side Panel p.11...
- Page 12 Pro-Line Sewing Table with Side Panel p.12...
- Page 13 Note the holes. Note los agujeros. Notez les trous. Pro-Line Sewing Table with Side Panel p.13...
- Page 14 Caution: Use two people. Precaución: Use dos personas. Précaution: Utilisez deux personnes. Pro-Line Sewing Table with Side Panel p.14...
- Page 15 Insert Bolt Connector (13) with holes facing Bolt (14). Rotate with screwdriver if necessary. Inserte el Conector de Perno (13) con los orificios orientados hacia el perno (14). Gire con un destornillador si es necesario. Insérez le Connecteur de Boulon (13) avec les trous orientés vers le boulon (14). Tourner avec un tournevis si nécessaire.
- Page 16 Pro-Line Sewing Table with Side Panel p.16...
- Page 17 Pull ball bearing sliders forward, then align with Sliding Shelf (S), and genly push in. Jale los rieles de balin hacia adelante, luego alinee con el Estante Deslizante (S) y empújelo suavemente hacia adentro. Tirez les glissières à billes vers l’avant, puis alignez-les sur L’étagère Coulissante (S) et poussez-les doucement.
- Page 18 Squeeze together and insert into holes, then push the end into plastic clips on shelf. Apriete e inserte en los agujeros, luego inserte el extremo en los enganches en el estante. Presser et insérez dans les trous, puis enfoncez l’extrémité dans les pinces sur l’étagère. Pro-Line Sewing Table with Side Panel p.18...
-
Page 19: Limited Warranty
GARANTIE LIMITÉE Studio Designs (la « Compagnie ») garantit à l’acheteur original que ce produit sera exempt de tout défaut de fabrication et matériel s’il est utilisé à la maison et dans des conditions d’exploitation normales, tel que décrit à la présente. La Compagnie réparera ou remplacera, à...
Need help?
Do you have a question about the Sew Ready PRO-LINE 13397 and is the answer not in the manual?
Questions and answers