Table of Contents
Advertisement
Quick Links
Advertisement
Table of Contents

Related Manuals for Daymak Ebikeinabox


Summary of Contents for Daymak Ebikeinabox
- Page 1 User Manual...
-
Page 2: Safety
Safety When operating the Ebikeinabox please make sure you adhere to the following: • Always wear a helmet when riding the Ebikeinabox. • Always check your mirrors and blind spots when operating the vehicle. • Turn on headlights when in need of additional visibility. -
Page 3: About Daymak
Daymak warranties, services, and stocks parts for everything it sells. We support our products. Please feel free to visit our website. You’ll find the latest in cool transportation... -
Page 4: Introduction
Liability Daymak does not assume any liability for damages, loss of profits, or claims from third parties due to improper use of this product. Daymak does not assume any liability for damages due to problems with the product resulting from service by a third party that is not certified by Daymak. -
Page 5: Table Of Contents
• CHARGING THE EBIKEINABOX • OPERATION • DISPLAY • DISPLAY ADVANCED • HANDLEBAR • FOLDING THE EBIKEINABOX • FOLDING THE EBIKEINABOX (CONT’D) • PEDALS • SEAT • TIRES • TECHNICAL DATA • VEHICLE IDENTIFICATION NUMBER (VIN) • MAINTENANCE AND TROUBLESHOOTING •... -
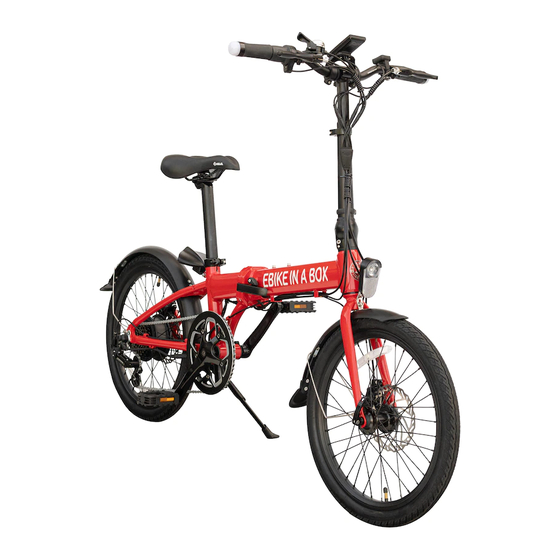
Page 6: Part Diagrams
Part Diagrams Diagram 1: Ebikeinabox This diagram illustrates the various parts of your bicycle. Please note that many of these parts are not user-serviceable and should be repaired only by trained professionals. This is especially true of the electrical systems and the mechanical components. -
Page 7: Riding Instructions
Riding Instructions This guide assumes that you already know how to ride a standard bicycle. Before you try to ride an electric bicycle, you should be very familiar with controlling and balancing a normal bicycle. Caution If you do not have cycling experience, an e-bike is too dangerous to ride. Do not begin learning to ride a bicycle using an e-bike. - Page 8 Items to Carry with the Electric Bike It is a good idea to carry the following items with you at all times when you ride your e-bike. • The charger, to charge the bike in case the battery power runs out. •...
- Page 9 Warning When you activate the e-bike, the electrical system becomes live. Do not try to affect changes to the E-Bike (such as removing the battery or repairing electrical components) while the E-Bike is activated. Turn the E-Bike off and remove the key before you attempt to access any of the electrical components.
- Page 10 Signalling Turning Signal Lights Your e-bike has turn signal lights. The turn signal activator is on the left handlebar. Push it left or right to activate it to indicate that you are turning in the appropriate direction. Lights The headlight and tail light are useful features when you are riding at night or in dark areas. They radically improve your safety in mixed traffic.
- Page 11 Riding in Cold Weather Your e-bike is designed to operate year-round. However, in very cold conditions or when there is a lot of snow or slush on the ground, it is possible for the motor in the e-bike to get wet or for the brakes to function less effectively, just as it can happen in wet weather.
-
Page 12: The Battery
The Battery This section details what you need to know about the battery that powers your e-bike. Always remember to treat your e-bike’s electrical systems with respect. Battery Power The dashboard has a battery charge indicator. When the e-bike is activated, the guage will jump and indicate the currently available battery power. -
Page 13: Charging Your E-Bike
If your charger’s LED status light does not change from red to green over an extended period of time, for perhaps more than 6 hours, and the battery is very hot, the battery or charger may need replacing. Stop charging and bring both to your Daymak dealer immediately. Do not charge the battery. -
Page 14: Understanding Your Voltage
Underneath each reading on the above chart shows a number and a “S” this represents how many series are in your battery pack. To know the exact series of your battery contact your local Daymak dealer. -
Page 15: Assembling The Ebikeinabox
Once the bike is charging the charger will glow red. When the unit is fully charged the charger will glow green and then your bike is ready to go. Warning Do not leave the Ebikeinabox charging for long periods of ti me aft er it is fully charged. Once the bike is charged unplug it ASAP. - Page 16 Contact your local Daymak dealer to purchase a new battery. When replacing your battery, dispose of it at a proper municipal battery recycling facility.
-
Page 17: Operation
Operation Right handle bar 1. Shift Gears Up - Press this butt on to shift the manual gears up. Only do this while pedalling to keep the gear alignment. 2. Thrott le - Turn this towards you to engage the motor automati cally. Left handle bar 3. - Page 18 Bluetooth Torch / Flashlight This unit comes with a Bluetooth torch / fl ashlight that connects wirelessly to your smart phone to play music, answer phone calls, charge your phone, and play the radio. 1) Press this to turn on / off the fl ashlight 2) Press this to change to the next song / station.
-
Page 19: Display
Display The Ebikeinabox comes with a back lit LED display that shows the performance of your bike. 1) Speed - This shows the speed that you are travelling in. 2) Battery Power - This shows how much battery power you have left. 5 Bars is fully... -
Page 20: Display Advanced
1 minute and 9 in 9 minutes. Press up and down to change settings repsectively PD - The last setting is a password to get into the dealer settings. Please bring to a local Daymak dealer in case these settings need to be accessed. -
Page 21: Handlebar
Handlebar The Ebikeinabox comes with an adjustable handlebar both in positi on, and height. To adjust the height of the handle bar fi nd the latch as seen below and pry it open. Once open you can move the handlebar up and down to your desired height and the clamp it again. -
Page 22: Folding The Ebikeinabox
Folding the ebikeinabox The Ebikeinabox as you should already know is fully foldable! Once completely folded it will look like below. To fold it follow these simple steps! Find the folding mechanism on the side of the bike as seen below. Lift the folding latch lock up. Then pull the latch to the left (it requires a litt le bit of force) Take the silver handle that is revealed and pull it to the right and up. -
Page 23: Folding The Ebikeinabox (Cont'd)
The Ebikeinabox comes with pedals so you can manually operate the machine or engage the pedal assit. These pedals are foldable and can be pushed in and then folded up when not in use. These... -
Page 24: Seat
Seat The Ebikeinabox comes with a quick release seat post that you can adjust the height quickly as you need. You can also remove this enti rely and put it aside for when you are storing it when folding. To do so, take the latch as seen in the picture below and pry it open, and then once the seat is in the desired positi on, clamp it closed again. -
Page 25: Technical Data
This section provides you with the technical specifications for your e-bike. The Motor and Wheel Assembly The Ebikeinabox has a 250 Watt magnetic DC brushless motor on the rear wheel hub. This type of motor has excellent low-end torque and high efficiency when working within its range. -
Page 26: Vehicle Identification Number (Vin)
This is also required for registering your warranty on the warranty secti on of Daymak.com. To fi nd the VIN on your Ebikeinabox look on the left hand side of the steering column right above the front... -
Page 27: Maintenance And Troubleshooting
Maintenance and Troubleshooting This section outlines problems you may have and solutions you may be able to use. Many of the parts in this product are not user-serviceable and should be repaired by trained professionals. This is especially true of the electrical systems and the mechanical components. - Page 28 Daymak dealer. The Motor Do not service the motor yourself. Bring the e-bike to your Daymak dealer for service. The motor in your e-bike is a highly complex and fine-tuned mechanism. Repairing it requires significant expertise. We suggest maintenance every 100 running hours or so.
-
Page 29: Ebike Maintenance
Ebike Maintenance Cleaning Cleaning is extremely important this will ensure your e-bike will serve you for a long time. In the long run, it will save you money and a lot of time waiting for the bike to be repaired. You should clean your ebike weekly. - Page 30 Schedule The frequency of maintenance depends on how much you ride and under which conditions. Recreational riders needs far less maintenance then off-road riders. The harder you ride, the more you have to take care of your bike if you want it to last. There are various time intervals for proper maintenance.
-
Page 31: Specifications
Specifications Name Ebikeinabox Motor 250W Voltage Amp Hour 7.8AH Watt Hours 281WH Battery Life 1000 cycles Battery Lithium Ion Removable Battery Charger 42V 4.0A Charge Time 1 - 2 Hours Lights Max Load 250 lbs. Assembled Weight 41 lbs Assembled Length 60"... - Page 32 22" TT 5" HT Rear / Basket Storage Under Seat Storage Rear / Basket Storage Volume Under Seat / Glove Storage Occupancy Alarm Steering Lock Center Kickstand Foldable Folded Dimenison 36" x 27" x 18" Thank you for choosing Daymak...
Need help?
Do you have a question about the Ebikeinabox and is the answer not in the manual?
Questions and answers