
Related Manuals for Formax AutoSeal FD 2056

Summary of Contents for Formax AutoSeal FD 2056
- Page 1 FD 2056 AutoSeal ® FE 2056 AutoSeal ® Pressure Sealer OPERATOR MANUAL FIRST EDITION 9/2020...
-
Page 3: Table Of Contents
TABLE OF CONTENTS SUBJECT PAGE DESCRIPTION SPECIFICATIONS UNPACKING & SETUP 2 - 3 CONTROL PANEL OPERATION 5 - 6 AUTOBATCH COUNTING MODE CUSTOM FOLDS SETUP 8 - 10 MEASURING FOLD LENGTHS RECALLING, EDITING & DELETING SAVED CUSTOM FOLDS SETUP 12 - 13 OPERATOR SETTINGS Standard/Metric Settings Standard Fold Override... -
Page 5: Description
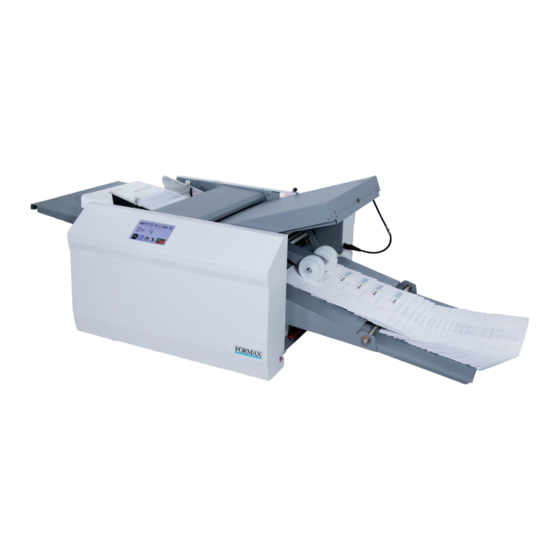
DESCRIPTION Non Operator Side Self Centering Paper Top Cover Upper Fold Table Side Guides Infeed Tray Stacker Wheels Infeed Tray Extension Telescoping Outfeed Stacker Infeed Tray Lever Lower Fold Table Control Panel Operator Side The FD 2056 Pressure Sealer is designed to process a variety of form sizes and weights. The fold tables are automatically adjusted for standard folds and custom folds. -
Page 6: Unpacking & Setup
UNPACKING & SETUP Check package for shipping damage. If there is shipping damage, do not discard the box. Remove the machine and packed components from the box. The fold tables, telescoping stacker, and power cord are wrapped separately in the box. NOTE: Two people must lift the machine from the box. - Page 7 Upper Fold Table Receptacle Location 4. Plug the fold table cables into the receptacles on the side frame (Fig. 3 & 4). Fig. 3 Plug in Receptacle Lower Fold Table Receptacle Location Fig. 4 Plug in Receptacle 5. Insert the telescoping extension tray into the end of the outfeed conveyor (Fig.
-
Page 8: Control Panel
CONTROL PANEL - Home Screen Interface No. NAME FUNCTION Resettable Counter Displays the number of the forms processed, can be reset between each job Counter Reset Icon Resets the counter to “0” Speed Decrease Icon Press to decrease the processing speed Speed Level Display Speed percentage Speed Increase Icon... -
Page 9: Operation
OPERATION Place power switch in the ON / “I” position. Extend the catch tray as required. Set the self-centring paper side guides for the width of the forms and lock in position using thumbscrews. (Fig. 6) Fig. 6 Self centering side guides Operator side Adjust infeed tray tension lever (Fig. - Page 10 Fold selection icon Select the type of fold desired by pressing the fold selection icon (Fig. 9). Note: If the fold selection icon shows the desired fold press the “Start/Stop” icon to begin processing forms. Fig. 9 “Start/Stop” icon Test Button Standard folds selection icons 10.
-
Page 11: Autobatch Counting Mode
AUTOBATCH COUNTING MODE The AutoBatch feature can be set to count down the number of sets in a batch, the number of sheets in each set, and the delay between each set. To enter the AutoBatch Mode press icon on the main screen (Fig. 12a). To enter the number of sets press the icon Invoices... -
Page 12: Custom Folds Setup
FD 2056 CUSTOM FOLDS SETUP The FD 2056 has 36 custom fold settings that can be stored into memory for recurring jobs with fold settings that vary from the standard fold settings. To create a custom fold, from the Home Screen press the fold selection icon access the fold selection screen (Fig. - Page 13 FD 2056 CUSTOM FOLDS SETUP, cont. Next set the automatic outfeed stackers. There are 10 stacker positions available. Select the one that best matches the size of the folded document. Using the touch pad key in the stacker position (Fig. 17), key in 0 - 9 based on the chart below.
- Page 14 FD 2056 CUSTOM FOLDS SETUP, cont. Key in the name of the job (Fig. 20) and press the save Brochure Job name icon in the bottom right corner. Fig. 20 Save icon Custom Job list Select the custom job and press the blue enter icon to set the fold stops (Fig.
-
Page 15: Measuring Fold Lengths
Measuring Fold Lengths Use the examples below to help determine the fold lengths for custom fold settings. Example 1: “Z” Fold Measure the length of panel “A”, enter this number as the upper Panel A fold table measurement. Measure the length of panel “B”, enter this number as the lower fold table measurement. -
Page 16: Recalling, Editing & Deleting Saved Custom Folds Setup
RECALLING, EDITING & DELETING SAVED CUSTOM FOLDS SETUP To recall, edit, or delete a saved custom fold from the home screen press the saved job icon (Fig. 22). Saved Job Icon Fig. 22 Custom Job list From the saved custom job screen you can recall a job, edit, rename, or delete a stored custom fold. - Page 17 RECALLING, EDITING & DELETING SAVED CUSTOM FOLDS SETUP To edit a previously saved job, select the job from the list and press the edit icon (Fig. 23). From the fold setup screen use the same process as setting a custom fold to edit the job settings (Fig.
-
Page 18: Operator Settings
OPERATOR SETTINGS A number of operator settings can be adjusted to personalize the FD 386 / FD 38Xi. This includes changing between standard and metric settings, number of test sheets, Fold and Stacker Override, and Standard Fold Override. This section will review each setting and how to adjust them. If needed, there is a Default Settings option that will reset to factory settings. -
Page 19: Standard Fold Override
Standard Fold Override Icon Standard Fold Override It may be necessary to adjust the factory set standard fold settings for a particular fold type and paper size. inch This can be done in the Standard Fold Override Mode. From the Operator Settings menu select the Standard Fold Override icon (Fig. -
Page 20: Test Sheet Setting
Test Sheet Setting The number of test sheets can be changed between 1, 2 or 3. From the Operator Settings Menu press the Test Icon to access Test Sheet Setting (Fig. 35). inch inch Fig. 35 The number of test sheets can be changed to 1, 2, or 3. Press the corresponding test button and then press the enter icon to save the selection. -
Page 21: Removing Roller Cover
REMOVING ROLLER COVER Roller cover The roller cover can be removed to access the sealing rollers. To remove, unscrew thumbscrews that hold the cover in place. (Fig. 39) Fig. 39 Thumbscrews REMOVING INFEED TIRES The infeed tires can easily be removed for cleaning and replace- ment. -
Page 22: Daily Maintenance / Cleaning Procedures
2. Clean infeed tires and fold rollers with Formax recommended roller cleaner & rejuvenator to remove paper dust and toner. A Formax Cleaner Kit is available from your dealer. A damp cloth with water is the best alternative. -
Page 23: Error Screens
ERROR SCREENS Paper Misfeed / Paper Jam FD 386/38Xi Touch Screen -Error Screens FD 386/38Xi Touch Screen -Error Screens Paper Jam Paper misfeed Paper Jam Paper misfeed D 342 Touch Screen -Error Screens per Jam Paper misfeed A misfeed has occurred. Reset the stack of paper in the infeed and press the icon to resume operation. - Page 24 TROUBLE-SHOOTING TROUBLE POSSIBLE CAUSE REMEDY Control panel is not Power switch turned off. Turn on power switch. illuminated. No power at the wall outlet. Check wall outlet. No power to the machine inlet. Check power cord for frayed/broken wires. No power to the control panel. Press the button on the circuit breaker.
-
Page 25: Troubleshooting / Clearing Paper Jams
TROUBLESHOOTING Clearing Paper Jams WARNING: Turn off machine and unplug cord from its receptacle If a jam occurs between the metal seal rollers, open the top cover, unplug and remove the upper fold table. Remove the jam clearing tool (located under the upper fold table), apply the tool to the upper metal roller (Fig. 43), and turn clockwise until the paper jam is clear. -
Page 26: Determining Fold Type
FOLD TYPE DETERMINING Two Standard Folds 11” “Z” & 11” “C” Refer to Operator Manual for custom fold setup. Leading glue edge Glue Glue 11” “Z” Fold 11” “Z” Fold Leading glue edge Glue Glue 11” “C” Fold 11” “C” Fold... -
Page 27: Fine Tuning Fold Test Sheet
Leading Edge Make copies of this page on copy paper for fine tuning folds Instruction For Lining Up Folds 1. Place a stack of these sheets into the feeder and fold one (1) or two (2) sheets. Leading Edge Fold “A” Fold “B”...
Need help?
Do you have a question about the AutoSeal FD 2056 and is the answer not in the manual?
Questions and answers