Advertisement
Quick Links
Advertisement

Related Manuals for STX International Magnum


Summary of Contents for STX International Magnum
- Page 1 STX Magnum Electric Meat Grinder Instructions...
-
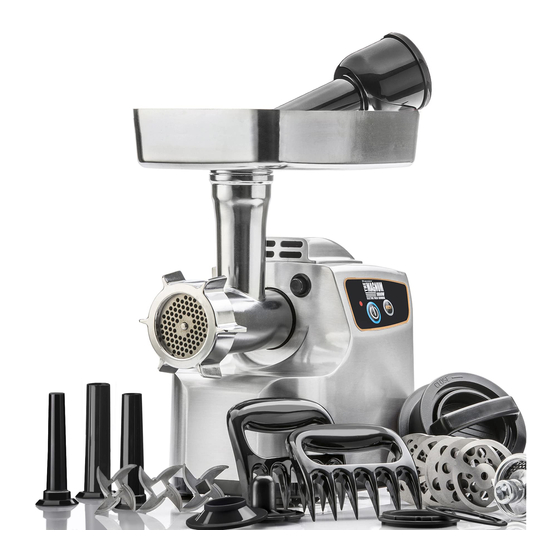
Page 3: Specifications
SPECIFICATIONS Model STX-1800-MG Power Supply 110/120 V, 60 Hz Net/Gross Weight 13.0 lbs. / 14.0 lbs. Overall Dimensions (L x W x H) 14” x 7.5” x 11.5” PARTS LIST AND PLACEMENT 1. Front Grinding Head Locking Cap (Screw Cap) 2. -
Page 4: Safety Precautions
SAFETY PRECAUTIONS Please read all instructions prior to operating this appliance. Please keep this manual for future reference. Failure to comply with the safety instructions and/or operating instructions contained in this manual will void any warranty. The manufacturer/seller accepts no liability for damages caused by failure to comply with the owner’s manual or negligent use of this product. - Page 5 STX International for OEM replacement. (See Contact Information on the back of this manual) STX International will only use original OEM parts when/ if replacement is necessary. See warranty in the back of the manual.
- Page 6 GRINDING HEAD ASSEMBLY 1. Holding the grinding head at a 45° angle, insert it into the round black hole on the front of the main unit (Figure 1). 2. Turn the grinding head counter clockwise until it is straight and the black button located to the upper right on the front of the grinder pops out.
- Page 7 MEAT GRINDING ASSEMBLY 1. Insert the auger into the front of the grinding head with the hexagonal tip of the auger facing towards the back (Figure 4). When you insert the auger, you may have to twist it just a little until you feel it set into the motor housing.
- Page 8 MEAT PREPARATION The temperature of the meat is VERY IMPORTANT. Your meat should be as COLD AS POSSIBLE without being frozen solid. Most professional butchers grind their meat at 34° Fahrenheit. The consistency should be crunchy to the touch – NOT frozen solid. If your meat is not cold enough when you grind, it may ball-up in the front of the grinding head and may result in charring of the meat and meat by-products (fat, blood, etc.).
- Page 9 HOW TO GRIND MEAT 1. Choose which grinding plate you wish to use and install it into the grinding head (see Meat Grinding Assembly on page 5). 2. Cube or strip your chilled meat and put the meat into the meat hopper on the top of the assembled grinder.
- Page 10 STUFFING SAUSAGE ASSEMBLY 1. Insert the auger into the front part of the grinding head with the hexagonal tip of the auger facing towards the back (Figure 8). When inserting the auger, you may have to twist it just little until you feel it set into the motor housing.
- Page 11 HOW TO STUFF SAUSAGE 1. Grind the meat to the proper consistency you desire for your sausage (See How to Grind Meat on page 7). 2. Add water and the spices of your choice to the mixture. Mix thoroughly and chill overnight in the refrigerator. Note that you do not have to refrigerate the mix prior to stuffing, however, it will stuff better and easier if you let it set and chill overnight.
- Page 12 KUBBE ATTACHMENT ASSEMBLY When using the Kubbe Attachment: • Do not use a cutting blade or a grinding plate. • The meat must be prepared beforehand, prior to using the Kubbe Attachment (See How to Grind Meat on page 7). •...
- Page 13 WHAT IS KUBBE? Kubbe is a traditional Middle Eastern appetizer comprised of a small football shaped shell filled with meat (usually bulgur wheat and lamb). The center section is often stuffed with spiced minced lamb filling and the ends are sealed. Kubbe is usually deep fried resulting in a crispy outside with a delicious filling.
- Page 14 B.A.R.F. DIET FOR PETS (BONES AND RAW FOOD) The internet is loaded with accolades and recipes for feeding your pet the B.A.R.F. diet. Millions of pet owners rave about everything from shinier coats, higher energy levels, and relief from allergies after switching from cheap or expensive store bought pet food to healthier homemade pet diets.
-
Page 15: Washing Instructions
WASHING INSTRUCTIONS GENERAL WARNINGS: • Any type of bleaching solutions containing chlorine will discolor the aluminum surfaces. • Thinners and benzenes will crack or change the color of the unit and should never be used to clean this meat grinder. •... - Page 16 GRINDING PLATES The grinding plates are made of tempered steel. 1. Wash these in liquid dish washing detergent and hot water. 2. Towel dry IMMEDIATELY and THOROUGHLY. 3. Rub them with some cooking oil (or spray). 4. Store them SEPARATELY in plastic bags until the next use to prevent rusting.
-
Page 17: Warranty
WHO MAY USE THIS WARRANTY? STX International a/k/a Mercantile Station 2, Ltd. and Paradigm Alley USA located at 2159 Magnum Circle, Lincoln, Nebraska 68522 (“we”) extend this limited warranty only to the consumer who originally purchased the product in the United States, the District of Columbia or Canada (“you”). It does not extend... - Page 18 SOME STATES HAVE DIFFERENT LIMITATIONS OF LIABILITY AND EXCLUSIONS, SO THE ABOVE LIMITATION OR EXCLUSION MAY NOT APPLY TO YOU. STX International Product Mercantile Station 2, LTD (a/k/a Paradigm Alley USA) 2159 Magnum Circle, Lincoln, NE 68522 Info@STXInternational.com • www.STXInternational.com - 16 -...
- Page 20 Our Business Hours are: Monday - Thursday: 8am - 4pm CST Friday: 8am - Noon CST If you would like to shop for other STX International Products Please visit our website www.STXInternational.com Mercantile Station 2, LTD (a/k/a Paradigm Alley USA) 2159 Magnum Circle, Lincoln, NE 68522 •...
Need help?
Do you have a question about the Magnum and is the answer not in the manual?
Questions and answers