
Related Manuals for emerio SEW-121820.1


Summary of Contents for emerio SEW-121820.1
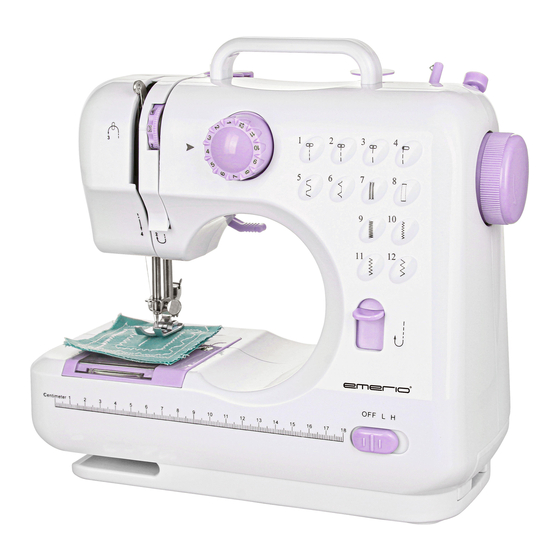
- Page 1 SEW-121820.1 Sewing Machine (EN) Nähmaschine (DE) Machine à coudre (FR) Naaimachine (NL) Maszyna do szycia (PL)
-
Page 2: Table Of Contents
Content – Inhalt – Teneur – Inhoud – Treść Instruction manual – English ..................- 2 - Bedienungsanleitung – German ................- 16 - Mode d’emploi – French ..................- 31 - Gebruiksaanwijzing – Dutch ..................- 45 - Instrukcja obsługi – Polish ..................- 59 - - 1 -... -
Page 3: Instruction Manual - English
Instruction manual – English SAFETY INSTRUCTIONS Before use make sure to read all of the below instructions in order to avoid injury or damage, and to get the best results from the appliance. Make sure to keep this manual in a safe place. - Page 4 cleaning the machine; after each use. 6. Never run the machine when there’s thread in the needle, but no fabric on the machine. This could damage the machine. 7. Always keep your hands away from the needle, hand wheel, upper thread tension dial and pattern selection dial when the appliance is running.
- Page 5 SEW-121820.1 PARTS IDENTIFICATION Front view Take-up lever Upper thread tension dial Pattern selection dial Thread cuter Light Needle clamp screw Bottom bobbin Drawer Hand wheel 10. Reverse button 11. Power & speed switch Back view Bobbin winder pin Bobbin winder stop...
- Page 6 2. Turn the sewing machine over on a flat surface and remove the battery compartment cover. 3. Insert 4xAA batteries into the compartment and replace the battery cover. Caution: To prevent the accidental start-up of the sewing machine, always make sure that the “Power & speed switch”...
- Page 7 Fig.3 Fig.4 Fig.5 Fig.6 THREADING THE SEWING MACHINE 1. Threading upper thread Caution: Always switch off the appliance, disconnect the appliance from the power supply and remove the foot pedal when threading the machine. 1) Turn the hand wheel to raise the needle to its highest position. 2) Put a spool on the thread spindle, put on the thread spindle cover and then pull out the thread.
- Page 8 2. Replacing the bottom bobbin 1) Slide the bobbin cover button to the right and remove the bobbin cover (Fig.7). 2) Put the new bobbin in the holder, with the thread going clockwise. Leave 10cm of thread hanging out (Fig.8). 3) Hold the end of the upper thread with one hand, and turn the hand wheel counterclockwise with the other hand, the needle thread will pick up the bobbin thread and pull it up through the hole under the needle (Fig.9).
- Page 9 Fig.9 Fig.10 SEWING 1. Turn the hand wheel counterclockwise to raise the needle to its highest position. 2. Raise the presser foot lifter and place the fabric you want to sew under the presser foot (Fig.11). 3. Lower the presser foot. (Fig.12). 4.
- Page 10 Fig.13 Fig.14 FEATURES 1. Selection of stitch pattern Rotate the pattern selection dial to select one pattern you want from the 12 stitch patterns. There are pattern illustrations on the surface of machine body for your reference. Caution: Before you change the stitch pattern, please turn off the switch and turn the hand wheel to raise the needle all the way up so it doesn’t get stuck and bent.
- Page 11 6. Sewing sleeves This sewing machine has been designed to sew sleeves or any narrow openings in garment. Lift the presser foot. Position the garment over the sewing arm. Lower the presser foot and follow the regular sewing instructions. 7. Manual buttonhole 1) Pull the cloth under the presser foot and lower the presser foot on the cloth where you need to sew buttonhole, then choose the 8 stitch.
- Page 12 WINDING THE BOBBIN 1. Put a spool of thread on spool pin. (Fig.20) 2. Guide the thread through the bobbin winder tension disk on the upper side of the machine. (Fig.21) 3. Put the bobbin on the bobbin winder pin, wind thread clockwise around bobbin several times. (Fig.22) 4.
- Page 13 ADJUSTING STITCHING 1. As shown in the Fig.A, normal stitching shall have top and bottom threading evenly, neither over tight nor loose. (① = Top thread; ② = Cloth; ③ = Bottom thread) Fig.A 2. If the bottom threading looks like a straight line (Fig.B), which indicates the top thread is too loose. Please turn upper thread tension dial to direction with bigger number to increase pressure until the stitching returns to normal.
- Page 14 Sewing effective: √:means easy to sew ×:means difficult to sew △:means not smooth to sew Note: 1. The definition of the fabric thickness: Thin (fabric): two layers of the fabric thickness < 0.35mm; Thick (fabric): two layers of the fabric thickness > 0.8mm; Regular (fabric): two layers of the fabric thickness ≥...
- Page 15 Presser foot curling Pattern 5 to 12 Used make three-folded flat curling edge of the fabric, with the center of the straight stitch suture, some fabric edging processing. Leather roller presser Pattern 1 to 12 Use the roller presser foot, evenly into leather,...
- Page 16 They can take this product for environmental safe recycling. BATTERY MUST BE RECYCLED OR DISPOSED OF PROPERLY. DO NOT OPEN. DO NOT DISPOSE OR IN FIRE OR SHORT CIRCUIT. Manufactured by: Emerio Deutschland GmbH Lerchenweg 3, 40789 Monheim am Rhein, Deutschland - 15 -...
-
Page 17: Bedienungsanleitung - German
Bedienungsanleitung – German SICHERHEITSHINWEISE Lesen Sie vor dem Gebrauch unbedingt die nachfolgenden Bedienungshinweise, um Verletzungen oder Beschädigungen zu vermeiden und das beste Ergebnis mit dem Gerät zu erzielen. Bewahren Sie diese Bedienungsanleitung an einem sicheren Ort auf. Wenn Sie dieses Gerät an eine andere Person weitergeben, stellen Sie sicher, dass Sie auch diese Bedienungsanleitung aushändigen. - Page 18 wenn Sie: die Nadel auswechseln; die Nadel einfädeln; die Unterfadenspule auswechseln; Bestandteile auswechseln; Batterien einlegen oder herausnehmen; die Maschine reinigen; nach jedem Gebrauch. 6. Lassen Sie die Maschine niemals laufen, wenn ein Faden in die Nadel eingefädelt ist, aber kein Stoff auf der Maschine liegt.
- Page 19 Betrieb ist, dass die Nähmaschine ausgeschaltet und von der Stromquelle getrennt ist, und entfernen Sie das Fußpedal. 17. Lagern Sie die Maschine an einem trockenen und gut belüfteten Ort. - 18 -...
- Page 20 SEW-121820.1 BESCHREIBUNG DER TEILE Vorderansicht Fadengeber Drehknopf für Oberfadenspannung Drehknopf für die Musterauswahl Fadenschneider Lampe Nadelbefestigungsschraube Unterfadenspule Schublade Handrad Rückwärtstaste Ein/Aus- und Geschwindigkeitsschalter Rückansicht Aufspuler Spulenstopp Fußpedal-Anschlussbuchse Aufspuler-Spannungsscheibe Nähfußhebel Nähfuß DC-Eingang Batteriefach Spindel BENUTZUNG DES FUSSPEDALS (A) UND ADAPTERS (B) 1.
- Page 21 Wenn das Fußpedal benutzt wird, kann die Geschwindigkeit nicht ausgewählt werden. EINLEGEN DER BATTERIEN 1. Achten Sie darauf, dass der „Ein-/Aus- und Geschwindigkeitsschalter“ auf die Position „OFF“ gestellt ist. 2. Drehen Sie die Nähmaschine über einem ebenen Untergrund um und entfernen Sie die Batteriefachabdeckung.
- Page 22 2. Befestigen des Nähfußes Legen Sie den Nähfuß unter die Nähfußhalterung, senken Sie den Nähfußhebel, drücken Sie die Halterung , um den Nähfuß wieder einzusetzen und stellen Sie den Nähfußhebel nach oben. (Abb. 5; Abb. 6) Achtung: Schalten Sie das Gerät stets aus, trennen Sie es von der Stromversorgung und entfernen Sie das Fußpedal, wenn Sie den Nähfuß...
- Page 23 2. Auswechseln der Unterfadenspule 1) Schieben Sie den Schieber der Abdeckung der Unterfadenspulen nach rechts und entfernen Sie die Spulenabdeckung (Abb. 7). 2) Setzen Sie eine neue Spule in die Halterung, sodass der Faden im Uhrzeigersinn verläuft. Ziehen Sie 10 cm des Fadens heraus (Abb.
- Page 24 Abb. 9 Abb.10 NÄ HEN 1. Drehen Sie das Handrad gegen den Uhrzeigersinn, um die Nadel ganz nach oben zu stellen. 2. Heben Sie den Nähfußhebel an und legen Sie den Stoff, den Sie nähen möchten, unter den Nähfuß (Abb. 11).
- Page 25 Abb. 13 Abb. 14 EIGENSCHAFTEN 1. Auswahl der Stichmuster Drehen Sie den Drehknopf zur Musterauswahl, um das gewünschte Muster aus 12 Stichmustern auszuwählen. Als Orientierung finden Sie Abbildungen der Stichmuster auf der Oberfläche der Maschine. Achtung: Bevor Sie das Stichmuster ändern, schalten Sie das Gerät bitte aus und stellen Sie die Nadel mithilfe des Handrades nach ganz oben, damit die Nadel nicht steckenbleibt und verbogen wird.
- Page 26 6. Ä rmel nähen Diese Nähmaschine kann Ärmel oder enge Ö ffnungen in Kleidungsstücken nähen. Heben Sie den Nähfuß an. Legen Sie das Kleidungsstück über den Näharm. Senken Sie den Nähfuß und folgen Sie den normalen Nähanleitungen. 7. Manuell Knopflöcher nähen 1) Ziehen Sie den Stoff unter den Nähfuß...
- Page 27 8. Schublade Diese Schublade ist ein Fach zum Aufbewahren von Zubehör. Sie kann herausgezogen werden und Sie können darin Ersatzspulen, Nadeln usw. aufbewahren. Sie befindet sich an der Seite unter dem Handrad. AUFSPULEN 1. Setzen Sie eine Garnspule auf den Garnspulenhalter. (Abb. 20) 2.
- Page 28 ANPASSEN DER NAHT 1. Wie in Abb. A gezeigt, sollte eine normale Naht gleichmäßig aus Ober- und Unterfaden gebildet werden, weder zu straff noch zu locker. (① = Oberfaden; ② = Stoff; ③ = Unterfaden) Abb. A 2. Wenn der Unterfaden wie eine gerade Linie aussieht (Abb. B), ist der Oberfaden zu locker. Drehen Sie bitte den Drehknopf für die Oberfadenspannung auf eine höhere Zahl, um die Spannung zu erhöhen, bis die Naht wieder normal ist.
- Page 29 Zeichenerklärung: √: einfach zu nähen ×: schwierig zu nähen △:wellt sich beim Nähen Hinweis: 1. Definition der Stoffdicke: Dünn (Stoff): zwei Stofflagen < 0,35 mm; Dick (Stoff): zwei Stofflagen > 0,8 mm; Normal (Stoff): zwei Stofflagen ≥ 0,35 mm und ≤ 0,8 mm. 2.
- Page 30 Blindstichfuß Muster 1 bis 12 Mit dem Blindstichfuß mit Führung kann die Maschine Blindstich verschiedenen Stoffen wie Hosen, Röcke, Vorhangkanten usw. nähen. Kräuselfuß Muster 5 bis 12 Nähen einer dreilagigen gekräuselten oder gerafften Stoffkante, mit der Mitte der geraden Naht, für manche Stoffe zum Nähen von Besätzen.
- Page 31 Sie sich an den Händler bei dem Sie dieses Gerät erworben haben. Dieser kann das Gerät umweltschonend entsorgen. BATTERIEN MÜ SSEN WIEDERVERWERTET ODER KORREKT ENTSORGT WERDEN. NICHT Ö FFNEN. NICHT WEGWERFEN, IN FEUER WERFEN ODER KURZSCHLIESSEN. Hersteller: Emerio Deutschland GmbH Lerchenweg 3, 40789 Monheim am Rhein, Deutschland - 30 -...
-
Page 32: Mode D'emploi - French
Mode d’emploi – French CONSIGNES DE SÉCURITÉ Avant d’utiliser l’appareil, lisez toutes les consignes suivantes pour éviter des blessures et des dommages, et pour optimiser les performances de votre appareil. Conservez cette notice d’utilisation dans un endroit sûr. Si vous donnez ou transférez cet appareil à... - Page 33 vous changez la bobine inférieure ; vous changez n'importe quelle pièce ; vous insérez ou retirez les piles ; vous nettoyez la machine ; après chaque utilisation. 6. Ne faites jamais fonctionner la machine lorsqu'il y a du fil dans l’aiguille mais pas de tissu sur la machine. Cela pourrait endommager la machine.
- Page 34 SEW-121820.1 DESCRIPTION DES PIÈCES Vue avant Levier releveur Sélecteur de tension du fil supérieur Sélecteur de point Coupe-fil Lampe Vis du serre-aiguille Bobine inférieure Tiroir Volant 10. Bouton d'inversion 11. Interrupteur d’alimentation et de vitesse Vue arrière Broche du bobineur Arrêt du bobineur...
- Page 35 INSTALLATION DES PILES 1. Assurez-vous que l’interrupteur d'alimentation est sur la position « OFF» (ARRÊT). 2. Retournez la machine à coudre sur une surface plane et retirez le couvercle du compartiment à piles. 3. Insérez 4 piles de type AA dans le compartiment et replacez le couvercle du compartiment à piles. Attention : ...
- Page 36 Lorsque vous remplacez le pied presseur, placez la machine sur une surface stable. Lorsque vous placez le pied presseur en bas, ne placez pas votre main ou vos doigts sous celui-ci pour éviter de vous blesser. Schéma 3 Schéma 4 Schéma 5 Schéma 6...
- Page 37 2. Remplacement de la bobine inférieure 1) Faites glisser le bouton du couvercle de la bobine vers la droite et enlevez le couvercle de la bobine (schéma 7). 2) Mettez une nouvelle bobine dans le support, avec le fil dans le sens des aiguilles d'une montre. Laissez pendre 10 cm de fil (schéma 8).
- Page 38 Schéma 9 Schéma 10 COUTURE 1. Tournez le volant en sens inverse des aiguilles d'une montre pour relever l'aiguille dans sa position la plus haute. 2. Levez le levier du pied presseur et placez le tissu que vous voulez coudre sous le pied presseur (schéma 11).
- Page 39 Schéma 13 Schéma 14 CARACTÉRISTIQUES 1. Sélection du point Tournez le sélecteur de point pour sélectionner le type de point désiré parmi les 12 modèles de points. Il y a des illustrations de modèles sur la surface du boî tier de la machine pour votre référence. Attention : ...
- Page 40 6. Couture de manches Cette machine à coudre a été conçue pour coudre des manches ou des ouvertures étroites dans un vêtement. Soulevez le pied presseur. Placez le vêtement sur le bras de couture. Abaissez le pied presseur et suivez les instructions de couture habituelles.
- Page 41 ENROULER LA BOBINE 1. Placez une canette de fil sur le porte-canette. (Schéma 20) 2. Guidez le fil à travers le disque de tension du bobineur situé sur la face supérieure de la machine. (Schéma 21) 3. Placez la bobine sur la broche du bobineur et enroulez plusieurs fois le fil dans le sens des aiguilles d'une montre autour de la bobine.
- Page 42 inférieur, et les fils ne doivent être ni trop serrés ni trop lâches. (① = Fil supérieur ; ② = Tissu ; ③ = Fil inférieur) Schéma A 2. Si le fil inférieur dessine une ligne droite (schéma B), cela signifie que le fil supérieur est trop lâche. Veuillez tourner le sélecteur de tension du fil supérieur dans le sens du plus grand chiffre pour augmenter la pression jusqu’à...
- Page 43 Niveau de difficulté de couture : √:Facile à coudre ×:Difficile à coudre △:Assez difficile à coudre Remarque : 1. Définition de l’épaisseur de tissu : Fin (tissu) : deux épaisseurs du tissu < 0,35 mm ; Épais (tissu): deux épaisseurs du tissu > 0,8 mm ; Ordinaire (tissu) : deux couches de tissu d'une épaisseur ≥...
- Page 44 Pied presseur ourlet Modèles 1 à 12 Il peut être utilisé pour invisible réaliser des ourlets invisibles dans une variété de tissus, tels que pour des pantalons, des jupes, des bords de rideaux, etc. Pied presseur ourleur Modèles 5 à 12 Utilisé...
- Page 45 LA BATTERIE DOIT ÊTRE RECYCLÉE OU MISE AU REBUT D’UNE MANIÈRE APPROPRIÉE. NE PAS OUVRIR. NE PAS JETER DANS UN FEU ET NE PAS COURT-CIRCUITER. Fabriqué par: Emerio Deutschland GmbH Lerchenweg 3, 40789 Monheim am Rhein, Deutschland - 44 -...
-
Page 46: Gebruiksaanwijzing - Dutch
Gebruiksaanwijzing – Dutch VEILIGHEIDSVOORSCHRIFTEN Voor gebruik dient u alle onderstaande instructies te lezen om letsel en schade te voorkomen en om de beste resultaten met het apparaat te bereiken. Bewaar deze handleiding op een veilige plek. Mocht u dit apparaat aan iemand anders overhandigen, dient u ook de gebruiksaanwijzing te overhandigen. - Page 47 de naald vervangt; de naald van draad voorziet; de onderste spoel vervangt; een onderdeel vervangt; batterijen installeert of verwijdert; de machine schoonmaakt; na elk gebruik. 6. Schakel de machine nooit in wanneer er draad op de naald is geregen maar er geen stof op de machine aanwezig is.
- Page 48 SEW-121820.1 BESCHRIJVING VAN DE ONDERDELEN Vooraanzicht Opneemhendel Bovendraad-spanningsknop Patroonkeuzeknop Draadafsnijder Werklamp Naaldklemschroef Onderste spoel Lade Handwiel 10. Achteruitknop 11. Aan/uit- en snelheidsschakelaar Achteraanzicht Spoelopwindpen Spoelopwindstop Ingangsaansluiting voor voetpedaal Spoelopwindspanningsschijf Naaivoethendel Naaivoet DC-ingang Batterijvak Klos DE VOETPEDAAL (A) EN ADAPTER (B) GEBRUIKEN 1.
- Page 49 DE BATTERIJEN INSTALLEREN 1. Zorg ervoor dat de aan/uit- en snelheidsschakelaar op de stand “OFF” (uit) staat. 2. Draai de naaimachine ondersteboven op een vlak oppervlak en verwijder het batterijdeksel. 3. Installeer 4xAA batterijen in het vak en breng het batterijdeksel opnieuw aan. Opgelet: ...
- Page 50 Opgelet: Schakel het apparaat altijd uit, haal de stekker uit het stopcontact en verwijder de voetpedaal tijdens het vervangen van de naaivoet. Voordat u de naaivoet vervangt, plaats de machine op een stabiel oppervlak. Wanneer u de naaivoet omlaag brengt, plaats uw hand of vinger er niet onder om letsel te vermijden. Fig.3 Fig.4 Fig.5...
- Page 51 2. De onderste spoel vervangen 1) Schuif de knop van de spoelkap naar rechts en verwijder de spoelkap (Fig.7). 2) Plaats een nieuwe spoel in de houder met de draad met de klok mee. Laat ongeveer 10 cm van de draad uitsteken (Fig.8).
- Page 52 Fig.9 Fig.10 NAAIEN 1. Draai het handwiel om de naald in de hoogste positie te zetten. 2. Breng de naaivoethendel omhoog en plaats de stof die u wilt naaien onder de naaivoet. (Fig. 11). 3. Laat de naaivoet zakken. (Fig.12). 4.
- Page 53 Fig.13 Fig.14 EIGENSCHAPPEN 1. Het steekpatroon selecteren Draai de patroonkeuzeknop om een van de 12 steekpatronen te kiezen. Aan de buitenkant van de machine zijn de steekpatronen door middel van een afbeelding weergegeven. Opgelet: Voordat u het steekpatroon wijzigt, schakel het apparaat uit en draai het handwiel om de naald in de hoogste positie te zetten zodat deze niet vast komt te zitten of gebogen raakt.
- Page 54 6. Mouwen naaien Deze naaimachine kan worden gebruikt om mouwen of andere nauwe openingen in kleding te naaien. Breng de naaivoet omhoog. Plaats het kledingstuk over de naaiarm. Laat de naaivoet zakken en volg de gebruikelijke naai-instructies. 7. Handmatig knoopsgat 1) Plaats het doek onder de naaivoet en laat de naaivoet zakken op het doek waar u een knoopsgat wilt naaien.
- Page 55 DE SPOEL OPWINDEN 1. Breng een klos met draad aan op de klospen. (Fig.20) 2. Stop de draad door de spoelopwindspanningsschijf aan de bovenkant van de machine. (Fig.21) 3. Breng de spoel aan op de spoelopwindpen en wikkel de draad enkele keren met de klok mee rond de spoel. (Fig.22) 4.
- Page 56 Fig.A 2. Als de onderdraad er uit ziet als een rechte lijn (Fig.B), geeft dit aan dat de bovendraad te los zit. Draai de bovendraad-spanningsknop naar een hoger cijfer om de spanning te verhogen en normale steken te krijgen. Fig.B 3.
- Page 57 Naaidoeltreffendheid: √:betekent eenvoudig te naaien ×:betekent moeilijk te naaien △:betekent niet soepel te naaien Opmerking: 1. Bepaling van de stofdikte: Dun (stof): twee lagen van stofdikte < 0,35mm; Dik (stof): twee lagen van stofdikte < 0,8mm; Normaal (stof): twee lagen van stofdikte ≥ 0,35mm en ≤ 0,8mm. 2.
- Page 58 Krullen-naaivoet Patroon 5 tot 12 Kan worden gebruikt om een vlakke krulrand met 3 vouwen van 5mm in de stof aan te brengen, in het midden rechte steken en om de rand van de stof af te werken. Leerrol-naaivoet Patroon 1 tot 12 Gebruik rol-naaivoet gelijkmatig...
- Page 59 Zij zullen dit product accepteren voor milieuvriendelijke afvalverwerking. RECYCLE OF GOOI DE BATTERIJ OP EEN JUISTE MANIER WEG. NIET OPENEN. NIET IN VUUR GOOIEN OF KORTSLUITEN. Geproduceerd door: Emerio Deutschland GmbH Lerchenweg 3, 40789 Monheim am Rhein, Deutschland - 58 -...
-
Page 60: Instrukcja Obsługi - Polish
Instrukcja obsługi – Polish INSTRUKCJE DOTYCZĄCE BEZPIECZEŃSTWA Aby nie dopuścić do urazów lub uszkodzeń oraz aby maksymalnie wykorzystać możliwości urządzenia, przed rozpoczęciem jego użytkowania należy przeczytać wszystkie poniższe zalecenia. Niniejszą instrukcję należy przechowywać w bezpiecznym miejscu. W przypadku przekazania lub odstąpienia komuś... - Page 61 nawlekasz igłę, wymieniasz dolną szpulkę, wymieniasz którąkolwiek część maszyny, wkładasz lub wyjmujesz baterie, czyścisz maszynę, po każdym użyciu. 6. Nigdy nie używaj maszyny, kiedy igła jest nawleczona, ale pod igłą nie ma tkaniny. Może to uszkodzić maszynę. 7. Zawsze trzymaj ręce z dala od igły, koła ręcznego, pokrętła naprężania górnej nici i pokrętła wyboru wzoru, gdy urządzenie pracuje.
- Page 62 SEW-121820.1 OPIS CZĘŚCI Widok z przodu Dźwignia podnoszenia Pokrętło regulacji naprężenia górnej nici Pokrętło wyboru wzoru Przecinak nici Światło Śruba zaciskowa igły Dolna szpulka Szuflada Koło ręczne 10. Przycisk szycia do tyłu 11. Przełącznik zasilania i prędkości Widok z tyłu Trzpień...
- Page 63 3. Włóż 4 baterie AA do komory i załóż pokrywę baterii. Ostrożnie: Aby uniknąć przypadkowego uruchomienia maszyny do szycia, zawsze upewnij się, że przełącznik zasilania i prędkości znajduje się w pozycji wyłączonej - „OFF”. Kiedy używasz zasilacza, pamiętaj, aby wyjąć baterie z komory. WYMIANA IGŁY Jeśli igła się...
- Page 64 rys. 3 rys. .4 rys. 5 rys. .6 NAWLEKANIE NICI W MASZYNIE DO SZYCIA 1. Nawlekanie górnej nici Ostrożnie: Zawsze wyłącz urządzenie i odłącz zasilanie i pedał, gdy nawlekasz nić w maszynie. 1) Obróć koło ręczne, aby podnieść igłę do najwyższej pozycji. 2) Umieść...
- Page 65 2. Wymiana dolnej szpulki 1) Przesuń przycisk pokrywy szpulki dolnej w prawo i zdejmij ją (rys.7). 2) Umieść nową szpulkę w uchwycie tak, aby nić obracała się w prawo. Pozostaw około 10 cm nienawiniętej nici.(rys.8) 3) Przytrzymaj koniec górnej nici jedną ręką, a drugą ręką przekręć kołem ręcznym w lewo, wtedy nić igły podniesie nić...
- Page 66 rys .9 rys. 10 SZYCIE 1. Obróć koło ręczne w lewo, aby podnieść igłę do najwyższej pozycji. 2. Unieś stopkę i umieść pod nią tkaninę, którą chcesz szyć (rys. 11). 3. Opuść stopkę. (rys. 12) 4. Obróć pokrętło wyboru na żądany wzór ściegu. Ostrożnie: ...
- Page 67 FUNKCJE 1. Wybór wzoru ściegu Obróć pokrętło wyboru na żądany wzór ściegu spośród 12 możliwych. Na obudowie maszyny znajdują się ilustracje wzorów ściegów. Ostrożnie: Przed zmianą wzoru ściegu, wyłącz maszynę i obróć koło, aby podnieść igłę do końca, w ten sposób nie zatnie się...
- Page 68 7. Ręczne obszywanie dziurek 1) Umieść tkaninę pod stopką i opuść stopkę, w miejscu, gdzie chcesz zrobić dziurkę, a następnie wybierz ósmy ścieg. 2) Włącz przełącznik i wykonaj 5-6 ściegów przy niskiej prędkości, a następnie wyłącz przełącznik (rys.15). 3) Wybierz siódmy ścieg, włącz przełącznik i przeszyj tkaninę na odpowiedniej długości, a następnie wyłącz przełącznik.
- Page 69 3. Umieść szpulkę na trzpieniu nawijacza szpulki, kilkakrotnie nawiń nitkę w prawo. (rys. 22) 4. Pchnij szpulkę w lewo. (rys. 23) 5. Włącz maszynę, aby rozpocząć nawijanie. (rys. 24) 6. Po nawinięciu odpowiedniej ilości nici na szpulkę wyłącz maszynę. 7. Odsuń szpulkę od dociskacza nawijacza szpulki, zdejmij szpulkę z trzpienia i odetnij nić. (rys. 25) Ostrożnie: Przed nawinięciem szpulki podnieś...
- Page 70 3. Jeśli dolny ścieg wygląda jak linia prosta (rys. C), oznacza to, że górna nić jest zbyt luźna. Obróć pokrętło naprężenia górnej nici w kierunku mniejszej liczby, aby zmniejszyć naprężenie, aż szycie powróci do normalnego stanu. rys. C DOBÓR ŚCIEGU DO RODZAJU TKANINY Szycie Tkanina bawełna/len...
- Page 71 3. Twarda tkanina: dżins, płótno, itp. 4. Miękka tkanina: ręcznik, ścierka RODZAJ STOPKI DO UŻYCIA (Z tą maszyną dostarczona jest tylko „stopka krawędziowa”.) Rodzaj stopki Ilustracja Typ ściegu Funkcja tego typu stopki Stopka krawędziowa Ściegi 1-12 Wykonuje ściegi profesjonalnie, wzdłuż krawędzi tkaniny, do szycia i wykańczania krawędzi.
- Page 72 WIĘCEJ PORAD 1. Upewnij się, że pod igłą jest tkanina, a igła się porusza, w przeciwnym razie maszyna zatnie się i nić zostanie zablokowana. 2. Przed rozpoczęciem szycia przetestuj koło ręczne obracając je 2-3 razy, aby upewnić się, że porusza się płynnie.
- Page 73 BATERIĘ NALEŻY ODPOWIEDNIO ZUTYLIZOWAĆ LUB PODDAĆ RECYKLINGOWI. NIE OTWIERAĆ. NIE WRZUCAĆ DO OGNIA, NIE ZWIERAĆ STYKÓW. Wyprodukowane przez: Emerio Deutschland GmbH Lerchenweg 3, 40789 Monheim am Rhein, Deutschland - 72 -...
Need help?
Do you have a question about the SEW-121820.1 and is the answer not in the manual?
Questions and answers