Table of Contents
Advertisement
Advertisement
Table of Contents

Related Manuals for Royal Alloy GP300S


Summary of Contents for Royal Alloy GP300S
- Page 3 Preface Preface Thank you for choosing your Royal Alloy GP300S scooter. Royal Alloy products embody high technology with reliability and have been designed utilising RA Engineering Co., Ltd and its partners’ many years of experience in manufacturing scooters for travel, commuting, leisure and sporting activities. This is why this model takes a leading position in the market sector.
- Page 4 Preface Note This manual should be regarded as part of the scooter and should be always with the scooter, even when it is resold. Note Our company is working hard towards improvement of product design and quality. This manual contains the latest product information at the time of print. However, it is possible that the manual may have slight differences with your scooter.
-
Page 5: Table Of Contents
Contents Contents Precautions for Safe Riding ......... 6 Running-in of New Scooter ......... 19 Names of Different Parts ..........7 Inspection before Riding ..........20 The Serial Number ............9 Inspection of Braking effect and free play .... 21 Functions of Controllers ..........10 Inspection the Front Brake and Anti-Dive Linkage21 Instrument Panel Indications ........ - Page 6 Contents Fuel Hose .............. 31 Air Filter ............... 31 Tyres ..............33 Fuses ..............34 Troubleshooting ............35 Storage Procedures ............. 37 Specifications ............... 38...
-
Page 7: Precautions For Safe Riding
Precautions for Safe Riding Precautions for Safe Riding Please obey all local traffic regulations and consider safety prior to riding. It is advised to control your speed and to Safety clothing Recommendation stay within safe limits. Bright-coloured well-fitting garments Practice before Riding recommended. -
Page 8: Names Of Different Parts
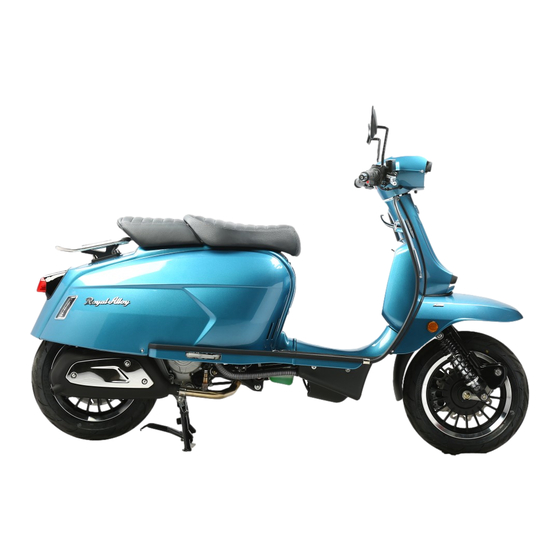
Names of Different Parts Names of Different Parts Read the following labels carefully before using the motorcycle. 1.Exhaust/Muffler pipe 4.Seat 7.Front turning lamps 2.Rear light/Brake light/number plate light 5.Acceleration grip &right switch 8.Front right shock absorber 3.Rear rack 6.Head lamp Warning Rear rack has a maximum payload of 5 kgs... - Page 9 Names of Different Parts 1. Rear brake lever 5. Rear indicator lamps 9. Main stand 2. Rear-view mirrors 6. Rear shock absorber 10. Side stand 3. Left grip switch 7. Rear disc brake 11.Front disc brake 4. Glove box 8. Air filter 12.Front left shock absorber...
-
Page 10: The Serial Number
The Serial Number The Serial Number Engine number Engine number is stamped on the rear of the crankcase assembly. Note Remember your engine number mind convenience in purchasing correct spare parts from your distributor. Chassis number Chassis number Chassis number is stamped on the frame right side frame rail. -
Page 11: Functions Of Controllers
Functions of Controllers Functions of Controllers Instrument Panel Indications 1 - Engine RPM Indicator The indicator will show the engine RPM. 2 - Fuel gauge This shows the fuel volume remaining in the fuel tank. When the pointer points to “F”, the fuel tank is full. When the pointer moves to “E”... -
Page 12: Ignition Switch
Functions of Controllers displays: • 10 – Odometer With the ignition key turned to the on position. • Press the “MODE” button then release “MODE” The odometer registers the total distance that the scooter button. has been ridden. • Clearing the trip counter history – When the 11 - Water temperature indicator display is TRIP METER, press the “MODE”... -
Page 13: Switches On The Handlebars(Left)
Functions of Controllers Rotate the key to turn power ON or OFF. Note ² Rotate the handlebars to ensure that they are When you leave the scooter, you may lock the steering unlocked. handlebars to help prevent your scooter from being stolen. ²... -
Page 14: Switches On The Handlebars(Right)
Functions of Controllers Switches on the Handlebars(Right) HIGH The high beam is turned on. The low beam is turned on. (Low beam is for normal riding) 2. Horn Button Press this button to sound the horn. 3. Turning Indicator Switch This switch is used to turn on/off the left/right indicators to show the other vehicles that you want to turn left or right. -
Page 15: Fuel Tank Cap
Functions of Controllers speed of the scooter to slow down or stop. The brake is 8. Main Stand applied by squeezing the brake lever gently towards the To use the main stand, depress it by foot and lift the grip. The rear brake light will be illuminated when the rear of the scooter backwards using the rear rack until the lever is squeezed inward. -
Page 16: Coolant Tank Cap
Functions of Controllers Coolant tank cap The coolant tank cap is in the left of vehicle. Warning Note ² Never open coolant tank cap when the scooter is When the key is inserted,the oil fillingport can be hot. opened or closed unless the key and lock coverwere ²... -
Page 17: Seat Lock(一)
Functions of Controllers Seat Lock( 一 ) Seat Lock( 二 ) ○ ○ To open the seat as follows: Carefully lift the rear of the front seat with your To open and close the seat as follows: hands, the seat will lift open. The seat release button is located on the left To close the seat as follows: hand side and to the rear of the seat, push the... -
Page 18: Front Luggage Box
Functions of Controllers Front Luggage Box Caution ² Do not keep breakables in the luggage box. ² Do not keep valuable item in the luggage box. ² Do not place fuel and oil in the luggage box. ² Only store water proof items in luggage box... -
Page 19: Fuel And Oil Recommendations
Fuel and Oil Recommendations Fuel and Oil Recommendations Fuel Use unleaded fuel with an octane number Unleaded Euro 95 or higher. Unleaded fuel can extend spark plug life and exhaust component life. We recommend using the highest octane pump fuel available. Engine Oil Use of high quality 4-stroke engine oil will extend the Transmission Oil... -
Page 20: Running-In Of New Scooter
Running –in of New Scooter Running-in of New Scooter The first 600 miles (1000km) are the most important in the Vary the engine Speed life of your scooter. Correct running-in operation during The engine speed should be varied and not held at a this period will help ensure maximum life and constant speed. -
Page 21: Inspection Before Riding
Inspection before Riding Allow the Engine Oil to Circulate before Riding Inspection before Riding Allow sufficient idling time after warm or cold engine start up before applying load or revving up the engine. This Before riding the scooter, be sure to check the following allows time for the lubricating oil to reach all critical engine items. -
Page 22: Inspection Of Braking Effect And Free Play
Inspection before Riding Oil level indicators (if fitted) and turning Inspection of the Tyres Indicators indicators 1. Tyre Pressures Horn Correct function Observe the wear condition of the tyre and determine Engine oil Check to ensure the correct level Lubricants the tyre pressure. -
Page 23: Inspecting The Quantity Of Fuel
Inspection before Riding Inspecting the Quantity of Fuel 1. Keep the vehicle in an upright and level position. Make sure that the fuel is sufficient to reach your 2. Start the engine, let it idle during a few minutes destination. Turn the ignition switch to ON position, if the and then switch it off. -
Page 24: Inspecting The Transmission Oil Level
Inspection before Riding Inspecting the Transmission Oil Level Inspection of the Ignition Unit and the Lights Start the engine, and check if the headlight and the rear lights are on. Operate the front and rear brake separately, and check if the brake light is activated. -
Page 25: Riding Tips
Riding Tips Riding Tips Caution Caution Before starting, you must Release the starter button soon after the engine is started. Check the quantity of fuel and engine oil. Otherwise damage may result to and starter motor and Place the scooter onto the main stand. gear wheels. - Page 26 Riding Tips Look around to see ensure that it is safe to set off. Apply Brakes Activate your appropriate turning indicator. Look around to judge Combined application of both brakes is recommended. the conditions are safe to set off. Keeping the rear brake lever Quickly release the throttle grip or rotate backwards (clockwise) to squeezed lever until you are ready to set off.
-
Page 27: Inspection And Maintenance
Inspection and Maintenance those on a dry day. Inspection and Maintenance Skidding may occur on wet or slippery roads, therefore concentrate The maintenance schedule indicates the intervals between periodic and be ready to apply the brakes cautiously at any time. services in miles and months. -
Page 28: Maintenance Schedule
Inspection and Maintenance To ensure the engine a long service life and a good performance, carry out the 600 miles (1000km) maintenance as soon as it is due. Caution We suggest you use genuine replacement parts or their equivalent. Even if you are an expert do-it-yourself mechanic, we recommend that those items on the maintenance schedule marked with an asterisk (*), be Torque driver pins... - Page 29 Inspection and Maintenance Bolts and nuts on frame body Tighten the bolts and nuts to specified torque after initial 600miles (1000km) (3 month) and every 2,485 miles (4,000km) (20 month). Specified torque Item Kg/m Reference Item Kg/m Reference Front axle nut Rear axle nut 10.0 Handlebar mounting...
-
Page 30: Battery
Inspection and Maintenance Battery The battery is located inside the removable cover on the body sect beneath the front of the seat. This battery is the sealed type and requires no maintenance such as fluid level and gravity. Spark Plug Caution Removal and Cleaning EFORE... - Page 31 Inspection and Maintenance compressed air. Then unscrew it using the spanner supplied in the toolkit and remove it from the engine, cylinder being careful not to let dust or any other substance enter into the cylinder. Check that the spark plug electrode and centre porcelain are free of carbon deposits or signs of corrosion.
-
Page 32: Fuel Hose
Inspection and Maintenance Caution Air Filter TIGHTEN THE SPARK PLUG CORRECTLY. OTHERWISE, The air filter element used in this scooter is a polyurethane foam THE ENGINE MAY OVERHEAT AND BE DAMAGED. USE ONLY THE RECOMMENDED TYPE OF SPARK PLUG; element. If the filter element has become clogged with dust, intake OTHERWISE, ENGINE DURATION AND PERFORMANCE resistance will increase with a resultant decrease in power output COULD BE COMPROMISED. - Page 33 Inspection and Maintenance • Squeeze the solvent out of the washed filter Filter element element by pressing it between the palms of both hands. Do not twist and wring the filter element as this will lead to tearing. • Rinse in warm free running water and allow to dry by using compressed air or warm air dryer.
-
Page 34: Tyres
Inspection and Maintenance Don’t mix it with silicon-based or oil-based fluid - otherwise Engine Idle Speed Adjustment the hydraulic brake system will be damaged. Start up the engine and warm it up. Don’t use residual fluid in the container opened during last •... -
Page 35: Fuses
Inspection and Maintenance all times. Tyre pressure should only be adjusted when the tyres are cold. Tyre Tread Condition Cold inflation tyre pressure UK and Europe (specification may alter in warmer climates) Front Wheel 32psi Rear Wheel 34psi Caution Tyre inflation pressures and the general tyre conditions Operating the scooter with excessively worn tyres will are extremely important for proper performance and decrease riding stability and may lead to loss of control. -
Page 36: Troubleshooting
Inspection and Maintenance Always be sure to replace the blown fuse with the correct is any electrical system failure, first check the fuse. In case amperage fuse. Never use substitute, for example the fuse is blown, there is a 10A spare fuse. aluminium foil or wire, to replace a blown fuse. - Page 37 Inspection and Maintenance Do not hold the spark plug close to the open spark plug hole in the cylinder head as gasoline vapour inside the cylinder could be ignited, creating a fire hazard. To reduce the chance of electrical shock, hold the outer steel shell of the spark plug against an unpainted metal portion of the engine.
-
Page 38: Storage Procedures
Scooter Please note: We suggest that you perform this task upon Place the motorcycle on its main stand and thoroughly clean purchasing you new Royal alloy Scooter as part of your the entire scooter. regular care and maintenance. Fuel Procedure for Returning to Service Drain the fuel tank. -
Page 39: Specifications
Specifications Specifications Engine:1 cylinder, S, horizontal, 4 Valve, second air intake Model GP300S/TG300 Overall size (mm) 1845×670×1115 Tyre type Wheel base (mm) 1390 Front tyre size 110/70-12 Net weight (Kg) Rear tyre size 120/70-12 Max loading weight(kg) Inflation: Fuel tank capability (L) 10.5... - Page 40 MEMO: ………………………………………………………………………………………………………………………… ………………….…………………………………………………………………………….……………………… …………………………………………………….………………………………………………………………… ………….…………………………………………………………………………….……………………………… …………………………………………….………………………………………………………………………… ….…………………………………………………………………………….……………………………………… …………………………………….…………………………………………………………………………….…… ……………………………………………………………………………….………………………… ……….…………………………………………………………………………………….…………………………...
- Page 41 ……….…………………………………………………………………………………….………………………… Owner’s Manual RA Engineering Co., Ltd...
Need help?
Do you have a question about the GP300S and is the answer not in the manual?
Questions and answers
My indicators flash to fast