Feniex GEO Series Instruction Manual
Interior lightbar
Hide thumbs
Also See for GEO Series:
- Instruction manual (8 pages) ,
- Instruction manual (6 pages) ,
- Instruction manual (7 pages)
Advertisement
FE NIE X //
V 1.5
//
I NSTRUCTION MA NUAL
WE B // w w w.feni ex .com
GEOSERIES
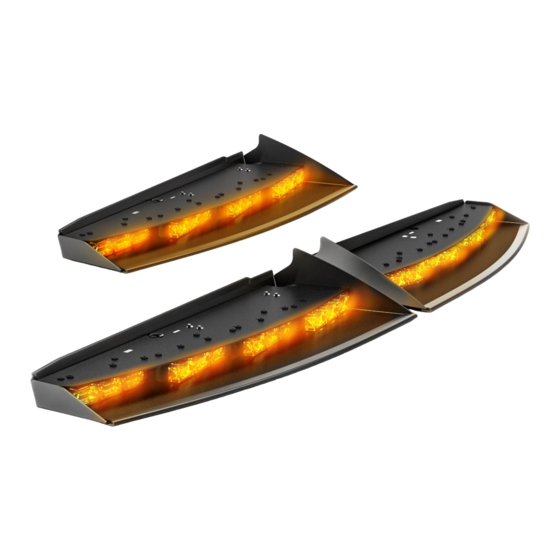
I NT ERIO R L IGHT BAR
G-FRONT, G-PASS
INSTRUCTION MANUAL
Feniex Product Copyrights This price List and the mentioned Feniex products include or describe copyrighted Feniex material. Laws in the
United States and other countries preserve for Feniex Industries and its licensors certain exclusive rights for copyrighted material, including the
exclusive right to copy, reproduce in any form, distribute and make derivative works of the copyrighted material. Accordingly, any copyrighted
material of Feniex and its licensors contained herein or in the Feniex products described in this Price List may not be copied, reproduced,
distributed, merged or modified,transmitted, transcribed, stored in retrieval system or translated into any language or computer language, in any
form or by any means, without prior written permission of Feniex Industries, Inc.. Feniex and the stylized Feniex logo are registered in the U.S.
Patent & Trademark Office.
Advertisement
Table of Contents

Related Manuals for Feniex GEO Series


Summary of Contents for Feniex GEO Series
- Page 1 Feniex Industries, Inc.. Feniex and the stylized Feniex logo are registered in the U.S.
-
Page 2: Table Of Contents
TABLE OF CONTENTS Safety Regulations Warranty Service after Expiration Copyright Feniex Product Copyright Equipment Dimensions Wiring Diagram Flash Patterns Mounting Instructions FE NI E X / / INST R U CTI O N MA N UA L WE B // w w w.fe ni ex .co m... -
Page 3: Safety Regulations Warranty
Feniex Product Copyrights product. The products described in this document are the property of Feniex Industries, Inc. It is Warranty furnished by express license agreement only Feniex Industries, Inc. warrants to the original... -
Page 4: Wiring Diagram
Chasis Ground Brown Mode 1 12v (+) Latching Switch Gray Right Arrow 12v (+) Latching Switch Blue/Gray Center Out 12v (+) Latching Switch F E NIE X // INSTRUCTI ON MA NUA L WE B // w w w.feniex .com... -
Page 5: Flash Patterns
WIRING INSTRUCTIONS 1. In order to power the unit, 5. For right arrow function, extend the red, 12V(+) wire to connect the gray wire to a 12V(+) the 12V(+) post of the vehicle’s post (switch). There are 8 different battery. Extend the black right arrow flash patterns. -
Page 6: Mounting Instructions
MOUNTING INSTRUCTIONS 1. Following OEM instructions, Passenger Side Bracket remove the vehicle visor clips on the passenger and driver side of Center the vehicle. Retain the hardware Bracket Center and the visor clips. Bracket Driver Side 2. Secure each mounting bracket Bracket to the metal frame using the provided hex head bolts or 8-32... - Page 7 MOUNTING INSTRUCTIONS 4. With the light bar against the headliner and the brackets positioned, reattach the visor clips back into their original position Visor Clip using the original hardware. Car Roof 5. Push the black cable harness through the headliner and proceed with wiring instructions.
- Page 8 VEHICLE BRACKETS Name: Driver Side: Passenger Side: Center: Front Silverado 2007-2013 Tahoe 2007-2014 30-00032-08 30-00032-09 Yokon 2007-2014 30-00032-10 Avalanche 2007-2013 Split 30-00079-01 Front Tahoe 2015+ 30-00078-01 Surbuban 2015+ Yukon 2015+ Silverado 2014+ 30-00079-02 30-00078-02 Split 30-00033-05 30-00033-03 30-00033-04 Front Taurus 2011+ Interceptor Sedan 2011+ Split 30-00085-03...
- Page 9 FLASH PATTERNS The flash patterns are listed in consecutive order of appearance. To select a certain flash pattern, start with a recognizable pattern and use the blue wire to cycle through patterns. FLASH PATTERNS Cluster Attack Night Ride Combo Slow-Fast Combo Slow Combo Fast Half Half Slow...
Need help?
Do you have a question about the GEO Series and is the answer not in the manual?
Questions and answers