Advertisement
Quick Links
MODEL NUMBERS:
Complete Pkg
Pro X-Over Cottage 201163
PARTS LIST
Item # Qty
Part #
1
1
201065
2
1
201138
3
1
201232
4
1
201233
5
1
201207
6
1
200492
7
1
201402
8
1
200362
9
2
201200
10
2
201201
11
1
201202
12
1
201203
13
1
201400
14
1
201401
15
3
201206
15a
1
201377
16
1
201154
17
1
200369
18
1
200806
19
1
200378
20
2
200196
21
2
200376
22
4
400641
23
6
200195
24
8
200615
25
4
401017
26
14
400648
27
2
400367
28
2
200787
29
30
200942
30
1
201168
31
1
201370
23
24
22
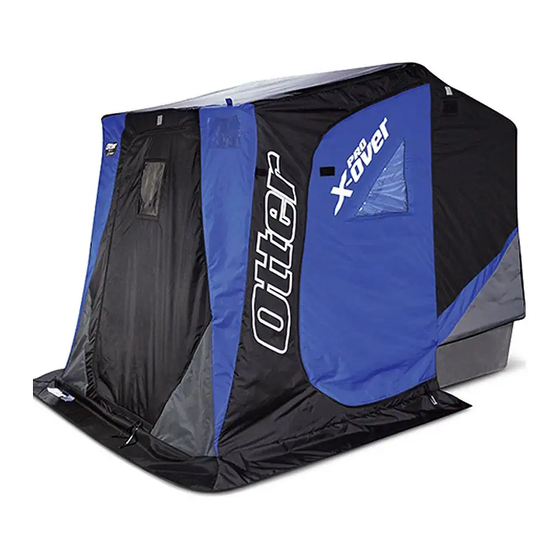
Otter Pro X-Over Cottage
Installation and Set-Up Instructions
Otter Pro X-Over Cottage
Fits Small Ultra Wide Otter II & Pro Sled Only
Parts Identifi cation and Check List
Description
Sled - Dark Gray
Tent - Pro X-Over Cottage
Frame Bracket "A"
Frame Bracket "B"
Back Adjustable Pole
Top Back Support Pole
Top Front Support Pole - Adjustable
Front Adjustable Support Pole
Left Side Back and Center Elbow and Extension
Right Side Back and Center Elbow and Extension
Left Side Front Elbow and Extension
Right Side Front Elbow and Extension
Left Side Bottom Elbow and Extension
Right Side Bottom Elbow and Extension
Middle Main Frame
Middle Main Frame with Pivot
Seat
Seat Bracket
Seat Base
Seat Rail - 48"
Seat Rail Cap
Seat Rail Bracket
#8 x 3/4" Self Tapping Screw
Black End Cap
5/16 Washer
1/4 x 3/4 Hex Bolt
1/4 Nylon Hex Lock Nut
5/16 x 2 Hex Bolt
5/16 Nylon Hex Lock Nut
7/16" Self Tapping Screw
Plastic Trim Lock Kit
Quick Switch Bracket Kit - Pro
25
26
27
28
3
14
13
16
20
29
30
Page 1
1
4
5
6
7
9
10
15
17
19
21
Instructions - 70761
2
8
11
12
15a
18
31
Advertisement

Related Manuals for Otter Pro X-Over Cottage


Summary of Contents for Otter Pro X-Over Cottage
- Page 1 Otter Pro X-Over Cottage Installation and Set-Up Instructions Otter Pro X-Over Cottage Fits Small Ultra Wide Otter II & Pro Sled Only Parts Identifi cation and Check List MODEL NUMBERS: Complete Pkg Pro X-Over Cottage 201163 PARTS LIST Item # Qty...
-
Page 2: Tools Required
Tools Required: Ratchet & 7/16” socket 7/16” Wrench Short Extension for Ratchet or 7/16” deep socket Drill/Driver Phillips Bit Phillips Screwdriver 1/2” Wrench 1/2” Socket 5/16” Drill Bit 7/16” Drill Bit NOTE: Installing the seating system before assembling the frame and canvas will make installation easier. ** Seat slide brackets are preassembled to the swivel. - Page 3 2. Slide brackets and swivel part way onto the plastic base. Adjust the fi t to be snug by pressing in on the brackets. However the brackets still need to be able to slide smoothly back and forth on the plastic base. Tighten the bolts securely once the fi...
- Page 4 4. Drill out the four pre-marked holes for the seat rail brackets as shown using a 5/16” drill bit. The sled may be tipped upside down to make drilling the holes easier. 5. Attach the metal brackets to the seat rail using the 5/16” bolts and nuts. The bracket with the greater angle goes toward the front of the sled.
- Page 5 6. After the brackets and end caps are installed, the seat rail may be bolted into place with the 1/4” bolts, washers and nylock nuts using the previously drilled holes. Install plastic base and seat onto the rail. Use WD-40 or silicone to lubricate plastic seat base opening so it will go onto the aluminum rail easier.
- Page 6 Note: Seat assembly not shown for clarity. 7. Position sled (Item 1) as shown with curved front to your left. 8. Drill the 4 marked holes using a 5/16” bit. 9. Drill the 7/16” hole in center of lip approximately 16” from bend in sled. The back adjustable pole (Item 5) not shown) is to be propped here.
- Page 7 11. Position middle main frame (Item 15), left side back and center elbow and extension (Item 9), and right side back and center elbow and extension (Item 10) as shown. Align locking mechanism in item 15 with square cutout in items 9 and 10 and slide together until they lock.
- Page 8 13. Slide one tube inside the other as shown for the left side bottom elbow and extension (Item 13) and the right side bottom elbow and extension (Item 14). Bottom elbows and extensions come wrapped together 14. Attach quick switch brackets (Item 31) onto items 14 and 13. Note: Off...
- Page 9 16. Insert a black end cap (Item 23) onto each end of the back main frame bar and attach the back main frame bar to the frame brackets (Item 3 and 4) in location shown and secure with 1/4” nylon hex lock nuts (Item 26) Back Main Frame Bar Back Main Frame Bar Seat Rail Not Shown...
- Page 10 18. Attach the front main frame bar to the frame brackets (Items 3 and 4) in location shown by pushing the white conversion clips onto the aluminum bushings on the brackets. Front Main Frame Bar Front Main Frame Bar White conversion clip Aluminum...
- Page 11 20. Set up main frame bars by grasping with both hands and pushing upward until button clicks into place. Start with bottom main frame bar and continue to the back main frame bar pushing lengthened bars into appropriate position. Center Main Frame Bar Back Main Frame Bar...
- Page 12 Converting front main frame bar from normal position to side door position. Front main frame bar shown in normal position. Normal Position A. All support poles should be installed. B. Unclip the front main frame bar from the frame brackets (Items 3 and 4), move it forward and clip it onto the side door brackets.
- Page 13 22. Slide the tent over the main frame bar assembly, then fasten the velcro straps on the inside of the tent to each main frame bar. Tent Note: Collapsing the center and front main frame poles part way down will make installation easier.
- Page 14 24. On the front of the fi shhouse, start in the corners and work inward, snap the plastic trim seal on the canvas tent (Item 2) to the lip edge of the sled (Item 1). The tent (Item 2) will meet in the middle and should be free to open and close so it can be removed.
- Page 15 Otter Outdoors Inc. 411 W Congress St. • Maple Lake, MN 55358 Otter Pro X-Over Cottage Phone 320-963-6480 • www.otteroutdoors.com August, 2019 Page 15...
Need help?
Do you have a question about the Pro X-Over Cottage and is the answer not in the manual?
Questions and answers