
Subscribe to Our Youtube Channel
Related Manuals for Dell Optiplex 5070 Small Form Factor


Summary of Contents for Dell Optiplex 5070 Small Form Factor
- Page 1 Dell OptiPlex 5070 Small Form Factor Setup and Specifications Regulatory Model: D11S Regulatory Type: D11S004 June 2020 Rev. A01...
- Page 2 A WARNING indicates a potential for property damage, personal injury, or death. © 2018 - 2019 Dell Inc. or its subsidiaries. All rights reserved. Dell, EMC, and other trademarks are trademarks of Dell Inc. or its subsidiaries. Other trademarks may be trademarks of their respective owners.
-
Page 3: Table Of Contents
Updating the BIOS in Windows ............................27 Updating BIOS on systems with BitLocker enabled....................27 Updating your system BIOS using a USB flash drive....................27 Updating the Dell BIOS in Linux and Ubuntu environments..................28 Flashing the BIOS from the F12 One-Time boot menu.....................28 Contents... - Page 4 Deleting or changing an existing system setup password..................32 Chapter 5: Software........................33 Downloading drivers................................33 System device drivers..............................33 Serial IO driver................................33 Security drivers................................33 USB drivers..................................33 Network adapter drivers...............................34 Realtek Audio................................. 34 Storage controller................................34 Chapter 6: Getting help......................... 35 Contacting Dell..................................35 Contents...
-
Page 5: Chapter 1: Set Up Your Computer
6. Follow the instructions on the screen to finish Windows setup: a. Connect to a network. b. Sign-in to your Microsoft account or create a new account. 7. Locate Dell apps. Table 1. Locate Dell apps Register your computer Dell Help & Support Set up your computer... - Page 6 Table 1. Locate Dell apps (continued) SupportAssist — Check and update your computer Set up your computer...
-
Page 7: Chapter 2: Chassis
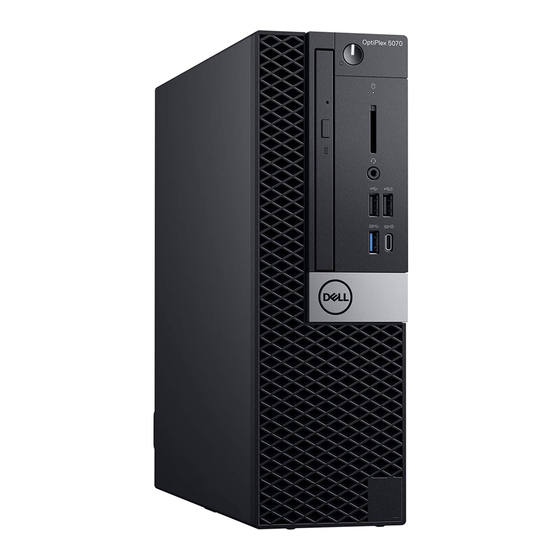
Chassis This chapter illustrates the multiple chassis views along with the ports and connectors and also explains the FN hot key combinations. Topics: • Front view Front view 1. Optical drive (optional) 2. Power button and power light 3. Hard drive activity light 4. -
Page 8: Chapter 3: System Specifications
Processor NOTE: Global Standard Products (GSP) are a subset of Dell’s relationship products that are managed for availability and synchronized transitions on a worldwide basis. They ensure the same platform is available for purchase globally. This allows customers to reduce the number of configurations managed on a worldwide basis, thereby reducing their costs. - Page 9 Credential Guard uses virtualization-based security to isolate secrets (credentials) so that only privileged system software can access them. Unauthorized access to these secrets can lead to credential theft attacks. Credential Guard prevents these attacks by protecting NTLM password hashes and Kerberos Ticket Granting Tickets NOTE: Processor numbers are not a measure of performance.
- Page 10 Table 3. Processor (continued) Intel Core Processors 9th Gen Core CPUs Tower/ Micro DG/CG Ready (Offered offline only) Small Form Factor Intel® Core™ i7-9700 (8 Cores/12MB/8T/ 3.0GHz to 4.7GHz/65W); supports Windows 10/Linux Intel® Core™ i7-9700T (8 Cores/12MB/8T/ 2.0GHz to 4.3GHz/35W); supports Windows 10/Linux Table 4.
-
Page 11: Memory
Memory NOTE: Memory modules should be installed in pairs of matched memory size, speed, and technology. If the memory modules are not installed in matched pairs, the computer will continue to operate, but with a slight reduction in performance. The entire memory range is available to 64-bit operating systems. Table 5. -
Page 12: Operating System
N-2 versions that are initially qualified for this platform. For future versions of Windows 10, Dell will continue to test the commercial platform with coming Windows 10 releases during device production and for five years post-production, including both fall and spring releases from Microsoft. -
Page 13: Storage
Storage Table 8. Storage Tower Small Form Factor Micro Bays: Optical Drives Supported 1 Slim 1 Slim Hard Drive Bay Supported (Internal) 1 x 3.5”/2 x2 .5” 1 x 3.5" or 2 x 2.5" 1 x 2.5" Hard Drives Supported 3.5”/2.5” (maximum) Interface: SATA 2.0 SATA 3.0... -
Page 14: System Board Connectors
System board connectors NOTE: See Detailed Engineering Specifications for maximum card dimensions. Table 9. System board connectors Tower Small Form Factor Micro PCIe x16 Slot(s) PCIe x16 (wired x4) Slot(s) 1 x4 open ended PCIe x1 Slot(s) Serial ATA (SATA) M.2 Socket 3 (for SSD) 1 - 2280/2230... -
Page 15: Graphics And Video Controller
Table 10. External ports and connectors (continued) Tower Small Form Factor Micro Support for Dual 25 W Graphics Audio: Rear panel Mic-in/Line-in, Line-out 1 x Line-out 1 x Line-out Universal Audio Jack 1 x UAJ 1 x UAJ 1 x UAJ and 1 x Line-out Graphics and Video Controller NOTE: Tower supports Full Height (FH) cards and Small Form Factor supports low profile (LP) cards. -
Page 16: Audio And Speakers
Regulatory Datasheet for this product is located at http://www.dell.com/regulatory_compliance. Details of Dell's environmental stewardship program to conserve product energy consumption, reduce or eliminate materials for disposal, prolong product life span and provide effective and convenient equipment recovery solutions may be viewed at www.dell.com/... - Page 17 NFPA 99 Leakage Current Spec (Dell ENG0011750) TCO 8.0 BFR / PVC Free: (aka Halogen Free) : The system shall comply with the limits defined in Dell specification ENV0199 - BFR/CFR/PVC-Free Specification California Energy Commission (CEC) MEPs - Internal PSU Requirements...
-
Page 18: Chapter 4: System Setup
Boot menu Press <F12> when the Dell logo appears to initiate a one-time boot menu with a list of the valid boot devices for the system. Diagnostics and BIOS Setup options are also included in this menu. The devices listed on the boot menu depend on the bootable devices in the system. -
Page 19: System Setup Options
System setup options NOTE: Depending on the and its installed devices, the items listed in this section may or may not appear. General options Table 16. General Option Description System Information Displays the following information: • System Information: Displays BIOS Version, Service Tag, Asset Tag, Ownership Tag, Ownership Date, Manufacture Date, and the Express Service Code. -
Page 20: Video Screen Options
Table 17. System Configuration (continued) Option Description NOTE: Depending on the computer and its installed devices, the items listed in this section may or may not appear. SATA Operation Allows you to configure the operating mode of the integrated hard drive controller. •... -
Page 21: Security
Table 18. Video Option Description • Auto (default) • Intel HD Graphics NOTE: If you do not select Auto, the on-board graphics device will be present and enabled. Security Table 19. Security Option Description Strong Password This option lets you enable or disable strong passwords for the system. The option is disabled by default. -
Page 22: Secure Boot Options
Table 19. Security (continued) Option Description Chassis Intrusion This field controls the chassis intrusion feature. Choose any one of the option: • Disabled (default) • Enabled • On-Silent OROM Keyboard Access • Disabled • Enabled (default) • One Time Enable Admin Setup Lockout Allows you to prevent users from entering Setup when Admin password is set. -
Page 23: Intel Software Guard Extensions Options
Intel Software Guard Extensions options Table 21. Intel Software Guard Extensions Option Description Intel SGX Enable This field specifies you to provide a secured environment for running code/storing sensitive information in the context of the main OS. Click one of the following options: •... -
Page 24: Power Management
Power management Table 23. Power Management Option Description AC Recovery Determines how the system responds when AC power is re-applied after a power loss. You can set the AC Recovery to: • Power Off • Power On • Last Power State This option is set to Power Off by default. -
Page 25: Manageability
Table 24. POST Behavior (continued) Option Description • Minimal — The system boots quickly, unless the BIOS has been updated, memory changed, or the previous POST did not complete. • Thorough — The system does not skip any steps in the boot process. •... -
Page 26: Wireless Options
Wireless options Table 27. Wireless Option Description Wireless Device Enable Allows you to enable or disable the internal wireless devices. The options are: • WLAN/WiGig • Bluetooth All the options are enabled by default. Maintenance Table 28. Maintenance Option Description Service Tag Displays the service tag of your computer. -
Page 27: Updating The Bios In Windows
3. Insert the USB Flash drive into the system that requires the BIOS update. 4. Restart the system and press F12 when the Dell Splash logo appears to display the One Time Boot Menu. 5. Using arrow keys, select USB Storage Device and click Return. -
Page 28: Updating The Dell Bios In Linux And Ubuntu Environments
Most Dell systems built after 2012 have this capability and you can confirm by booting your system to the F12 One-Time Boot Menu to see if BIOS FLASH UPDATE is listed as a boot option for your system. If the option is listed, then the BIOS supports this BIOS update option. - Page 29 3. The Bios flash menu will open then click the Flash from file. 4. Select external USB device System setup...
- Page 30 5. Once the file is selected, Double click the flash target file, then press submit . 6. Click the Update BIOS then system will reboot to flash the BIOS. System setup...
-
Page 31: System And Setup Password
7. Once complete, the system will reboot and the BIOS update process is completed. System and setup password Table 31. System and setup password Password type Description System password Password that you must enter to log on to your system. Setup password Password that you must enter to access and make changes to the BIOS settings of your computer. -
Page 32: Deleting Or Changing An Existing System Setup Password
The computer reboots. Deleting or changing an existing system setup password Ensure that the Password Status is Unlocked (in the System Setup) before attempting to delete or change the existing System and/or Setup password. You cannot delete or change an existing System or Setup password, if the Password Status is Locked. To enter the System Setup, press F2 immediately after a power-on or reboot. -
Page 33: Chapter 5: Software
Downloading drivers Downloading drivers 1. Turn on the . 2. Go to Dell.com/support. 3. Click Product Support, enter the Service Tag of your , and then click Submit. NOTE: If you do not have the Service Tag, use the auto detect feature or manually browse for your model. -
Page 34: Network Adapter Drivers
Network adapter drivers Verify if the Network adapter drivers are already installed in the system. Realtek Audio Verify if audio drivers are already installed in the computer. Storage controller Verify if the storage control drivers are already installed in the system. Software... -
Page 35: Chapter 6: Getting Help
Dell product catalog. Dell provides several online and telephone-based support and service options. Availability varies by country and product, and some services may not be available in your area. To contact Dell for sales, technical support, or customer service issues: 1.
Need help?
Do you have a question about the Optiplex 5070 Small Form Factor and is the answer not in the manual?
Questions and answers