
Related Manuals for Videonics MX-1


Summary of Contents for Videonics MX-1
- Page 1 Videonics MX-1 Digital Video Mixer INSTRUCTION MANUAL VIDEONICS The Video Editing Company...
-
Page 2: Controls
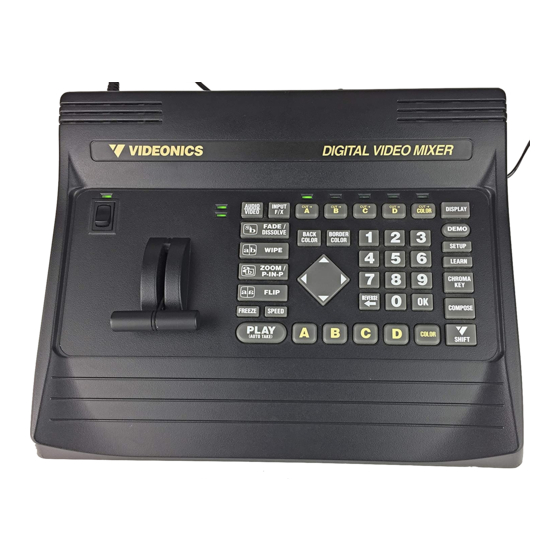
VIDEONICS 1. POWER INDICATOR 2. POWER SWITCH 3. TAKE BAR (FOR MANUAL TRANSITIONS) 4. AUTO-TAKE, AUTO-TAKE SPEED, AND VIDEO FREEZE BUTTONS 5. TRANSITION EFFECT BUTTONS 6. AUDIO/VIDEO SELECTOR AND INDICATOR 7. INPUT EFFECTS (MOSAIC, STROBE, ETC.) BUTTON 8. 4-INPUT SWITCHER CONTROLS, INDICATORS 9. - Page 3 Videonics MX-1 Digital Video Mixer INSTRUCTION MANUAL MX-1 Digital Video Mixer Instruction Manual • MANL-0521-02 • © 1994 Videonics, Inc. The Videonics logo, Thumbs Up, and Videonics Video TitleMaker are registered trademarks of Videonics, Inc. MX-1 is a trademark of Videonics.
-
Page 4: Table Of Contents
In a Hurry? ... 1 Helpful Sections ... 1 For More Information ... 1 What is a Video Mixer? ... 2 What is the MX-1? ... 2 Applications and Setups ... 3 Editing with the MX-1 ... 4 Chapter 2 • QuickStart ... 5 Chapter 3 •... - Page 5 Using the TBC ... 64 Dual TBC Mode ... 64 Frame Rate Lock Setting ... 64 Vertical Interval Data ... 65 Answers About the MX-1’s TBC ... 65 Chapter 19 • Editing and Other Applications 67 Live Mixing ... 67 Editing with Untimed Sources ...
-
Page 6: Chapter 1 • Introduction
If you want to get started quickly, see the QuickStart section, Chapter 2. Helpful Sections The MX-1 is a sophisticated video production tool. Some of the concepts used in this manual may be new to you. You may wish to consult these sources: •... -
Page 7: What Is A Video Mixer
What is the MX-1? The MX-1 is a video mixer with many additional features. (See the Glos- sary and Digital Video Primer for descriptions of the following functions.) Four-Input Synchronized Switcher. -
Page 8: Applications And Setups
Effects Generator. Effects can be used to enhance a source or to transition between two sources. TBC (Time Base Corrector). The time base of the MX-1’s output is always automatically corrected. This makes the picture stable even when the inputs are not. -
Page 9: Editing With The Mx-1
Editing with the MX-1 Note that the MX-1 is not an edit controller — that is, it does not control the VCRs and camcorders. You can control the decks manually or by using an external edit controller (such as those made by Videonics). -
Page 10: Chapter 2 • Quickstart
• Connect the power supply (F) and turn the unit on, confirming that the power light comes on. • Connect the MX-1’s OUT jacks to the VIDEO and AUDIO IN jacks of a VCR (D). Connect a television/monitor to the VCR in the normal fashion (A), so that you will be able to see the VCR’s output. -
Page 11: The Preview Screen
PAGE 6 • Press any key to stop the demo. The PREVIEW screen • You should see the following (with some slight differences) on the PREVIEW monitor screen: • This screen shows you four preview images (B) — these are your video inputs in miniature. -
Page 12: Setting Up A Transition
VIDEONICS DIGITAL VIDEO MIXER IN 1. The yellow highlight above preview A tells you A is currently the active input. • Press CUT B. The B light will come on and the OUTPUT monitor will show whatever is plugged into IN 2. B should be highlighted in yellow. •... -
Page 13: Performing Transitions
PAGE 8 SPEED • The screen now shows: The CURRENT source (A), the NEXT source (B), and the desired effect (the horizontally-moving curtain wipe). Press PLAY and the wipe will occur. Both the PREVIEW and OUTPUT screens show the results. •... - Page 14 OK to highlight the symbol, but it’s not necessary. 4 Press PLAY. As you use the MX-1, you will memorize the numbers of the effects you use the most. A list of effects is in the back of this manual and on the Reference Card.
-
Page 15: Chapter 3 • Installation
Chapter 3 • Chapter 3 • Connections: Overall Concept The MX-1 Digital Video Mixer can accept up to four audio/video sources. It can send any of these to the output and can perform transitions between any two sources. The output is sent to a VCR and/or monitor (called the OUTPUT monitor). -
Page 16: Types Of Input And Output Jacks
VIDEONICS DIGITAL VIDEO MIXER The PREVIEW monitor needs a composite (RCA-style) video input. The OUTPUT monitor will be connected to your recording VCR (C ) in most cases. Required connections depend on the VCR. You can use any arrangement that will allow you to view tapes played on the VCR. C A Record VCR. -
Page 17: Types Of Cables Used With The Video Mixer
RCA-BNC adapters. • Audio. The Mixer uses RCA-style cables for all audio channels. How Many Monitors? Normally, the MX-1 is used with two monitors. • The PREVIEW monitor contains the on-screen controls and previews of all four inputs. • The OUTPUT monitor shows the output, complete with all effects and transitions, exactly as it will be recorded or displayed. -
Page 18: In And Out Markings
VIDEONICS DIGITAL VIDEO MIXER It is possible to work with an output monitor and no PREVIEW monitor. This is not a recommended setup because it requires you to work “blind,” without the benefit of the on-screen controls or input previews. More Than Two Monitors You can add a monitor for each input as well. - Page 19 • If you will be recording the Mixer’s output (as in a video production setup), connect the MX-1 video OUT to the VIDEO IN of the Record VCR (B). Then connect a television or monitor to the Record VCR (A), as described in the manual that came with the VCR.
-
Page 20: Connecting Sources
• Still others switch automatically when you plug the cable into the VIDEO IN jack. Check the connections. Turn the MX-1, VCR, and television on and press DEMO. You should see a series of images with various transitions between them. Press DEMO again to stop the demo. - Page 21 Some VCRs have circuitry that is intended to improve the apparent sharp- ness of their outputs. These circuits often boost the signal past standard limits and can interfere with the MX-1’s TBC (time base corrector). We recommend you turn such options off.
- Page 22 Mixer. Test the input connections. When the MX-1 is turned on, it automatically sets up IN 1 to be source A, IN 2 to be source B, etc. If the Setup screen has not been used to change these, you should be able to press the CUT buttons and see the sources you have connected.
- Page 23 PAGE 18 VIDEONICS DIGITAL VIDEO MIXER Note: If the picture tears or you see horizontal white or black lines, see Chapter 20, “Video Quality.”...
-
Page 24: Connecting Editing Equipment
VIDEONICS Video processors, color correctors, enhancers, and the like can be used between any source and the MX-1 ( ); or they can be placed between the MX- 1’s output and the recording VCR ( ). • If different sources need different kinds of correction, then a processor should be connected between the output of each source and the Mixer input ( ). -
Page 25: Adding Titles
If you need more flexibility, you can connect an external audio mixer to any of the audio inputs. You can also bypass the MX-1 entirely, connecting the audio mixer’s output directly to the recorder’s audio input. -
Page 26: Edit Control
VIDEONICS DIGITAL VIDEO MIXER Edit Control An external edit controller can be used to control the source and Record VCRs. Mixer transitions can be triggered at the critical moment by a “GPI trigger,” if the controller has a GPI output and it is connected to the Mixer’s CONTROL input. -
Page 27: Chapter 5 • Setup Screen
PAGE 22 Chapter 5 • Chapter 5 • The Setup screen allows you to change how the inputs and out- puts are used and define certain options. You can: • Route any video input jack (IN 1, 2, 3, 4) to source A, B, C, or D. •... -
Page 28: Routing The Inputs
VIDEONICS DIGITAL VIDEO MIXER automatic connections are locked in and can only be changed manually, using the Setup screen. Audio connections are not changed by the automatic connection feature. Routing the Inputs If the automatic connections are not satisfactory, you can change the input routing using the Setup screen. -
Page 29: Advanced Setup
PAGE 24 • Use the right and left arrow keys to change the video connection. You can choose either the S-video (Y/C) jacks or the composite (RCA-style) jacks of any of the four inputs. • Use the up and down arrows to change the audio connection. You can use the stereo audio jacks (both L and R) from IN 1 or IN 2 or IN 3, or you can choose the L-only jack from IN 3, or the R-only jack from IN 3. - Page 30 Chapter 18, “TBC”) compensates for slight deviations in video frame rate between the inputs and the output. When it is locked (setting 0), the MX-1 adjusts the frame rate of the output by very small amounts at the end of each video field, to reduce or eliminate the need to repeat or drop video fields.
- Page 31 PAGE 26 VIDEONICS DIGITAL VIDEO MIXER Seeing the Settings The small preview screens do not show the effects of these settings. To see the full screen picture as you change the settings, set both CURRENT and NEXT to the source you are adjusting before you display the advanced setup screen.
-
Page 32: Chapter 6 • Basic Controls
VIDEONICS DIGITAL VIDEO MIXER Chapter 6 • Chapter 6 • The Mixer is controlled through its front panel and the on-screen controls of its PREVIEW screen. This section describes the basics. Built-In Demo The Mixer includes a built-in demo that shows many of the transitions. Simply press the DEMO button and the unit will cycle through many of its transition effects. -
Page 33: Source Previews
PAGE 28 Source Previews All four sources appear on the PREVIEW screen, in miniature ( ). You can use the previews to watch the action, position cameras, find a spot on a tape, etc. Preview Image Quality The miniature previews are designed for a quick, convenient view of all the action and won’t match the quality of the video that appears on the Mixer’s normal output. -
Page 34: Viewing A Transition
VIDEONICS DIGITAL VIDEO MIXER next transition. Other on-screen controls ( ) indicate the next effect’s speed and direction and the colors of the background and border. The following chapters explain these items. Viewing a Transition While a transition is being performed, the PREVIEW display disappears and is replaced by the transition effect, performed at full quality and frame rate. -
Page 35: Chapter 8 • Transitions
PAGE 30 Chapter 8 • Chapter 8 • The MX-1 Video Mixer includes hundreds of transitions that can be used to go from one source to another. They range from simple cuts, dissolves, and wipes to sophisticated zooms, fly-ins, and flips. -
Page 36: Which Source Is Which
VIDEONICS DIGITAL VIDEO MIXER At the completion of the effect, the NEXT source becomes the CURRENT source and you are ready to select the new NEXT source and effect for another transition. Which Source is Which? The lights above the CUT buttons and the highlights on the PREVIEW screen indicate the CURRENT and NEXT sources. -
Page 37: Choosing The Transition Effect
PAGE 32 To choose the NEXT source, use the ABCD buttons at the bottom of the control panel. Choosing the Transition Effect Below the preview images is an array of symbols (C). Each symbol repre- sents one of the available effects. A blue highlight (D) shows which effect has been selected. -
Page 38: Executing The Transition
VIDEONICS DIGITAL VIDEO MIXER If you make a mistake while entering a number, simply press any arrow key or OK to end the number you were entering, then enter the correct number. A list of effects is in the back of this manual and on the Reference Card. -
Page 39: Setup For The Next Transition
PAGE 34 To change the speed, press the SPEED button. The number will increase by 1 with each press. Continue pressing until the speed is set to the desired number. Hint: Press SHIFT and SPEED at the same time to decrease the number. You can change the speed anytime before you execute the effect. -
Page 40: Reverse
A for- ward transition goes to the old footage and a reverse direction is used for returning to the present. The MX-1 has an auto-reverse feature to make this easy. The auto-reverse setting automatically changes the effect’s direction after each tran- sition. - Page 41 PAGE 36 Press SHIFT and REVERSE simultaneously to make future transitions auto-reverse. The arrow below the highlighted effect on the PREVIEW screen becomes an auto-reverse arrow to show that auto-reverse is set. The auto- reverse arrow points forward or reverse to show the direction that will be used for the next transition.
-
Page 42: Chapter 9 • Audio Control
VIDEONICS DIGITAL VIDEO MIXER Chapter 9 • Chapter 9 • Sound is just as important as video in a video production. The Mixer provides flexible control, letting you automatically or manu- ally fade the sound between sources. Connecting Sound Sources The Installation and Setup instructions (Chapters 3 and 5) describe how to connect sound sources and route them so they are associated with sources A, B, C, and D. -
Page 43: Sound Strategies
PAGE 38 The sound symbol above the preview images ( ) shows the CURRENT sound source (the one that is currently live.) The sound symbol below the previews ( ) shows the NEXT sound source (where the sound will come from after the next transition). -
Page 44: Headphones
MX-1’s audio inputs and permanently set that source as your sound input, as described in the “Independent Audio” section, above. This allows you to use the mixer when you need flexible control, or use the MX-1’s audio mix capability when you prefer to have the audio fade automatically, with video transitions. -
Page 45: Borders And Backgrounds
PAGE 40 Chapter 10 • Chapter 10 • Borders and Backgrounds You can define a solid color background to be used behind some effects and for the COLOR source. You can also add a colored border that separates the two sources during a transition. The Solid Color Background The background color appears in three places: •... -
Page 46: Turning The Border On And Off
VIDEONICS DIGITAL VIDEO MIXER Choices 0-8 are pre-defined. Choice 9 is a color you can define, as de- scribed in the next section. 0 Black 1 White 2 Gray 3 Red 4 Yellow 5 Green 6 Bright Blue 7 Light Blue 8 Purple 9 User-defined color * * Color 9 is a medium blue-green until it is redefined. - Page 47 PAGE 42 SHIFT Once the user-defined color has been selected, the following buttons can be used to change it. A Use SHIFT with 1 and 4 to increase and decrease the hue, or color (red, green, yellow, etc.). B Use SHIFT with 2 and 5 to increase and decrease the saturation, or degree of color (dull red vs.
-
Page 48: Chapter 11 • Input Effects
• Use the ABCD buttons at the bottom of the MX-1’s front panel to decide which source is to be modified. The green highlight will change to that source. - Page 49 PAGE 44 • Use the up and down arrows to change the effect’s value. Some of the effects are turned on or off: 1 indicates that the effect is on, 0 indicates that it is off. Others can be set to a numeric value. •...
- Page 50 VIDEONICS DIGITAL VIDEO MIXER List of Input Effects Here is a description of the effects (from left to right as they appear on the screen). In all cases, a setting of 0 turns the effect off. EFFECT VALUES Black and white B/W negative Color negative Flip horizontal...
-
Page 51: Chapter 12 • Freeze
PAGE 46 Chapter 12 • Chapter 12 • With the touch of a button, you can freeze a picture on the screen. Input effects and transitions can also be frozen. At any time, you can freeze the picture by pressing the FREEZE button. Whatever is on the output (on the OUTPUT monitor) —... - Page 52 VIDEONICS DIGITAL VIDEO MIXER PAGE 47 Example: Your tape shows two children talking. You press FREEZE at the appropriate moments, capturing a sequence of glances, gestures, laughs, and facial expressions.
-
Page 53: Chapter 13 • Chroma Key
Chroma key is an advanced, professional feature that usually requires some time and care to set up properly. To achieve a good chroma key, you should plan on some experimentation. The MX-1 includes several features that allow you to fine-tune the effect, and it is important that you carefully follow the steps in this chapter for the best results. -
Page 54: Setting Up The Picture For Chroma Key
Then use the chroma key feature of the MX-1 to replace the color of the cloth with some aerial footage of a city and you have turned a high-flying idea into a dramatic... -
Page 55: Performing A Chroma Key
• Be sure no other portion of the image shares the key color (the color of background that will be keyed out). The MX-1 can chroma key on any color, so you can select a background color based on your subject. Bright blue or green are the colors most commonly used in professional chroma key studios. -
Page 56: Fine-Tuning The Key-Colors
VIDEONICS DIGITAL VIDEO MIXER • Press OK. All areas of the picture that match the color under the cursor will be replaced by the background source (B). • You can increase the range of colors that will be keyed by identifying additional key-colors. -
Page 57: Ending Chroma Key
PAGE 52 Performing the Chroma Key When the PREVIEW screen shows the desired result, press PLAY. The picture on the OUTPUT monitor will be replaced by the chroma keyed image. In our example, we would see a transition from the city footage to the same footage with the superhero added. -
Page 58: Chapter 14 • More Effects
VIDEONICS DIGITAL VIDEO MIXER Chapter 14 • Chapter 14 • Some of the Mixer’s transitions also act as effects. When set part way, they alter the picture in useful ways. You can also create color or black references. Tint Effect You can use the background color capability to tint a picture. -
Page 59: Applications
PAGE 54 Chapter 15 • Chapter 15 • Picture-In-Picture (PIP) When one picture can’t quite tell the story alone, “picture-in- picture” allows you to combine two images on one screen, placing one in a small rectangle. The inset picture can be scaled to any size and moved to any location on the screen. - Page 60 VIDEONICS DIGITAL VIDEO MIXER Enter PIP Mode Hold SHIFT as you press ZOOM/P-IN-P. The PREVIEW screen changes to show the background video with the foreground video inset in a small window. Move and Size the Window • Use the arrow keys to move the rectangle. •...
-
Page 61: Ending Pip Mode
PAGE 56 You can cut or dissolve from the PIP image back to the CURRENT source by using the PLAY button or Take Bar. More Changes You can continue to modify the PIP image even after it is displayed on the output, using any of the PIP features described above: You can move or resize the window, freeze the background image, turn the border on and off and change its color. -
Page 62: Chapter 16 • Compose
VIDEONICS DIGITAL VIDEO MIXER Chapter 16 • Chapter 16 • The MX-1 Mixer will allow you to create an elaborate composite screen made up of picture elements, solid colors, lines, and rect- angles. You can perform limited transitions from the composed image to a source. -
Page 63: Rules For Compositions
PAGE 58 rectangle was added ( ) and a second still ( ) was centered on the white rectangle. Rules for Compositions The first step is to plan your composition. You can create almost anything with the available elements, but there are a few rules to keep in mind. •... -
Page 64: Placing The Element
VIDEONICS DIGITAL VIDEO MIXER • To make the rectangle larger or smaller, hold SHIFT and use the up and down arrows. This changes the height and width of the rectangle together. In other words, SHIFT+UP and SHIFT+DOWN changes the rectangle’s size but not its proportions (that is, the shape, or “aspect ratio,”... -
Page 65: Adding More
PAGE 60 will automatically freeze when you use the arrow keys to place a new element.) Input effects are not applied to videos that are placed in the composed screen, except for the background video. Note: While the video in the rectangle is still moving, occasionally lines may appear alongside the rectangle. -
Page 66: Ending Compose Mode
VIDEONICS DIGITAL VIDEO MIXER You can cut and dissolve back and forth between CURRENT and compose using PLAY or the Take Bar but note that if you transition to any other source, the composed screen is erased. While the composition is being displayed, you can freeze and unfreeze the background image by pressing FREEZE. -
Page 67: Sequences (Learn Mode)
In other words, it is remembered as if you had used the PLAY button rather than the Take Bar. • The learned sequence is erased when you turn the MX-1 off or it loses power, or when you learn a new sequence. -
Page 68: Playing The Sequence
VIDEONICS DIGITAL VIDEO MIXER • Perform a series of transitions. Each transition will be performed as usual and will be simultaneously memorized. You can use any normal method for performing these (such as use of numbers, arrow keys, or large effect buttons) but using the number keys is best since it uses fewer learn steps. -
Page 69: Number Of Steps
PAGE 64 Number of Steps The learned sequence can contain up to 50 “steps.” Each transition effect number counts as one step and each press of the PLAY button counts as one more. If your learn sequence consists entirely of effect numbers followed by PLAY, then 25 transitions can be stored. -
Page 70: Chapter 18 • Tbc
See the Digital Video Primer pamphlet for more information. Using the TBC The MX-1’s built-in TBC is always active — it cannot be disconnected or disabled and no user action is required to turn it on. Dual TBC Mode It is possible to use the MX-1 as a dedicated two-channel TBC which performs time base correction on two separate channels. -
Page 71: Frame Rate Lock Setting
PAGE 66 Frame Rate Lock Setting There is one option you can set that affects the operation of the MX-1’s TBC. The option, frame rate lock disable, reduces or eliminates the need for dropped or duplicated video fields, a common consequence of TBC use. The... -
Page 72: Answers About The Mx-1'S Tbc
VIDEONICS DIGITAL VIDEO MIXER Answers About the MX-1’s TBC Here are answers to some commonly asked technical questions. (Some of this is highly technical but don’t be concerned — you don’t need to under- stand any of it to have full use of the Mixer and its TBC.) •... -
Page 73: Editing And Other Applications
Editing and Other Applications With its four inputs, frame synchronizer, time base corrector, and audio capabilities, the MX-1 Digital Video Mixer is adept at mixing multiple video sources in a wide variety of applications, including both single- and dual-source editing. -
Page 74: Loosely Synchronized Tapes
VCR’s pause control to get them in sync. Once they are playing in synchrony, use the MX-1 to transition from one to the other as the action warrants. Use the sound recorded by the camcorder aimed at the participants’... - Page 75 PAGE 70 • Release pause on the recorder, to record more of the frozen picture. At the appropriate moment, perform the transition between the frozen picture and the rolling video from the next scene. This works best with a recorder equipped with flying-erase heads (a VCR feature that makes a clean break when recording is paused).
-
Page 76: A/B Roll Editing
VIDEONICS DIGITAL VIDEO MIXER A/B Roll Editing The most complex case is editing scenes from multiple sources. In this case, it is the job of a device called an A/B roll edit controller (or your job, if you’re doing it manually) to synchronize the sources so they are correctly timed. -
Page 77: Other Accessories
PAGE 72 Additional TitleMaker features, such as tinted backgrounds, patterns, scroll, and crawl, can all be used. Because the Mixer’s TBC creates a stable time base, the TitleMaker will be able to lock solidly to it, for an excellent picture. Title generators of lesser quality can be used instead on one of the Mixer’s inputs. - Page 78 VIDEONICS DIGITAL VIDEO MIXER Automatic scan mode presents a full screen view of each input in turn on the OUTPUT monitor. The scan starts with A and proceeds with B, C, and D, then repeats the sequence. Each is displayed for about two seconds. The switch between sources in not synchronized and may cause the screen to jump or roll.
-
Page 79: Chapter 20 • Video Quality
PAGE 74 Chapter 20 • Chapter 20 • The Digital Video Mixer is designed to meet the highest video standards. A number of video ar- tifacts can be created, especially when fancy video effects are in use. This chapter describes com- mon artifacts. -
Page 80: Upside-Down Video
If there is an EDIT switch turn it ON. If the processing cannot be dis- abled, you can compensate using the MX-1’s special “filter settings.” The Advanced Setup section of Chapter 5, “Setup Screen,” describes this. PAGE 75... -
Page 81: Chapter 21 • Specifications
PAGE 76 Chapter 21 • 21 • Specifica- tions BASIC FEATURES 4-input switcher, digital frame synchronizer and special effects mixer with dual time base corrector. EFFECTS Video: 210 dissolves, wipes, slides, compress/ expand, fly-in, flips, zooms, luminance key, more (see list). Manual or automatic at 10 speeds. Input effects include black and white, negative (black and white and/or color), horizontal and vertical flip, mosaic, strobe, film-look strobe,... -
Page 82: Chapter 22 • Glossary
VIDEONICS DIGITAL VIDEO MIXER Chapter 22 • 22 • Glossary A/A (OR A/X/A) ROLL EDITING Editing from a single source, using effects to tran- sition from the source to itself (source “A” to “A”) using a picture freeze at the end of one scene to transition the start of the next scene. - Page 83 PAGE 78 CROSS COLOR This phenomenon manifests itself as spurious on- screen rainbow patterns on highly textured ob- jects similar to those found on a striped shirt or tweed jacket. CROSSFADE The audio equivalent of the video dissolve where one sound track is gradually faded out while a second sound track simultaneously replaces the original one.
- Page 84 VIDEONICS DIGITAL VIDEO MIXER GENLOCK Creation of a video signal that is synchronized to a reference signal. Because the new signal is synchronized, it can be superimposed on the origi- nal signal and effects, such as dissolves, can be performed. Name comes from “GENerating a LOCKed signal.”...
- Page 85 PAGE 80 VIDEONICS DIGITAL VIDEO MIXER...
- Page 86 VIDEONICS DIGITAL VIDEO MIXER POSTERIZATION See PAINT. PREVIEW An output that allows the operator to see the video source before processing (before titles are added, effects are performed, etc.) Typically, each signal can be previewed on its own monitor. This is an effective method to check work before going “on the air.”...
- Page 87 PAGE 82 SUPERIMPOSE To place in front of video, e.g., placing text over a video signal. S-VHS (Super-VHS) High resolution version of the VHS videotape for- mat. S-VIDEO Abbreviation for Super-Video, this term describes a video system which transmits the chrominance (color) and luminance (black and white) informa- tion over separate conductors to minimize color fringing, dot crawl, and other artifacts of color and...
-
Page 88: Chapter 23 • Effects List
VIDEONICS DIGITAL VIDEO MIXER Chapter 23 • 23 • Effects List Terms and Abbrevia- tions (A): The CURRENT source (the one on the screen before the transition begins). (B): The NEXT source (the one on the screen after the transition is complete). Dissolve: One image fades away as another fades Wipe: A wipe is a simple window or boundary that reveals the underlying video. -
Page 89: Cutting Back And Forth
Index Front panel buttons and blue, chroma key 46 rear panel connector blue highlight labels are indicated by upper-case entries (such BNC connections 11 as FREEZE). border A/A roll 3, 68 effects 69 BORDER COLOR freeze 69 A/A roll editing 68 border color 6 A/B roll editing 69 borders 7, 39... -
Page 90: Soft Cuts
monitor input switch 14 monitors 12 IN 3 audio 21 IN and OUT 13 independent audio 37 mono 11, 22 indicators mosaic 44 sound source 36 movie 44 infinite-window TBC 66 multiple cameras 3 input effects 42 multiple monitor setup 12 choosing 42 multiple source editing list 44... - Page 91 synchronized cuts 28 volume 23 synchronized switcher 2 synchronizing edits 67 weight 74 white flashes 73 T-bar 8, 30, 34 window 54 take bar 8, 30, 34 WIPE 33 TBC 3, 64 wipe 81 controlling 64 wipes 30 defined 64 TBC control 66 tearing video 73 Y-cable 11...
- Page 92 Reading the Transition Symbols: On-screen symbols generally show the effect in the middle of the transition. The symbol shows the effect in its forward direction (that is, not re- versed). The dark area shows the incoming video (B) and the white area shows the outgoing source.
- Page 93 where needed to show action. For example, a squashed or shrunk letter shows that the video is compressed; part of a letter sliding off the screen indicates a slide; a flipped letter indicates a flip effect. Multi-step effects are often indicated by I, II, and III. I indicates the first step, II the second, and III the third.
Need help?
Do you have a question about the MX-1 and is the answer not in the manual?
Questions and answers