
Subscribe to Our Youtube Channel
Related Manuals for Kramer VM-2DT


Summary of Contents for Kramer VM-2DT
- Page 1 USER MANUAL MODEL: VM-2DT 1:2 HDBT Distributor P/N: 2900-300363 Rev 1 www.KramerAV.com...
-
Page 2: Table Of Contents
Introduction Getting Started Overview Typical Applications About HDBaseT™ Technology Using Twisted Pair Cable for HDBT Defining the VM-2DT 1:2 HDBT Distributor Connecting the VM-2DT Operating the VM-2DT Routing the IR and RS-232 Signals Acquiring an EDID Upgrading the Firmware Default EDID... -
Page 3: Introduction
Kramer Electronics Ltd. Introduction Welcome to Kramer Electronics! Since 1981, Kramer Electronics has been providing a world of unique, creative, and affordable solutions to the vast range of problems that confront the video, audio, presentation, and broadcasting professional on a daily basis. In recent years, we have... -
Page 4: Overview
European Advanced Recycling Network (EARN) and will cover any costs of treatment, recycling and recovery of waste Kramer Electronics branded equipment on arrival at the EARN facility. For details of Kramer’s recycling arrangements in your particular country go to our recycling pages at www.kramerav.com/support/recycling/. -
Page 5: Typical Applications
IR, as well as various control signals. Using Twisted Pair Cable for HDBT Kramer engineers have developed special twisted pair cables to best match our digital twisted pair products that significantly outperform regular CAT 5 / CAT 6 cables. We strongly recommend that you use shielded twisted pair cable. For details, go to our website at www.kramerav.com/product/VM-2DT. -
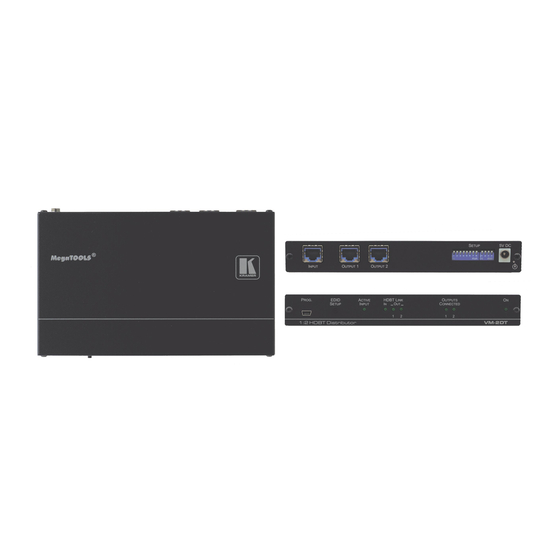
Page 6: Defining The Vm-2Dt 1:2 Hdbt Distributor
Kramer Electronics Ltd. Defining the VM-2DT 1:2 HDBT Distributor This section defines the VM-2DT. Figure 1: VM-2DT 1:2 HDBT Distributor Front Panel Feature Function PROGRAM Mini USB Connector Use to send serial commands, see Protocol 3000 on page 15. Connect to a PC to perform firmware upgrades (via K-Upload) and work with the EDID Designer. -
Page 7: Connecting The Vm-2Dt
Kramer Electronics Ltd. Connecting the VM-2DT Always switch off the power to each device before connecting it to your VM-2DT. After connecting your VM-2DT, connect its power and then switch on the power to each device. To connect the VM-2DT as illustrated in the example in Figure 1. -
Page 8: Operating The Vm-2Dt
IR signals can traverse between IN and OUT 1 ports and RS-232 commands can traverse between IN and OUT 2 ports. DIP-switches 2 and 5 are set to ON and are therefore disabled. Figure 4: VM-2DT DIP-Switches Setup VM-2DT - Operating the VM-2DT... - Page 9 Blu-ray player IR remote control transmitter. To route the IR signal you have to use the Kramer external IR Receiver cable on one end and the Kramer IR emitter cable on the other end. Note that IR Emitter Extension Cables are also available, if required.
- Page 10 Kramer Electronics Ltd. Figure 5: IR/RS-232 Routing Example VM-2DT - Operating the VM-2DT...
-
Page 11: Acquiring An Edid
Supports EDID Designer (via the mini USB port ) that can be loaded from our website: Kramer EDID Designer. Note that in order to use the mini USB port , you need to download and the Kramer USB driver from our web site at: www.kramerav.com/support/product_downloads.asp and install it. Forcing the RGB Mode... -
Page 12: Upgrading The Firmware
The latest version of K-UPLOAD and installation instructions can be downloaded from our website at: www.kramerav.com/support/product_downloads.asp. Note that in order to use the mini USB port, you need to install the Kramer USB driver, available at: www.kramerav.com/support/product_downloads.asp. VM-2DT - Operating the VM-2DT... -
Page 13: Default Edid
1024 x 768p at 75Hz - VESA 1280 x 1024p at 75Hz - VESA 1280 x 1024p at 60Hz - VESA STD 1600 x 1200p at 60Hz - VESA STD 1152 x 864p at 75Hz - VESA STD VM-2DT - Default EDID... - Page 14 Front center..... No Rear left/right..No Rear center....No Front left/right center.. No Rear left/right center... No Rear LFE....No Report information Date generated... 01/12/2016 Software revision..2.90.0.1020 Data source....Real-time 0x0071 Operating system..6.1.7601.2.Service Pack 1 VM-2DT - Default EDID...
-
Page 15: Technical Specifications
1.29kg (2.84lb) Included Accessories: Power supply RK-T2B 19” rack adapter, Kramer HDBT cables Options: Specifications are subject to change without notice at www.kramerav.com For optimum range and performance use the recommended Kramer cables available at www.kramerav.com/product/VM-2DT VM-2DT - Technical Specifications... -
Page 16: Default Communication Parameters
Baud Rate: 115,200 Data Bits: Stop Bits: Parity: None Factory Reset Protocol 3000 FACTORY command to reset to factory default configuration Serial USB Command Format: ASCII protocol 3000 Example (get the input signal status): #SIGNAL? 1,1<cr> VM-2DT - Technical Specifications... -
Page 17: Protocol 3000
You can enter commands directly using terminal communication software (e.g., Hercules) by connecting a PC to the serial or Ethernet port on the VM-2DT. To enter CR press the Enter key (LF is also sent but is ignored by the command parser). -
Page 18: Understanding Protocol 3000
Spaces between parameters or command terms are ignored. Commands in the string do not execute until the closing character is entered. A separate response is sent for every command in the chain. VM-2DT - Protocol 3000... -
Page 19: Kramer Protocol 3000 Syntax
Kramer Electronics Ltd. Kramer Protocol 3000 Syntax The Kramer Protocol 3000 syntax uses the following delimiters: CR = Carriage return (ASCII 13 = 0x0D) LF = Line feed (ASCII 10 = 0x0A) SP = Space (ASCII 32 = 0x20) Some commands have short name syntax in addition to long name syntax to enable faster typing. -
Page 20: Protocol 3000 Commands
Get device build date Response ~nn@BUILD-DATESPdateSPtimeCR LF Parameters date – Format: YYYY/MM/DD where YYYY = Year, MM = Month, DD = Day time – Format: hh:mm:ss where hh = hours, mm = minutes, ss = seconds K-Config Example “#BUILD-DATE?”,0x0D VM-2DT - Protocol 3000... - Page 21 – String of up to 19 printable ASCII chars Notes This command identifies equipment connected to Step-in master products and notifies of identity changes to the connected equipment. The Matrix saves this data in memory to answer REMOTE-INFO requests K-Config Example “#MODEL?”,0x0D VM-2DT - Protocol 3000...
- Page 22 #SN?CR Get: Get device serial number Response ~nn@SNSPserial_numberCR LF Parameters serial_number – 11 decimal digits, factory assigned Notes This device has a 14 digit serial number, only the last 11 digits are displayed K-Config Example “#SN?”,0x0D VM-2DT - Protocol 3000...
- Page 23 The machine name is not the same as the model name. The machine name is used to identify a specific machine or a network in use (with DNS feature on). K-Config Example Set the DNS name of the device to “room-442”: “#NAME room-442”,0x0D VM-2DT - Protocol 3000...
- Page 24 Response is sent to all com ports after execution if HDCP-STAT was set by any other external control device (button press, device menu and similar) or HDCP mode changed. Notes On output – sink status On input – signal status K-Config Example Get the output HDCP-STATUS of the input (HDCP Off): “#HDCP-STAT? 0,1,0”,0x0D VM-2DT - Protocol 3000...
- Page 25 Kramer Electronics Ltd. EDID Handling Commands Additional EDID data functions can be performed via a compatible EDID management application, such as Kramer EDID Designer (see www.kramerav.com/product/EDID%20Designer). Command Description CPEDID Copy EDID data from the output to the input EEPROM CPEDID...
- Page 26 What Kramer Electronics Will Do Kramer Electronics will, at its sole option, provide one of the following three remedies to whatever extent it shall deem necessary to satisfy a proper claim under this limited warranty: Elect to repair or facilitate the repair of any defective parts within a reasonable period of time, free of any charge for the necessary parts and labor to complete the repair and restore this product to its proper operating condition.
- Page 27 SAFETY WARNING Disconnect the unit from the power supply before opening and servicing For the latest information on our products and a list of Kramer distributors, visit our Web site where updates to this user manual may be found. We welcome your questions, comments, and feedback.
Need help?
Do you have a question about the VM-2DT and is the answer not in the manual?
Questions and answers