Table of Contents
Advertisement
Quick Links
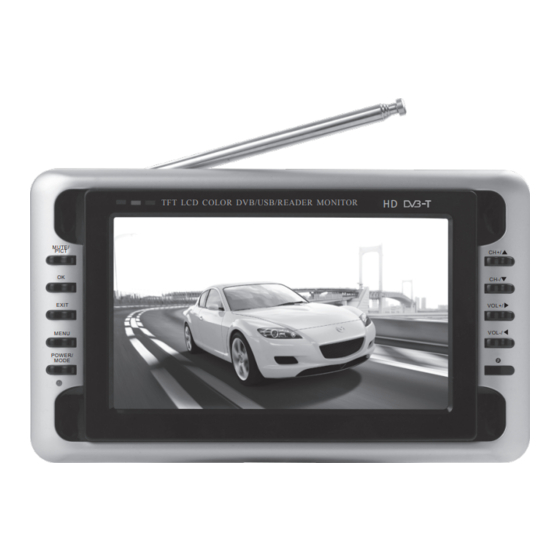
LCD Colour Digital Television Receiver
TFT LCD COLOR DVB
/USB
/READER MONITOR
HD
MUTE/
PICT
CH+/
OK
CH-/
EXIT
VOL+/
MENU
VOL-/
POWER/
MODE
User's manual
A 00J Q
5. Connection of Main Interfaces
1. Connection of Power Supply:
Align the power supply plug on AC
adapter with the jack on the machine
rear cover marked with DC.
2. Connection of Antenna Cable:
75ohm antenna
conversion line
Align one end of the attached antenna cable
plug in the antenna jack on TV set and the
other end plug in the external antenna jack.
3. Connection of AV cable
AV conversion cable
(1) AV input:
Insert the external video
cable into the yellow end of AV cable.
Insert the audio left channel cable into the
white end and the audio right channel cable
into the red end. Then, insert the AV cable
into "AV
IN"
jack.
(2) AV output:
Insert the external video
cable into the yellow end of AV cable. Insert
the audio left channel cable into the white
end and the audio right channel cable into
the red end. Then, insert the AV cable into
"AV OUT" jack.
Note: AV OUT is only available in DTV mode.
4
1. Precautions
1. Storage
Keep this product away from extremely hot or cold places. The storage
temperature ranges from
-20
to 60
and the working temperature from
-5
to 40 .
Do not use this product in damp environments like bathrooms, steam rooms,
Swimming pools or any area with high humidity.
Do not expose your TV set to high humidity, dust or oil smoke.
Do not throw or drop this product.
Do not insert items inside the case or subject to strong vibrations or shocks.
Do not push on or scrub this product with sharp objects.
2. Maintenance
Disconnect all cables of this device before cleaning.
Wipe the enclosure, screen and keys using soft cloth with a little soft detergent
if required.
Do not use polishing cloth, or chemical cleaners to clean this unit. Detergents like
alcohol and benzene based products will damage your device.
Warning!
It is very dangerous to watch television programs or operate the TV set while
driving. Ensure you comply with relevant legislation regarding the use of TVs
in vehicles.
Special Notice
Bright spots or dark spots may appear on the screen over time. This is a normal
phenomenon associated with the active matrix display technology and is not a sign
of malfunction.
Do not attempt to repair this device yourself. For any failures, please turn off your TV
set Immediately and contact us or your dealer. This device integrates a great deal of
precision electronic Components, disassembly or alteration may result in damages
or breakages.
2. Accessories
1. Car power adapter
4. Remote control
2. AC power adapter
5. AV cable
3. 75- antenna cable
6. Telescopic antenna
Open the package and make sure all the items are included.
1
6. DVB-T Installation Guide
Follow the installation guide to enjoy your high definition digital TV world. Follow the
help information that at the bottom of the window to select preference menu
language and suitable country (Region) and start channel search.
If no channel is found during the channel searching process, the user may adjust
the antenna position to obtain optimal TV signal.
Press upward/downward key to select item,
press leftward/rightward key to switch selected
items. In Channel Search item, press OK to
auto-search channels, press EXIT to return
main menu.
7. DVB-T MENU Operation Guide
7.1 Program
Four sub-menus (Program Edit, EPG, Sort, LCN)
are included in Program item, press OK key to enter,
press upward/downward key to select item, press
leftward/rightward key to switch selected items, press
EXIT to return main menu.
7.1.1 Program Edit
Before entering Program Edit item, enter factory
password 888888.
Before entering Program Edit interface, press red/
green/yellow/blue key on the remote to Move/Skip/
Lock/Delete/FAV all TV channels. Press EXIT key
to exit.
5
3. Appearance
TFT LCD COLOR DVB
/USB
/READER MONITOR
HD
MUTE/
PICT
CH+/
OK
CH-/
EXIT
VOL+/
VOL-/
MENU
MODE
POWER/
1. Telescopic antenna
2. MUTE/PICT(Mute/
Picture adjust
button): Press to switch between MUTE and
sound under all mode; Keep pressing for 3 seconds as picture adjust.
3.
OK: Press to confirm your selection.
4.
EXIT: Press to exit step by step.
5.
MENU: Press to enter the menu, then use UP & DOWN as direction keys and
LEFT & RIGHT as adjust ment keys.
6. POWER/MODE(Standby/Operation mode shift button): Press to switch modes
between DTV/AV, press and hold over 3 seconds for turning off TV.
7. Power indicator
Red: Standby
Green: Power-on
8. TFT-LCD screen
9.
CH+/
: In DTV mode, as direction key with DTV menu, or as channel up without
DTV menu.
10.
CH-/
: In DTV mode, as direction key with DTV menu, or as channel down
without DTV menu.
11
. VOL+/
: In DTV mode, as direction key with DTV menu, or as volume up
without DTV menu.
12. VOL-/
: In DTV mode, as direction key with DTV menu, or as volume down
without DTV menu.
13. Remote-control receive window
14. USB connect Jack
15. Antenna input Jack
16. AV Output
17. AV Input
18. Headphone jack
19. DC Input
20. Speaker
2
7.1.2 Sort
Program ordering
You can sort the programs according to your flavor.
Optional choices: By LCN, By ONID , By Service Name,
By Service ID etc.
7.1.3 LCN
LCN: ON/OFF for logical program list.
7.2 Picture
Set the following items under Picture menu:
1)Aspect ratio: Under this item, it is enable to switch
between Auto/16:9 Wide screen/4:3 Full/4:3
Pan&Scan/4:3 Letter Box.
2)TV Format: Under this item, it is enable to switch
between PAL/NTSC system.
Once setting finished, press EXIT to return main menu.
7.3 Channel Search
Under Channel Search item, the following operations
Are available:
1)Auto Search: Select this item, and press OK to auto
search TV channels.
2)Manual Search: Select this item, press OK to manual
search TV channels.
3)Country: Setup your country according to your location.
4)Antenna Power: Start or exit the active antenna
output function.
7.3.1 Manual Search
Under Frequency Channel item, press digital number
on the remote to input channel number directly, press
OK to manual search TV channels.
6
4. Description of Buttons on Remote Control
1.
: Standby/power-on key.
2. MODE: Press to switch between DTV/AV.
3. SEARCH: Automatic search channel when press the key more 3 seconds
4.
: Mute key.
5. 0-9: Digit keys. Press the key to enter channel directly.
6.
: Return key.
7. FAV: ON/OFF my favor channel function. (only available under DTV mode)
8. LIST: Display program list.
9. INFO: Display current Channel information.
10. EPG: press to display electronic program guide (only available under DTV mode).
11. OK: Confirm key.
12. CH+
: Channel selection/upward key.
13. CH-
: Channel selection/downward key.
14. VOL+
: Volume up/rightward key.
15. VOL-
: Volume down/leftward key.
16. AUDIO: Sound track switch key.
17. MENU: Menu key.
18. EXIT: return key; press to exit current menu and return to previous menu.
19. TV/RADIO: TV channel and radio channel switch key.
20. "RED" key: Corresponding menu red function key.
21. "GREEN" key: Corresponding menu green function key.
22. "YELLOW" key: Corresponding menu yellow function key.
(Under DTV mode,
press this key to switch aspect ratio)
23. "BLUE" key: Corresponding menu blue function key.
(Under DTV mode,press
the key for timing burn function)
24. P. ADJ: Picture adjustment key (only available under DTV mode).
Note: Under Menu surface, press this key will not have function..
25. PICT: Picture mode key, press for "STANDARD", "SOFT", "VIVID", "LIGHT",
"PERSONAL".
26. SLEEP: sleep turn off time setting key.
27. SUBTITLE: Press to turn ON/OFF subtitles.
28. TEXT: Turn teletext function.
2
. 9
:
F
a
t s
B
a
k c
w
r a
. d
3
. 0
:
F
a
t s
F
r o
w
r a
3
. 1
:
L
a
t s
k
e
. y
3
. 2
:
N
e
t x
k
e
. y
3
. 3
:
S
o t
p
k
e
. y
3
. 4
:
P
a l
y
P /
a
u
s
e
3
7.4 Time
Setup the following items under Time menu:
1)Time Offset: Adjust time zone to Auto or Manual.
2)Country Region: Setup your capital of the Country
under this item.
3)Time Zone: Setup your time zone according to
your location.
7.5 Option
OSD Language, Subtitle Language, Audio Language,
are available to setup in Option menu, press upward/
downward key to select the above items, press
leftward/rightward key to switch the selected item. Once
7.6 System
The following operations are available in System
interface:
1)Parental Guidance: Setup Lock function according
to audiences' ages.
2)Set Password: Change factory password in this
item. Input old password and new one orderly, and
then confirm. The default password is 888888.
Please remember the new password after
modifying.
3)Restore Factory Default: Press OK key to restore to
factory default setting.
4)Information: Press OK key to check system information.
5)Software Update: Upgrade is needed, select this item
for relative operation.
Under USB interface, the following operations are available:
1)Multimedia: Press OK key to enter USB playing main interface.
7
. d
b
t u
o t
. n
Advertisement
Table of Contents

Related Manuals for Nikkai A00JQ


Summary of Contents for Nikkai A00JQ
- Page 1 3. Appearance 4. Description of Buttons on Remote Control 1. Precautions 1. Storage : Standby/power-on key. Keep this product away from extremely hot or cold places. The storage 2. MODE: Press to switch between DTV/AV. temperature ranges from to 60 and the working temperature from 3.
- Page 2 7.8 PVR FUNCTION 7.11 UPDATE THE RECEIVER BY USB INTERFACE 2)Photo Configure: Press OK key to setup pictures Problems Causes Base on USB PVR function you could record the preference program and playback. 1)Plug the USB drive that with the update file to the USB interface of the receiver. playing.
Need help?
Do you have a question about the A00JQ and is the answer not in the manual?
Questions and answers