Table of Contents
Advertisement
Advertisement
Table of Contents

Related Manuals for Nikkai A01JQ


Summary of Contents for Nikkai A01JQ
- Page 1 Operation Manual LCD Colour Digital Television Receiver Order Code: A01JQ...
-
Page 2: Table Of Contents
Contents Precautions Accessories Appearance Description of Panel Buttons Description of Buttons on Remote Control Connection of Main Interfaces VII DVB-T Installation Guide VIII DVB-T MENU Operation Guide 8.1 SETUP 8.2 TV/RADIO 8.3 MULTIMEDIA 8.4 GAME ATV Menu Troubleshooting Specifications... -
Page 3: I Precautions
I Precautions Storage 1. Keep this product away from extremely hot or cold places. The storage temperature ranges from -20 to 60 and the working temperature from 0 to 40 . 2. Do not use this product at damp environment like bathtubs, wash basins, kitchens, washtubs, as well as basements, swimming pools or similar places. -
Page 4: Accessories
II Accessories 1. Car power adapter 2. AC power adapter 3. 75- antenna cable 4. Remote control 5. AAA battery 6. AV cable 7. Telescopic antenna * Open the package and make sure all the items are included. -
Page 5: Appearance
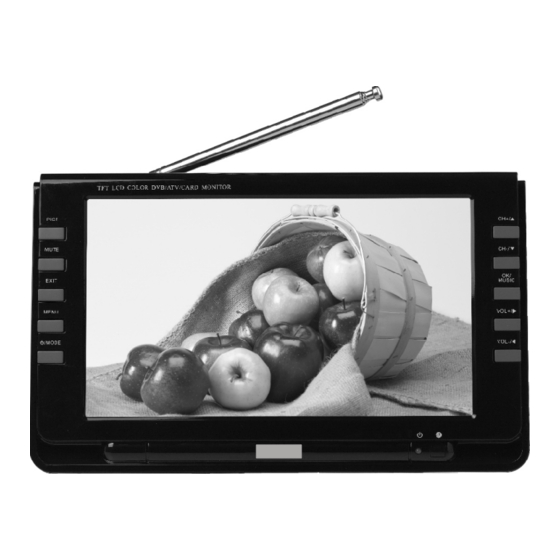
III Appearance 1. Telescopic antenna 2. PICT: Picture mode shift button 3. MUTE: Mute button 4. EXIT: Return button 5. MENU: Menu button /MODE: Standby/ Operation mode shift button 7. TFT-LCD screen 8. CH+/ : Channel Select/ Upward button 9. CH-/ : Channel Select/ Downward button 10. -
Page 6: Description Of Panel Buttons
IV Instruction of control panel buttons 1. PICT: Long press for 3 seconds as Picture mode under TV/AV mode, under picture switch mode as "STANDARD", "SOFT", "VIVID", "LIGHT", "PERSONAL", Press for Picture adjust/panel display mode/ reset selection key under DTV mode, able to choose brightness, contrast, chroma, hue (only available with NTSC system), panel disply mode and reset. -
Page 7: Description Of Buttons On Remote Control
V Remote control button 1. POWER: standby/off key. 2. MUTE: Mute key. 3. 0-9: digit keys. 4. --/-: channel direct selection and P/N switch key. Press for channel direct selection under ATV mode. Press as P/N switch under DTV mode. : return key. -
Page 8: Connection Of Main Interfaces
VI Connection of Main Interfaces 1. Connection of Power Supply: Align the power supply plug on AC adapter with the jack on the machine rear cover marked with DC. 2. Connection of Antenna Cable: 75ohm antenna conversion line Align one end of the attached antenna cable plug in the antenna jack on TV set and the other end plug in the external antenna jack. -
Page 9: Dvb-T Installation Guide
VII DVB-T Installation Guide When first time usages or program list do not exist, the DVB-T Installation Guide will display once the device is turned ON. Please set up as the following Pictures. Press key to move the cursor to your wanted item, press adjust with your local DVB-T standard setting. -
Page 10: Dvb-T Menu Operation Guide
VIII DVB-T MENU Operation Guide Press MENU from the remote control or from the device to enter MENU surface, there will be five menu and some sub-menu under. Press to switch each menu, then press to select sub-menu, press OK to enter sub-menu. Press to move cursor to your wanted location. - Page 11 8.1.2 TV Setup Under TV Setup Menu for the following items: (1) TV format: Display mode, '4:3LB', '4:3PS', '16:9LB' and '16:9FIT'. (2) TV mode: AV output system, selection of 'PAL', 'NTSC', 'AUTO'. (3) OSD Transparency: Setting for OSD transparency levels. (4) Banner Display Time: Menu banner time display setting.
-
Page 12: Tv/Radio
The default password of the device is 0000, please memorize after changing password. 8.1.4 Advance Timer Uers can setup appointed time to watch appointed Channels, start and finish time can be setup according to the timer system in this device, please confirm with the timer system from this device before setting up;... -
Page 13: Multimedia
When LCN setup as OFF , (see 8.1.1) the following Menu surface will be appear: Move and Sort are for setting channels in order. 8.2.2 Enter TV Guide Menu, under the program gide, you can see the current channels display list, press to move the cursor to the channel you wish to watch, press key to enter the Guide timer of... - Page 14 8.3.1 Enter My Album , press INFO to change drivers as shows below: Press key to move cursor to select Device , press switch drivers, press to return to different file Menu surface. Press key to select the picture you wish to view, press OK to confirm as follow: Press INFO from the remote control for viewing tools, press key to move the picture for clock wise or anti-clock wise, press...
- Page 15 Press key to select the picture you wish to view, press OK to view, press 'BLUE' in the remote control to return to the original file Menu. 8.3.3 When viewing Picture, press OK key to enter Picture playing mode and auto-switch to different effect to view the picture. Press INFO from the remote control for playing tools, press key to select previous or next pictures, press RED for play/pause;...
-
Page 16: Game
Press key to select the music you wish to play, press OK to confirm, press RED from the remote control for play/pause, GREEN key for stop, YELLOW key for repeat, press this key respectively can select Repeating , Repeat all , Random , Repeat OFF ;... -
Page 17: Atv Menu
IX ATV Menu Press the MENU button to pop up the following menu: MAIN MENU PICTURE SYSTEM PRESET Press to select one of the three entries above. Press to open the submenu. 9.1 PICTURE PICTURE BRIGHT CONTRAST COLOUR RESET Press to select BRIGHT and press to adjust its analog. - Page 18 SYSTEM ENGLISH CLOCK 16:9 BLUE BACK : Allows you to select the language you want. CLOCK: Allows you to set the time for auto shutdown. : (Display screen mode) Allows you to switch the mode between 16:9/4:3. : Allows you to revolve the image. BLUE BACK: Allows you to activate or deactivate this function when there are no signals.
- Page 19 Note: Before you start the AUTO-SEARCH, please set the SOUND/COLOR as the corresponding local systems. Or, the channel program may have no audio or have cacophony while the image may have no colour. SWAP: Press to select this entry. Press to change it to your required channel.
- Page 20 9.4 Proper Receiving 9.4.1 Access the setting entries of the Language in the System to choose your required OSD language. 9.4.2 Access the setting entries of the SOUND-SYS and COLOR-SYS and start searching channels according to specific instructions in Part 9.3. 9.4.3 Access the setting entries of the AUTO-SEARCH and SEARCH and make sure whether the systems are set according to the responding transmitting requirements.
-
Page 21: Troubleshooting
X Troubleshooting The following phenomenon does not indicate failures. Before you contact us for repair, please check your device according to the approaches below. Problems Causes The AC adapter does not connect to the vehicle adapter properly; No picture or sound Non-permissible power is applied;... -
Page 22: Specifications
XI Specifications DTV system: Input frequency: VHF 177.5 MHz - 226.5 MHz UHF 474 MHz - 858 MHz Modulate: QPSK/16-QAM/64-QAM Decode standard: MPEG-2: MP@ML, MPEG-4: SP&ASP Audio decode standard: MPEG1: LAYER I/II/III, MPEG-2: LAYER I/II ATV system Analog receive frequency: DK/I 49.75 MHz - 847.25 Mhz BG 48.25 MHz - 847.25 MHz Analog color system: PAL/SECAM General characteristic... - Page 23 Warning This manual is for your reference only. The information in the Manual is subject to change without prior notice. The company reserves the right to explain for any unknowns, errors or omissions. Warning No elements are recoverable inside your device. Do not attempt to open it to improve your TV set.
Need help?
Do you have a question about the A01JQ and is the answer not in the manual?
Questions and answers