
Related Manuals for XAiOX iTrackU SiRF III


Summary of Contents for XAiOX iTrackU SiRF III
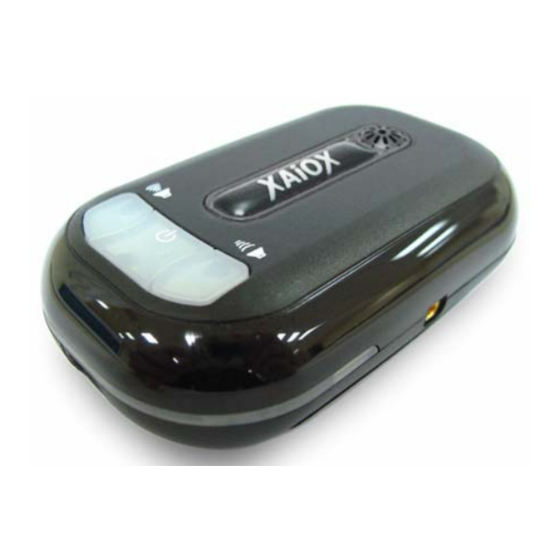
- Page 1 User’s Manual XAiOX iTrackU SiRF III Bluetooth GPS Receiver User Manual Bluetooth GPS Receiver XAiOX iTrackU SiRF III with Route-Recorder and Voice-Announcement Copyright©2007 XAiOX Technologies, USA All rights reserved...
-
Page 2: Table Of Contents
User’s Manual XAiOX iTrackU SiRF III Bluetooth GPS Receiver Table of contents 1. Introduction ……………………………………………………………………………………………………………………… 1.1 Read Me First ……………………………………………………………………………………………………………… 1.2 Overview ……………………………………………………………………………………………………………………… 1.3 Features ……………………………………………………………………………………………………………………… 2. Hardware Description ………………………………………………………………………………………………………… 3. Box Contents ……………………………………………………………………………………………………………………… 4. Volume and LED control ……………………………………………………………………………………………………... -
Page 3: Introduction
User’s Manual XAiOX iTrackU SiRF III Bluetooth GPS Receiver 1. Introduction 1.1 Read Me First • The battery must be charged for at least 8 hours for ‘INITIAL’ use. The LED2 (GREEN) will turn off after 3 hours’ charging, please keep on charging for 5 more hours. Thereafter, for each time charging the battery, please fully charge for 3 hours. -
Page 4: Features
User’s Manual XAiOX iTrackU SiRF III Bluetooth GPS Receiver 1.3 Features • 20-Channel-Tracking • Cold-/Warm-/Hot-Start: 42/38/1 seconds • Reacquisition-Time: 0,1 second • Supported Standard NMEA-0183 • Compatible with Bluetooth-Devices with Serial Port Profile (SPP) • Small, slim and lightweight device that fits well in your hand •... -
Page 5: Hardware Description
User’s Manual XAiOX iTrackU SiRF III Bluetooth GPS Receiver 2. Hardware Description Status-Scheme Colour Status LED1 RED OFF GPS not yet fixed RED FLASHING GPS fixed. Will transfer data, when BT connection is on. LED2 GREEN ON Unit is switched on (flashing 1 x per second) - Page 6 User’s Manual XAiOX iTrackU SiRF III Bluetooth GPS Receiver GPS Bluetooth operates on OS with Bluetooth function that supports SPP In order to avoid any unexpected problem, DO NOT attempt to change the default baudrate...
-
Page 7: Box Contents
User’s Manual XAiOX iTrackU SiRF III Bluetooth GPS Receiver 3. Box Contents • XAiOX iTrackU Bluetooth GPS-Receiver • AC Adapter (220V/110V) • Car Charger (Input 12V, Output 5V) • 1100mA Lithium-Ion rechargeable battery • User’s manual (CD-ROM) • Gel Pad Holder... -
Page 8: Volume And Led Control
User’s Manual XAiOX iTrackU SiRF III Bluetooth GPS Receiver 4. Volume and LED control 1. Volume up Volume up: press shortly the “volume up” button (notified by “beep” sound) 2. Volume down Volume down: press shortly the “volume down” button (notified by “beep” sound) 3. -
Page 9: Auto Power On/Off
6. Power OFF the XAiOX iTrackU Press power button for 1 second to switch off the iTrackU. We strongly recommend to close the E-map before turning off the XAiOX iTrackU, in order to avoid any possible PDA /Smart phone freeze... -
Page 10: General Important Notes
User’s Manual XAiOX iTrackU SiRF III Bluetooth GPS Receiver -10- 7. General Import Notes Car Charger At the tip of the car charger you find a removable cover (screw able). Behind this cover there is a changeable 1.5A-fuse. If you detect any malfunction please check this fuse first and replace it if necessary. -
Page 11: Software-Installation - Pocket Pc Ce
User’s Manual XAiOX iTrackU SiRF III Bluetooth GPS Receiver -11- 8. Connecting to your Bluetooth PDA 1. Turn on the iTrackU Press power button for 1 second, the LED2 (Power Status LED) and LED3 (Bluetooth Status) start blinking. 2. Activate Bluetooth function of your PDA / smart phone Before you are trying to activating the Bluetooth function of your PDA / smart phone, please make sure the device is equipped with Bluetooth function, and the driver software has been installed. - Page 12 User’s Manual XAiOX iTrackU SiRF III Bluetooth GPS Receiver -12- Beispiel: iPAQ Bluetooth mit Pocket PC Software <1> Turn Bluetooth ON <2> Click ‚Connect!’ Select ‚Bluetooth Manager’...
- Page 13 User’s Manual XAiOX iTrackU SiRF III Bluetooth GPS Receiver -13- <3> Select ‚Explore a Bluetooth device’ <4> Select <No device selected>, Then click ‘Next’. then click ‚Next’.
- Page 14 User’s Manual XAiOX iTrackU SiRF III Bluetooth GPS Receiver -14- <5> Click ‚BT-GPS’ . <6> Select ‚SPP slave’, If you are asked to enter a then click ‚Next’. password, type ‚0000’.
- Page 15 User’s Manual XAiOX iTrackU SiRF III Bluetooth GPS Receiver -15- <7> Click ‚Finish’. <8> Tap the Bluetooth icon again and BT-GPS connection is now select ‘Bluetooth setting’. established successfully.
- Page 16 User’s Manual XAiOX iTrackU SiRF III Bluetooth GPS Receiver -16- <9> Settings for TomTom Navigation Software. You can use any free Serial COM Port (outgoing)
-
Page 17: Working Modes
User’s Manual XAiOX iTrackU SiRF III Bluetooth GPS Receiver -17- 9. Working Modes Mode A: GPS + Bluetooth + Route-Recorder 1. Power on iTrackU by pressing power button for 1 second 2. “Bluetooth On” by voice announcement 3. Bluetooth status LED... -
Page 18: Modus C: G-Maus + Route-Recorder (Bluetooth Off)
User’s Manual XAiOX iTrackU SiRF III Bluetooth GPS Receiver -18- Mode C: G-Mouse + Route-Recorder (Bluetooth Off) The iTrackU can be used as a G-mouse by simply connecting to laptop PC via USB cable 1. Connecting iTrackU to laptop PC via USB cable, (USB to mini USB cable) please make sure that the Bluetooth is off 2. -
Page 19: Use The Route-Recorder
User’s Manual XAiOX iTrackU SiRF III Bluetooth GPS Receiver -19- 10. Use the Route-Recorder Install driver 1. Insert supplied cd 2. Open folder “iTrackU-Software” 3. Open folder “iTrackU-USB-driver” 4. Open folder “InstallShield” 5. Run “setup.exe” 6. Connect the device and your operating system will install... - Page 20 User’s Manual XAiOX iTrackU SiRF III Bluetooth GPS Receiver -20- Remark: – You can set the vibration auto function on/off or choose the sensitivity of the sensor. – You can set the tag-function on/off (this function allows you to save your current position by holding the “volume up” button) Dump logged Data 1.
- Page 21 User’s Manual XAiOX iTrackU SiRF III Bluetooth GPS Receiver -21- Detect Com-Port 1. Open control panel (start settings control panel) 2. Doubleklick on “system” 3. Choose register “hardware” and run the device manager 4. Among “ports (Com and LPT)” you find the line “BT+GPS+DATA LOG” in which you find the...
-
Page 22: Technical Specifications
User’s Manual XAiOX iTrackU SiRF III Bluetooth GPS Receiver -22- 11. Technical Specification GPS Chip: SiRF Star III Frequence: L1, 1575, 42 MHz C/A Code: 1,023 MHz Chip Rate Channels: Antenna: Built-in low noise patch antenna (External Antenna optional) Ext. Antenna Port... - Page 23 User’s Manual XAiOX iTrackU SiRF III Bluetooth GPS Receiver -23- Bluetooth Protocol: Bluetooth serial Communication: Distance up to 10 m NMEA-0183 GGA, GSA, GSV, RMC GPS Protocol: (Data Bit: 8, Stop Bit: 1) Rechargeable 1100mA/h Lithium-Ion Battery Battery: And 5V DC Input Charging time: approx.
- Page 24 User’s Manual XAiOX iTrackU SiRF III Bluetooth GPS Receiver -24- Flash memory size: 4M – logs 249.856 Waypoints Log Data Format: NMEA Data Output Data Format: WGS84 2-degree transverse Mercator Data conclude: Longitude, Latitude, Speed, UTC, Tag Output data search: Search by a.
Need help?
Do you have a question about the iTrackU SiRF III and is the answer not in the manual?
Questions and answers