Table of Contents
Advertisement
10
技术要求:
1.说明书设计尺寸:210×297mm(A4),印刷尺寸:142×210
2.整本说明书使用105g铜版纸黑白印刷,其他颜色详见内文;
3.必须保证字体按照图纸正确印刷,不得出现乱码现象;
4.纸张边角应裁切整齐,印刷字迹清晰整洁、内容正确,没有明显的拖墨和重影等缺陷;
5.未注公差按GB/T 1804-C标准执行;
变更记录:
变更单号
变更人
说明书
品牌:CCH
(版本号编码规则:品牌首字母+日期,示例:T20210111)
变更日期
说明书版本号 变更内容
印 刷 标 准 颜 色 CMYK 值
CMYK:100/50/0/0
CMYK:0/0/100/0
CMYK:15/100/20/0
CMYK:0/0/0/100
mm;
设 计
校对1
谭丽佳
封晓晶
工 艺
校对2
批 准
许传刚
此页面无须印刷
This page needs no printing.
审核1
图 样 标 记
黄檞栋
审核2
S
A
B
李玉旺
江苏友奥电器有限公司
日 期
20210113
重 量 比 例
1:1
Advertisement
Table of Contents

Related Manuals for CCH YPK2-08C


Summary of Contents for CCH YPK2-08C
- Page 1 印 刷 标 准 颜 色 CMYK 值 审核1 图 样 标 记 重 量 比 例 设 计 校对1 谭丽佳 封晓晶 黄檞栋 说明书 工 艺 校对2 审核2 李玉旺 CMYK:100/50/0/0 CMYK:0/0/100/0 品牌:CCH CMYK:15/100/20/0 CMYK:0/0/0/100 江苏友奥电器有限公司 批 准 日 期 许传刚 20210113...
- Page 2 YPK2-08C Portable Air Conditioner User Manual Thank you for selecting this high quality air conditioner. Please be sure to read this manual carefully before using it.
-
Page 3: Table Of Contents
Read all instructions carefully before setting up and operating the unit. Please keep this instruction manual for future reference. This manual is designed to provide you with important information needed to setup, operate, maintain and troubleshoot your portable air conditioner. Failure to follow these instructions may damage and/or impair operation and void the warranty. -
Page 4: User Tips
USER TIPS Please avoid such operations, in case of any safety and health risks. Such instructions are to be followed, for safety and health concerns. PRECAUTION For indoor use only; For household use only please place the A/C in a dry environment. - Page 5 Do not operate the machine Please wipe the machine with a with wet hands or in a humid soft cloth, instead of wax, diluent environment. or irritant detergent. Clean the filter once every two For your health, never drink weeks condensed water discharged from the machine.
-
Page 6: Safety Warnings
SAFETY WARNINGS Damaged power cord or plug Never damage the power cord, or shall not be used. Never plug use unlicensed power cord. Make to a loose socket. sure voltage is right. Do not modify or extend the A grounded outlet is suggested power cord. - Page 7 Never control on/off status by Please turn off the machine directly plugging/unplugging. before unplugging. Keep away from heat sources Never overload the socket. or direct sunlight exposure. If there is any actue noise, In case of electric shock, never smell or smoke, turn off and damage the power cord by unplug for diagnosis.
- Page 8 Never insert fingers or any Keep electrical parts away from hard objects into the louver. water. If water enters, turn off and unplug Please turn off and unplug before in time; and call for check and wiping, cleaning or replacing repair from a professional.
-
Page 9: Tips
TIPS For a proper work of compressor, For a proper ventilation, keep place the machine vertically on the machine at least 50cm from an even ground. objects nearby. Never use the appliance near Keep the appliance from spraying gasoline or other flammable agent or any solvent,... -
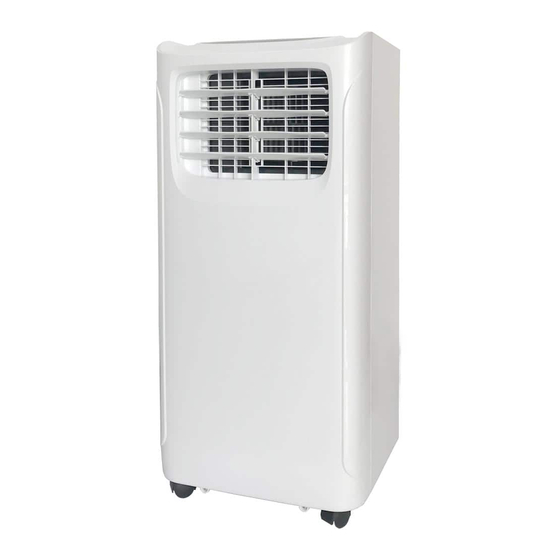
Page 10: Product Overview
PRODUCT OVERVIEW Main Components 1. Handle 2. Air Inlet Grille (Up) 3. Control Panel 4. Casters 5. Louver 6. Air Outlet Grille 7. Drainage Hole 8. Air Inlet Grille (Down) 9. Air Exhaust Duct Assembly 10. Window Sealing Kit... -
Page 11: Control Panel And Remote Control
CONTROL PANEL AND REMOTE CONTROL Wifi Cool Full High Dry Sleep MODE TIMER POWER °C/°F 1. Power Button Press the button for ON/OFF 2. Fan Speed Button Press the key to choose high/low speed. In standby mode, press this key for 3s to active the wifi paring function. -
Page 12: Operation
OPERATION Place & Install Best Install Place • Place the machine on the horizontal floor near the window. • For proper ventilation and best machine performance, keep the appliance at least 50cm from objects nearby. 50cm(19.7inch) Install Air Exhaust Duct Assembly Connector Air exhaust duct Flat nozzle... - Page 13 Step 1: Clip-fixture Type 1. Measure window size; 2. Adjust Length of the plate according to window size; 3. Lock the plate Step 2: Fix the plate to window Step 3: Swirl the exhaust pipe assembly (exhaust fitting end) into the rear panel outlet (counterclockwise).
- Page 14 little breach screw 1.Plug in first Step 4: Insert the exhaust pipe assembly (exhaust port end) into the window seal panel assembly and screw it up. Impression Drawing of Completion...
- Page 15 Incorrect installation • It’s important to keep the exhaust duct smooth. Incorrect installation will affect work of the A/C. • Prevent the exhaust duct from sharp bending. • Ensure air can flow smoothly in the duct. Warning The exhaust duct is designed especially for this model. Don’t replace or lengthen it;...
-
Page 16: How To Operate
Warning: 1. Never use leaked batteries; 2. Chemicals in batteries could result in such health hazards as burns. If liquid in batteries splashes to skin or clothes, please wash with clean water in time. If batteries are swallowed, please rinse mouth immediately with clean water and then go to the doctor. -
Page 17: Clean And Maintenance
TIMER MODE • In standby mode, press Timer button to set ON time. A range of 1 to 24 Hours could be set with UP/DOWN button. Timer indicator will light up in this mode. • Under running state, press Timer button to set OFF time. A range of 1 to 24Hours could be set with UP/DOWN button. - Page 18 Filter is to be cleaned once every two weeks. If air quality indoor is poor, it has to be washed more often, or performance of the appliance would be lowered due to blocked filter screen. Please follow below instructions for cleaning: Take off...
-
Page 19: Common Failures And Diagnosis
Seasonal Maintenance If the appliance will not be in use for a long time, please maintain by following below steps: 1. Pull out water plug for drainage. 2. Run in Fan mode for at least 2 hours to dry internal parts. 3. -
Page 20: Troubleshooting
TROUBLESHOOTING The following table lists the common faults and maintenance methods of this series of portable A/C. When the machine is in abnormal operation, the following table can be used for simple diagnosis and maintenance. If it still can’t be solved, please contact professional maintenance personnel. - Page 21 1850 S Carlos Ave, Unit2 Ontario, CA 91761 Hour s : 8: 30A M -5: 00PM PST TO OBTAIN WARRANTY SERVICE: Contact CCH Technical Support Toll free: 1-844-909-7300 Email:TechSupport@cchappliance.com From 8:30AM to 5:00PM Monday through Friday Pacific Time. WARRANTY PERIOD: Labor: 1 Year from the Date of Purchase.
Need help?
Do you have a question about the YPK2-08C and is the answer not in the manual?
Questions and answers
Needing to know the Warranty of the Product - We purchased November 2022 and it quit working
The warranty period for the CCH YPK2-08C product includes:
- Labor: 1 year from the date of purchase.
- Parts: 1 year from the date of purchase.
If the product was purchased in November 2022, the warranty would be valid until November 2023 for both labor and parts.
This answer is automatically generated