
Related Manuals for Calphalon TSCLTRDG1-AF


Summary of Contents for Calphalon TSCLTRDG1-AF
- Page 1 PERFORMANCE AIR FRY COUNTERTOP OVEN INSTRUCTION MANUAL PN 202688 REV. C MODEL: TSCLTRDG1-AF TSCLTRDG1-AF_20EM4.indd 1 TSCLTRDG1-AF_20EM4.indd 1 10/8/20 10:18 10/8/20 10:18...
-
Page 2: Table Of Contents
TABLE OF CONTENTS IMPORTANT SAFEGUARDS POLARIZED PLUG PRODUCT DIAGRAM LCD DISPLAY USAGE INSTRUCTIONS PREPARING YOUR COUNTERTOP OVEN OVEN FUNCTIONS OVERVIEW HOW TO USE YOUR COUNTERTOP OVEN COOKING FUNCTIONS DETAILS CLEANING & MAINTENANCE TROUBLESHOOTING WARRANTY TSCLTRDG1-AF_20EM4.indd 2 TSCLTRDG1-AF_20EM4.indd 2 10/8/20 10:18 10/8/20 10:18... -
Page 3: Important Safeguards
IMPORTANT SAFEGUARDS When using electrical appliances, basic safety precautions should always be followed, including the following: 1. Read all instructions, product labels and warnings before using Performance Air Fry countertop oven. This appliance generates heat during use. Do not touch hot surfaces. Use handles or knobs. Always protect your hands with non-slip oven mitts or similar. -
Page 4: Polarized Plug
20. Do not cover crumb tray or any part of the oven with metal foil. This will cause overheating of the oven. 21. Empty the crumb tray after each use. 22. The glass door is made of tempered glass. Always inspect the glass door for chips, cracks or any other damage. -
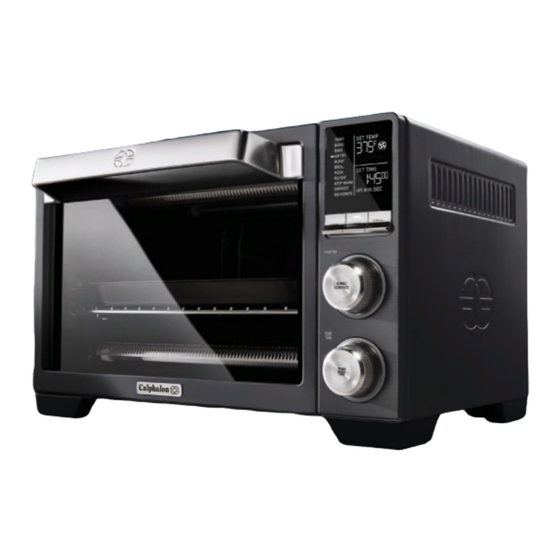
Page 5: Product Diagram
4. Turbo Convection Selector Button 12. Interior Light (not shown in image) 5. Time/ Temperature Selector Button 6. Time/ Temperature Control Dial *These parts can be replaced on Calphalon.com or 7. Two Rack Positions at 1-800-809-7267 8. *Air Fry Basket / Dehydrate Rack... -
Page 6: Preparing Your Countertop Oven
PREPARING YOUR COUNTERTOP OVEN • Remove all packaging before using the Calphalon® Performance Air Fry Oven. • Wipe Countertop Oven with a damp cloth. DO NOT IMMERSE IN WATER. Make sure to only use mild, soapy water. Abrasive cleaners, scrubbing brushes and chemical cleaners will damage the coating on this unit. -
Page 7: How To Use Your Countertop Oven
HOW TO USE YOUR COUNTERTOP OVEN • Once the Calphalon® Performance Air Fry Countertop Oven is plugged in, the LCD screen will illuminate and the START Button LED light will flash. • The Function Options will be displayed on the LCD Screen with the Function Indicator on the default preset TOAST function. -
Page 8: Cooking Functions Details
NOTE: For further details on product features and usage instructions, please visit www.calphalon.com. COOKING FUNCTIONS DETAILS Toast For best TOAST results, place wire rack in the upper rack position. This function is ideal for toasting sliced bread, English muffins and frozen waffles. - Page 9 3. Turn the Function Selector Dial to select the BAKE function. Once the function has been selected, use the Time/Temperature Control Dial to select the desired cooking temperature and time. Turn the Time/Temperature Control Dial clockwise to increase temperature and time and counter-clockwise to decrease.
- Page 10 FOOD Weight Accessory Function Temperature Time Oil? (Min) Meat/Poultry/Fish Breaded Chicken Breast 1 lb Air Fry Basket Air Fry 20-25 Min Chicken Breast 1 lb Air Fry Basket Air Fry 20-25 Min Chicken Wings 1 lb Air Fry Basket Air Fry 20-25 Min Steak 1 lb...
- Page 11 Roast For optimal results, place wire rack in the lower rack position. 1. Insert the wire rack into the lower rack position. 2. Ensure the countertop oven door is closed for preheating. 3. Turn the Function Selector Dial to select the ROAST function. Once the function has been selected, use the Time/Temperature Control Dial to select the desired cooking temperature and time.
- Page 12 9. Press the START button to begin the broiling cycle. Note: The timer will not begin until the START button is pressed. 10. When BROILING cycle is complete, an audible alert will sound. 11. Open countertop oven door fully and remove food carefully. We recommend using oven mitts or pot holders when removing food from the countertop oven.
- Page 13 4. Turn the Function Selector Dial to select the REHEAT function. Once the function has been selected, use the Time/Temperature Control Dial to select the desired cooking temperature and time. Turn the Time/Temperature Control Dial clockwise to increase temperature and time and counter-clockwise to decrease.
- Page 14 3. Turn the Function Selector Dial to select the DEFROST function. Once the function has been selected, use the Time/Temperature Control Dial to select the desired cooking temperature and time. Turn the Time/Temperature Control Dial clockwise to increase temperature and time and counter-clockwise to decrease.
-
Page 15: Cleaning & Maintenance
CLEANING & MAINTENANCE • Clean oven and any accessory after each use. • Before cleaning your Calphalon® Performance Air Fry Countertop Oven, press the CANCEL/OFF button to turn OFF the countertop oven. Unplug the cord and allow it to cool before cleaning. -
Page 16: Troubleshooting
TROUBLESHOOTING Possible Problem Easy Solution Oven does not turn ON • Plug the Countertop into the electrical outlet. • Check that the power plug is securely inserted into the outlet. • Insert the power plug into a different outlet. • Press the START button. Smoke odor •... -
Page 17: Warranty
WARRANTY 3 YEAR LIMITED WARRANTY Sunbeam Products, Inc. (“Calphalon”) warrants that for a period of three year from the date of purchase, this product will be free from defects in material and workmanship. Calphalon, at its option, will repair or replace this product or any component of the product found to be defective during the guarantee period.
Need help?
Do you have a question about the TSCLTRDG1-AF and is the answer not in the manual?
Questions and answers