
Subscribe to Our Youtube Channel
Related Manuals for LiteGait 300MX


Summary of Contents for LiteGait 300MX
- Page 1 Operator & Service Manual LiteGait® 300MX LiteGait® is a Registered Trademark of Mobility Research, Inc.
- Page 3 Serial Number of Your Device: Note: Please keep your serial number in a safe and secure location. The serial number must be pro- vided when seeking service for your LiteGait® device. The serial number provides us access to techni- cal information regarding your device.
- Page 5 IMPORTANT SAFETY INSTRUCTIONS ***WARNING*** READ ALL INSTRUCTIONS BEFORE USING LiteGait® MAXIMUM PATIENT WEIGHT: LiteGait® 300MX: 300 lbs MAXIMUM UNIT HEIGHT: 7 feet 5 inches Use only under the direct supervision of a health care professional or caregiver Brakes should remain in the locked position at all times until ...
- Page 7 If you have questions about the possible uses of LiteGait® with particular patients, or are in need of some ideas for ways to use LiteGait® more effectively, please do not hesitate to contact us for information relating to your individual situation. Our website also offers valuable information.
-
Page 9: Table Of Contents
Table of Contents Unpacking and Assembly .................... 10 Unit Diagram ....................... 13 About Your Unit ......................13 USING Your LiteGait® ....................14 I. Raising and Lowering Yoke ..................14 II. Charging LiteGait® ....................14 III. Adjusting Handle Bars ..................15 IV. -
Page 10: Unpacking And Assembly
6.) Remove cardboard harness and NOTE: Two people are required for safe assembly. accessories box. NOTE: Your LiteGait® may look different than the follow- ing images, but assembly Steps are the same. NOTE: If you have any questions during installation, please contact Mobility Research Technical Support for assistance. - Page 11 16.) Using two people lift the post onto base. Feel free to call 1-800-332-9255 Extension 7104 for Mobility Research Support during this assembly. NOTE: Your LiteGait® may look different than images above www.LiteGait.com 1-800-332-9255...
- Page 12 SECTION LEFT INTENTIONALLY BLANK www.LiteGait.com 1-800-332-9255...
-
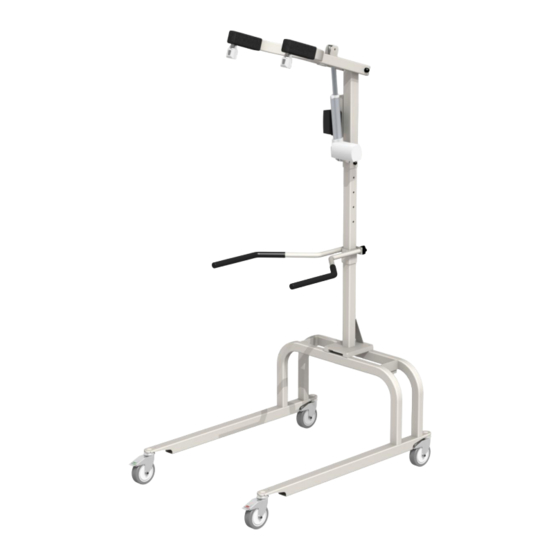
Page 13: Unit Diagram
6. Total Locking Casters 7. Directional Locking Casters 8. Handle Bar Assembly 9. Actuator NOTE: Your LiteGait® may look different than image above CONTROL UNIT: Junction box mounted in the base About Your LiteGait® for the battery power, handheld switch and contains electrical safety protection circuitry. -
Page 14: Using Your Litegait
24 volt battery pack that needs to be charged on a I. Raising and Lowering Yoke weekly schedule. To recharge your battery follow the The LiteGait® MX actuator is raised and lowered by a steps below: hand switch with one up and one down arrow. -
Page 15: Adjusting Handle Bars
LiteGait® should not be used. WARNING: LiteGait® Handle Bars are designed to be used as a balance aid while using the LiteGait. Excess loading of the handle bars may damage handle bars. Avoid Having patients lift their weigh using the handle bars. -
Page 16: Base And Casters
Press the directional locks to lock swivel of casters Press tab to lock Locked Caster LiteGait® can now be easily rolled back and forth over Total Locking Casters the treadmill or on a straight path in the therapy room or Total locking casters are indicated by a red hallway. - Page 17 Using Your LiteGait® SECTION LEFT INTENTIONALLY BLANK www.LiteGait.com 1-800-332-9255...
-
Page 18: Harness Application
There are four buckles on the top and bottom of the harness wrap. The four top buckles extend beyond the harness from the top seam and attach to the LiteGait® overhead straps. The bottom four buckles attach to the groin piece and do not extend past the bottom seam of the harness. - Page 19 Using Your LiteGait® Harness Application - While Standing 1. Wrap harness around patient with lowest side straps even with GREATER TROCHANTER. 2. Connect buckles top to bottom. 3. Adjust side straps* to the patient from bottom to top, alternate sides and tighten evenly.
- Page 20 Using Your LiteGait® Set the Left Zero by pressing the SET button. Harness Application – In Supine 1. Roll patient away from you. 2. Attach groin piece and place harness on patient with half of the harness rolled and under patient. (Figure 1) Figure 1 3.
-
Page 21: Training With Litegait
Leave a few inches of slack in the front straps. 3. Once the patient is connected, unlock casters. With one hand on LiteGait, press up button on hand switch to lift patient into a standing position. Roll LiteGait® forward slightly while lifting so patient ends up directly under the yoke buckles. - Page 22 Stepping up onto Treadmill (Continued) 7. To exit the unit, reverse the process. Keep directional casters locked until the LiteGait® is at the end of the treadmill. It is helpful to ensure that the locking casters are nudged into an outward rolling position so they do not get caught on the treadmill as they roll.
-
Page 23: Unit Care And Maintenance
Unit Care and Maintenance LiteGait® Maintenance Your LiteGait® has been specially designed to be durable and relatively maintenance free. The frame is constructed from high strength steel, and has been painted with a special powder coat to resist rust and scratches. - Page 24 To maintain the highest quality of function and safety, it is extremely important that you conduct regular maintenance checks of your LiteGait® unit and all of its parts. Please refer to the following checklist for an inspection guideline. If you should have any questions concerning the functional status of any of the LiteGait® parts, please contact the Service &...
- Page 25 The device should still move forward and backward with ease. Your LiteGait® may differ from the image shown above. Below are images of the LiteGait® harness showing signs of wear that would indicate replacement. Wear On Buckle Straps Loose Stitching...
-
Page 26: Troubleshooting
The Directional Locking Casters are labeled with a green STEER sticker and engage misaligned when the caster is aligned with the leg of the base. If the LiteGait® does not move forward and backward when the directional locking casters are locked they are not aligned properly. - Page 27 Symptom: The patient cannot stand to properly position and tighten the harness and groin piece. 1. Possible Cause: Resolution: Patient is too weak or unsafe to stand Apply the harness in supine position. Avoid harness application in sitting as it reinforces flexed hip position. www.LiteGait.com 1-800-332-9255...
-
Page 28: Parts List
Parts List LiteGait® I Parts List – Harness and Accessories Standard Adult Harness Wrap with 10.5” & 13” Groin Pieces iHarness with GP’s 10.5” Groin Piece for HA (HAIN-GP10) HAIN-A1013 13” Groin Piece for HA (HAIN-GP13) Harness Extender 7.5” extension to plug into front of the harness... - Page 29 Wheel with hardware that locks via a tab labeled with a red Socks Y30X-B BRAKE sticker. If you should have any questions or would like to place a part order, please contact: Phone: Technical Support at 1-800-332-9255 ext. 7104 Email: service@litegait.com www.LiteGait.com 1-800-332-9255...
-
Page 30: Appendix: Bisym
BiSym also allows for measuring in the side stepping position. Side stepping measurement s are displayed as total weight only. DISPLAY UNITS ® Display the values of suppor t provided by the LiteGait in the Weight selected weight unit s or a percentage of the patients body weight. - Page 31 “Bearing” Limit support from, ® LiteGait , select “Support” If a weight goal is set, adjusting the patient weight will cause the percentage goal to adjust. If a percentage goal is set, adjusting patient weight will cause weight goal to adjust.
- Page 32 Positive results being will produce positive “chimes” noises PATIENT FEEDBACK - Use with the Integrated FreeDome Yoke Note when using the SIDE orient ation, the measurement is limit ed to the total measurement. Left and Right readings are disabled. www.LiteGait.com 1-800-332-9255...
- Page 33 WiFi network. Print Session using printer connected to tablet, WiFi or WiFi Saving the session will direct. save a copy of the report and data file on the tablet under the BiSym folder. SECTION INTENTIONALLY LEFT BLANK www.LiteGait.com 1-800-332-9255...
- Page 34 3.Inser t edge of tablet into inst ruct ions to install tablet holder while sliding holder while sliding holder to LiteGait. opposite edge of holder opposite edge of holder CHARGING BISYM BATTERY / DISPLAY D i s c o n n e c t t h e 2.
- Page 35 7. Touch the menu at the t o p r i g h t , s e l e c t 10. Select configuration. the Bisym device 8. Enter password “mobility” to open 11. Select Apply the configuration screen www.LiteGait.com 1-800-332-9255...
- Page 36 The password access the configuration screen is “mobility”. Press OK to access configuration. ZERO CALIBRATION: ® Connect harness to LiteGait MOBILITY without any additional weight. RESEARCH Press Zero to set zero calibration USE ONLY. Select BiSym Units Press apply to Side View box should be selected save and exit..
- Page 37 Appendix: BiSym SECTION LEFT INTENTIONALLY BLANK www.LiteGait.com 1-800-332-9255...
-
Page 38: Resource Directory
Service@LiteGait.com Clinical Support ClinicalSupport@LiteGait.com Education Department Education@LiteGait.com Sales@LiteGait.com Sales Department POSTAL ADDRESS: Mobility Research P.O. Box 3141 Tempe, AZ 85280 LiteGait® is a Registered Trademark of Mobility Research, Inc. PO Box 3141, Tempe AZ, USA 85280. (2018 US) www.LiteGait.com 1-800-332-9255... -
Page 39: Limited Warranty Certificate
This information will allow us to notify you for product updates, recall information, clinical support, technical support, maintenance information and to receive our E-Newsletter. You may visit our website at http://www.litegait.com/ warranty.html and submit this form or fill in the information below and mail or fax back. (Keep a copy for your records)
Need help?
Do you have a question about the 300MX and is the answer not in the manual?
Questions and answers