Table of Contents
Advertisement
Advertisement
Table of Contents

Related Manuals for Cognex VisionView


Summary of Contents for Cognex VisionView
- Page 1 VisionView ® Operator Interface Panel User Manual...
- Page 3 Copyright © 2008 - 2009 Cognex Corporation. All Rights Reserved. Portions of the hardware and software provided by Cognex may be covered by one or more of the U.S. and foreign patents listed below as well as pending U.S. and foreign patents. Such pending U.S. and foreign patents issued after the date of this document are listed on Cognex web site at http://www.cognex.com/patents.
- Page 5 TUV SUD AM SCC/NRTL OSHA Scheme for UL/CAN 60950-1 TUV SUD AM, IEC/EN 60950-1. CB report available upon request. RoHS RoHS 6 Compliant For the most up-to-date regulations and conformity information, please refer to the Cognex online support site: Note: http://www.cognex.com/Support/VisionView.
- Page 7 • VisionView is intended to be supplied by a NRTL listed power supply with a minimum output rated 24VDC, 2A with a maximum short circuit current rating of less than 8A and a maximum power rating of less than 100VA and marked Class 2 or Limited Power Source (LPS).
-
Page 9: Table Of Contents
Filmstrip Options ................................14 Settings ....................................17 Security Settings ................................18 Sensor Settings ................................18 Display Settings - VisionView Operator Interface Panel ....................19 Display Settings - VisionView PC Software........................20 Image Settings ................................21 Network Settings ................................22 Run Mode Tiled Image Mode.................................. - Page 10 Single Image Mode................................... 27 Single Image Mode Controls ............................28 Adjust Image.................................. 30 Pan/Zoom Mode ................................31 Options ..................................... 32 Configure Custom View ..............................33 Configure SmartLink Table ............................34 In-Sight Custom View and EasyView Interactive Graphics Mode................................ 36 Handle Selection Button ..............................36 Move Handle .................................
- Page 11 ListBox ...................................43 Wizards ..................................43 Supported Fonts..................................43 How To... Display a Text String in the Image (In-Sight Sensors) ......................45 Troubleshooting VisionView Troubleshooting..............................47 In-Sight Sensor Troubleshooting...............................47 Specifications General Specifications ................................49 Power Connector Specifications ...............................50 VisionView 700 Dimensional Drawings.............................51 Appendix A Cleaning/Maintenance ................................53...
-
Page 13: Visionview Operator Interface Panel
VisionView PC Demo CD that is shipped with the VisionView Operator Interface Panel. The full version provides complete functionality, does not timeout and is available for download on the VisionView support site and on the VisionView PC Software CD. To use the full version, you must purchase a license and install the license using the Cognex Software Licensing Center, which is automatically installed to the PC with the full version. -
Page 14: Visionview Support
VisionView Support Cognex online support is available to assist you in using the VisionView Operator Interface Panel and user interface. For online support, documentation, and downloads, visit: http://www.cognex.com/Support/VisionView. -
Page 15: Install Visionview
Place VisionView face-down on a clean, flat surface. Slide the rubber gasket around the back of VisionView, until it rests directly against the back of the VisionView faceplate. Slide the panel cutout around the back of VisionView, until the panel rests directly on the rubber gasket. - Page 16 Holding the mounting clip firmly in place, tighten the set screw using a 3mm hex wrench; maximum torque 0.2259 Nm (2 in-lb). Repeat for the 7 remaining set screws and mounting clips until VisionView is securely attached to the panel, ensuring the rubber gasket remains in place.
-
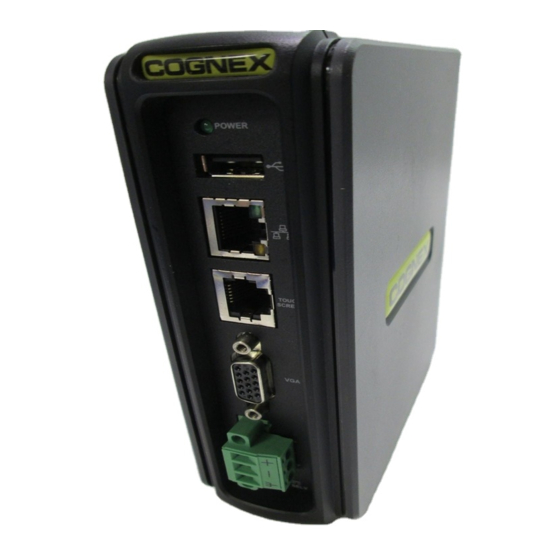
Page 17: Connect The Network Cables
VisionView. In this configuration, four In-Sight or DVT sensors are directly connected to VisionView and a PC is connected to VisionView’s LAN port (to communicate with the sensors using In-Sight Explorer or Intellect software). Connect the sensors to VisionView by plugging the sensors’... - Page 18 In this configuration VisionView’s LAN port is connected to a switch, router or factory network, allowing VisionView to communicate with remote sensors on the factory floor. Up to four In-Sight or DVT sensors may also be directly connected to VisionView. Connect the switch/router to VisionView by plugging an RJ-45 cable into VisionView’s LAN port and plug the other end into an available port on the switch/router.
-
Page 19: Connect The Power Cable
Verify the 24VDC power supply being used is unplugged and not receiving power. Attach the power cable’s -24V wire to Pin 2 and the +24V wire to Pin 3 on the green power connector supplied with VisionView. Optionally, connect a wire from Pin 1 to frame ground (refer to Table 8-2 on page 50). Tighten the wire retention screws. -
Page 21: Setup Mode
Press the touch screen once more to • If no sensors are directly connected to VisionView, up to 9 continue. sensors detected on the network are populated in the If the administrator's touch is not accurate, calibration Selected Sensors list, sorted in alphabetical order. -
Page 22: Manually Select Sensors
Selected Sensors list. Detected Sensors: Displays a list of all sensors detected on the network. VisionView will only detect sensors that are on the same Details: Opens the Sensor Details screen for the highlighted subnet as VisionView (refer to Network Settings on page 22). -
Page 23: Add Other Sensor
Domain Name Server Sensor Type: Displays the sensor or emulator type. on the network or if the sensor and VisionView do not reside on the same subnet. You must enter a Device Name if the sensor is assigned a link-local IP address. -
Page 24: Language
Language: Allows the operator to specify the language • French used in the VisionView interface. • Italian • Sensor Configuration: Allows the operator to configure the scale and position of In-Sight Custom Views or DVT SmartLink tables when displayed from VisionView. -
Page 25: Job Control Options
Setup Mode Job Control Options • Status Icons: Displays the current icons used as pass, warning and fail indicators. • Change: Toggles the type of icons used as pass, warning and fail indicators. • Job Control: Allows the operator to perform job file operations, including loading a job file, saving or renaming the active job file. -
Page 26: Adjust Image Options
This setting is applied to all sensors displayed from image. VisionView. If the reject action is changed from the Filmstrip If the Pan/Zoom checkbox is unchecked, Pan/Zoom Mode is Options screen, it will override any sensor-specific reject action that... - Page 27 • Number to Save: Specifies the number of failed inspection images to save. (VisionView Operator Interface Panel: 10, 25, 50, 100, 250, 500, 800; default = 10. VisionView PC software: 10, 25, 50, 100, 250, 500, 1000, All; default = 10.) Operator Controls Figure 3-10: Location for Saving Images Screen •...
- Page 28 Microsoft Windows network. Leave this field empty if using FTP. Figure 3-11: Location for Saving Images Screen • From the VisionView Operator Interface Panel, the Storage Location is a network location; when using the VisionView PC software, the Storage Location can be either a local or network location.
-
Page 29: Settings
Do not connect more than one USB drive at a time to Note: VisionView. • Backup to USB: Saves a backup of VisionView settings to a USB drive. • Restore from USB: Restores VisionView settings from a USB drive. The Restore process will interrupt normal operation of the VisionView application;... -
Page 30: Security Settings
Mode to Setup Mode. existing user name on all sensors. If the connection user name is left as <default> or empty, VisionView • Idle Timeout: The amount of time the display can remain... -
Page 31: Display Settings - Visionview Operator Interface Panel
Interface Panel all selected sensors and must correspond with an existing password on all sensors. If the password is left blank, VisionView automatically selects an appropriate default password for the sensor(s). For In-Sight and DVT sensors, the default password is blank. -
Page 32: Display Settings - Visionview Pc Software
PC. When the application is exited, the size and position of the application are saved, and these settings are restored the next time the application is started. The Display Mode options are disabled in the VisionView PC Note: Demo. -
Page 33: Image Settings
Image to Display Only Show Images with a Status of: Specifies the type of images to display during Run Mode. This setting is applied to all sensors displayed from VisionView, and is in effect in both Online and Offline mode. •... -
Page 34: Network Settings
Figure 3-18: Network Settings Screen Device Name: Click Edit to define the name of the VisionView device as it should appear on the network. Each VisionView has its Figure 3-19: Manual Network Settings Screen Device Name set automatically the first time it boots. For example, IP Address: Click Edit to assign a unique identifier for the the default Device Name is “VisionViewxxxxx”, where “xxxxx”... - Page 35 Setup Mode Default Gateway: Click Edit to specify the IP address of the default gateway host, if available on the network. The gateway host is responsible for relaying data between hosts on different networks. DNS Server (optional): Click Edit to specify the IP address of the host on the network providing DNS resolution, if available.
-
Page 37: Run Mode
VisionView is powered up. When In Tiled Image Mode, the image area displays images for all VisionView enters Run Mode, it attempts to connect to each of the sensors simultaneously and displays only the controls that are sensors selected in Setup Mode. -
Page 38: Tiled Image Mode Controls
Tiled Image Mode Controls Each image includes: • The sensor’s Display Name. Offline: Place all sensors Offline. If all sensors are Offline, the • The job pass, warning or fail status icon and border (if button appears pressed and is displayed in red. available). -
Page 39: Adjust Image
Run Mode Adjust Image Single Image Mode In Single Image Mode, the image area displays only one sensor's image and the controls that are supported on that sensor. If a particular control is not supported by the sensor or not enabled in the Setup Mode, the control is hidden. -
Page 40: Single Image Mode Controls
The sensor’s image includes: Trigger: Triggers an inspection on the sensor. • The job pass, warning or fail status border (if available). Switch View: Displays the next view available on the sensor. Switch View is sensor-specific. • An AutoSave Failure icon is displayed if the Show AutoSave Failures checkbox is unchecked and a failed For In-Sight sensors, up to five views are available in the following inspection image is not automatically saved to the specified... - Page 41 Run Mode The filmstrip will stop updating if any of the following conditions To better diagnose the failed inspection, the operator can press the occur: Pan/Zoom button to pan or zoom the image. For more information, refer to Pan/Zoom Mode on page 31. •...
-
Page 42: Adjust Image
Adjust Image Filmstrip Buttons/Indicators: The result status for each inspection. The yellow highlighting indicates the result currently selected in the filmstrip. The gray rectangle indicates the portion of the filmstrip currently displayed. Click Freeze to review results. Click Continue to resume filmstrip updates. -
Page 43: Pan/Zoom Mode
Zoom Fixed: The image will represent a 1:1 pixel mapping zoom level, either repeatedly click the Zoom In or Zoom Out between the image and the VisionView display. The default zoom button, tap the image area, or if using a mouse, left- or right-click magnification is 100%. -
Page 44: Options
If the reject action is changed while in Run Mode, the setting is only applied to the active sensor, and will persist if VisionView is power-cycled or placed in Setup Mode. • Continue: If the inspection fails, the filmstrip continues to update. -
Page 45: Configure Custom View
Run Mode sensor. Selecting a new job in VisionView will change the Custom View Scaling and Positioning sensor’s startup job. • The settings are sensor-specific, and apply to all Custom • Save: Allows you to save changes made to the active job Views on the sensor. -
Page 46: Configure Smartlink Table
Configure SmartLink Table • Position: Specifies the position of the SmartLink table on the VisionView display. (Upper Left, Upper Right, Lower Left, Lower Right, Centered, Below Image, Next to Image). Figure 4-10: Configure SmartLink Table Screen SmartLink Table Scaling and Positioning •... -
Page 47: In-Sight Custom View And Easyview
In-Sight Custom View and EasyView From In-Sight Explorer, you can create a Custom View or an EasyView to customize how data is displayed on VisionView and to allow the operator to make simple adjustments to the job from the factory floor. The types of adjustments the operator can make depend on the types of interactive controls saved in the job, the privileges associated with the Sensor User Name and whether the Require User Authentication checkbox is checked in the Sensor Settings screen (refer to Sensor Settings on page 18). -
Page 48: Interactive Graphics Mode
Interactive Graphics Mode To enter Interactive Graphics Mode, press an interactive graphic control. The current view is replaced by the image, the interactive graphic, the handle adjustment buttons and the Pan/Zoom button. In the image area, touch the appropriate handle to make it the active handle. Alternately, use the Handle Selection button to select a handle. -
Page 49: Move Handle
In-Sight Custom View and EasyView Move Handle Repositions the graphic on the image. The Move handle is located at the geometric center of the graphic. When using the Nudge buttons or a keyboard to reposition the graphic, the handle is nudged one pixel in the specified direction. When the Move handle is active, the X- and Y- coordinates of the Move handle are displayed. -
Page 50: Rotate Handle
Rotate Handle Adjusts the rotation of the region (clockwise or counter-clockwise). When using the Nudge buttons or a keyboard to rotate the graphic, the graphic is rotated one degree in the specified direction. When the Rotate handle is active, the current rotation (in degrees) is displayed. Table 5-3: Rotate Actions Action Nudge Button... -
Page 51: Handle Edit Button
In-Sight Custom View and EasyView Handle Edit Button Displays the current position, size, rotation or bend of the active handle. Pressing a Handle Edit button opens Numeric Entry Mode, allowing the operator to manually enter the value for the active handle. For more information, refer to Numeric Entry Mode on page 40. Pan/Zoom Button When in Interactive Graphics Mode, the operator may need to pan or zoom the image to make adjustments to the interactive graphic. -
Page 52: Numeric Entry Mode
Numeric Entry Mode Numeric Entry Mode allows you to manually adjust a numeric value, by pressing the Up or Down button or using the numeric keypad. Pressing the Up or Down button increases or decreases the numeric value by 1, within the allowed value range. If the numeric value is within the allowed value range, the cell background is blue;... -
Page 53: Supported Interactive Controls
® • For complete descriptions of the supported controls, refer to the In-Sight Explorer Help file. Notes: • ColorLabel, StatusLight, and MultiStatus controls are supported in VisionView, but are not interactive. Button Pressing a Button triggers a spreadsheet event. Checkbox Pressing a Checkbox toggles the state of the checkbox and associated spreadsheet cell. -
Page 54: Editfloat
Pressing an EditPoint control switches the display to Interactive Graphics Mode, where the position of the point can be adjusted. EditPolygon Pressing an EditPolygon control switches the display to Interactive Graphics Mode, where the position and size of the polygon can be adjusted. Individual points in the polygon cannot be added or removed from VisionView. Note: EditRegion Pressing an EditRegion control switches the display to Interactive Graphics Mode, where the position, size, rotation and bend of the region can be adjusted. -
Page 55: Listbox
The following font sizes are supported: 8, 9, 10, 12, 14, 16, 20, 26, 32, 40, 72, 96 and 144. If an unsupported font size is used, the closest supported font size is substituted. The following font types are supported on VisionView. If an unsupported font type is used, the text is displayed in one of the supported font types. -
Page 57: How To
Insert the PlotString function in the spreadsheet, referencing the decoded string. Using the Format Cells dialog, format the Font, Font Style and Font Size of the PlotString cell and the plotted text string. Save the job, close In-Sight Explorer and return to the VisionView application. The formatted text string should be displayed over the image. -
Page 59: Troubleshooting
Problem Cause/Resolution Unable to Establish VisionView Network Connection If VisionView is configured to obtain an IP address automatically and connected directly to a PC, verify that the PC is not configured as a gateway device. Slow Image Update Rate Disabling the filmstrip may increase VisionView's image update rate when the sensor is Online. - Page 60 Custom View Characters are Displayed as Square Blocks The font type used in the Custom View must be consistent with the language selected in VisionView. If a Custom View contains a font that is not consistent with the selected language, the characters may be represented as square...
-
Page 61: Specifications
Cognex vision sensors directly, additionally supplying power to In-Sight Micro vision systems through Power over Ethernet 3 Host USB 2.0 (480 Mb/sec.) ports for saving images to a USB drive Power Consumption 24VDC ±10%, 2A (1A when not providing Power over Ethernet to In-Sight Micro vision systems). VisionView contains an internal, self-resetting fuse. Mechanical Material... -
Page 62: Power Connector Specifications
1. The Backlight Life may be increased beyond 50,000 hours by using the Inactivity Timeout. By default, if there is no operator interaction for the specified Inactivity Timeout, the Brightness is dimmed to 10%, further increasing the Backlight Life. 2. VisionView Vision Sensor ports provide power to Cognex vision sensors requiring Power over Ethernet; connecting third party devices to these ports could damage VisionView. -
Page 63: Visionview 700 Dimensional Drawings
Specifications VisionView 700 Dimensional Drawings All dimensions are in mm [inches]. Note: Figure 8-1: VisionView 700 Dimensional Drawings and Panel Cutout... -
Page 65: Appendix A Cleaning/Maintenance
Appendix A Cleaning/Maintenance Use a micro-fiber cleaning cloth to quickly remove smudges and fingerprints from VisionView. Be sure to first remove large dirt particles with clean, compressed air, a camel hair brush or brush the surface lightly with the cloth. - Page 68 P/N 597-0108-04 Printed in the USA...
Need help?
Do you have a question about the VisionView and is the answer not in the manual?
Questions and answers