Table of Contents
Advertisement
Quick Links
STYLE SELECTIONS and logo design are trademarks
or registered trademarks of LF, LLC. All rights reserved.
Serial Number
Questions, problems, missing parts? Before returning to your retailer, call our customer service
department at 1-877-888-8225, 8 a.m. - 8 p.m., EST, Monday - Sunday.
You could also contact us at partsplus@lowes.com or visit www.lowespartsplus.com.
XXXXXXX
Purchase Date
1
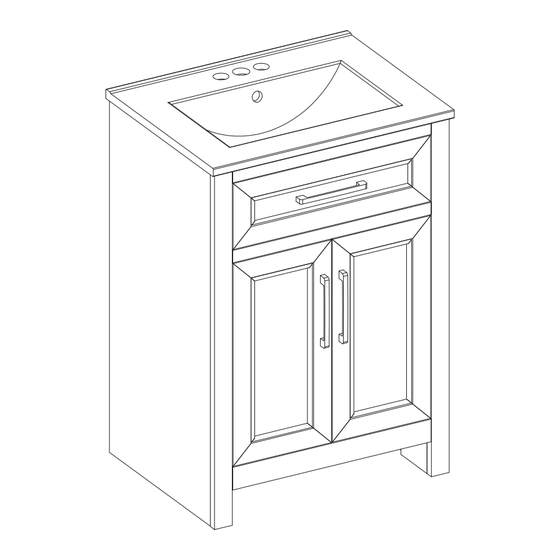
VANITY WITH TOP
MODEL #1790VA-24-201
ATTACH YOUR RECEIPT HERE
ITEM #962222
Español p. 11
Español p.
XX
Advertisement
Table of Contents

Subscribe to Our Youtube Channel
Related Manuals for LF STYLE SELECTIONS 1790VA-24-201


Summary of Contents for LF STYLE SELECTIONS 1790VA-24-201
- Page 1 MODEL #1790VA-24-201 STYLE SELECTIONS and logo design are trademarks Español p. 11 Español p. or registered trademarks of LF, LLC. All rights reserved. ATTACH YOUR RECEIPT HERE Serial Number Purchase Date Questions, problems, missing parts? Before returning to your retailer, call our customer service department at 1-877-888-8225, 8 a.m.
-
Page 2: Table Of Contents
TABLE OF CONTENTS Package Contents...........................3 Hardware Contents..........................3 Safety Information..........................3 Preparation............................4 Assembly or Installation Instructions ....................4 Care and Maintenance ........................9 Warranty............................9 Replacement Parts List .........................10... -
Page 3: Package Contents
PACKAGE CONTENTS PART DESCRIPTION QUANTITY Vanity Back Stretcher Bar Tip-out Door (preassembled to Vanity (A)) Left Door (preassembled to Vanity (A)) Right Door (preassembled to Vanity (A)) HARDWARE CONTENTS Touch-Up Pen Qty. 1 SAFETY INFORMATION Please read and understand this entire manual before attempting to assemble, operate, or install this product. -
Page 4: Preparation
PREPARATION Before beginning assembly of product, make sure all parts are present. Compare parts with package contents list and hardware contents list. If any part is missing or damaged, do not attempt to assemble the product. Estimated Installation Time: 45 minutes (24 hours for silicone caulk to dry) Tools Required for Installation (not included): Phillips screwdriver, utility knife or scissors, silicone caulk, power drill with drill bit Helpful Tools (not included): Measuring tape, level... - Page 5 VANITY INSTALLATION INSTRUCTIONS 2. Flip down the bottom panel to let it rest on the wood support blocks located on the side panels. 3. Locate one of the back stretcher bar (C) and gently slide the lock pins into the lower slot holes on the side panels.
- Page 6 VANITY INSTALLATION INSTRUCTIONS 4. Locate the other back stretcher bar (C) and gently slide the lock pins into the upper slot holes on the side panels. Note: Clean area where the vanity (A) will be permanently located prior to beginning installation, ensuring the vanity (A) will not interfere with any water supply and drain lines once mounted.
- Page 7 VANITY INSTALLATION INSTRUCTIONS Note: A t this stage it may be easier to install the faucet and drain kit (not included) to top (B) per the manufacturer’s instructions, before moving on to Step 6. 6. Apply stain free silicone caulk (not included) to the top edge of vanity (A).
- Page 8 VANITY INSTALLATION INSTRUCTIONS 8. Gently open the top tip-out door and remove the plastic tray by lifting/sliding up (per the diagram). 9. Re-hang the plastic tray back inside of the top tip-out door. If this door needs to be adjusted, please refer to the hinge adjustment steps below.
-
Page 9: Care And Maintenance
CARE AND MAINTENANCE • Dust the vanity regularly with a soft, non-lint producing cloth or household dusting product. • You can clean the vanity with a gentle, non-abrasive household cleaner. • Make sure to dry the wood immediately with a soft cloth or towel. •... -
Page 10: Replacement Parts List
REPLACEMENT PARTS LIST For replacement parts, call our customer service department at 1-877-888-8225, 8 a.m. - 8 p.m., EST, Monday - Sunday. You could also contact us at partsplus@lowes.com or visit www.lowespartsplus.com. PART DESCRIPTION PART # 1790VA-24-VC TOP Back Stretcher Bar 1790VA-24-BACK BAR Tip-out Door 1790VA-24-TIP-OUT DOOR...
Need help?
Do you have a question about the STYLE SELECTIONS 1790VA-24-201 and is the answer not in the manual?
Questions and answers