Table of Contents
Advertisement
Quick Links
Advertisement
Table of Contents

Subscribe to Our Youtube Channel
Related Manuals for DigiTech XC-0381


Summary of Contents for DigiTech XC-0381
- Page 1 User Manual for Digital Voice Recorder Model No.: XC-0381...
-
Page 2: Table Of Contents
Contents Button Description Part Description ....2 Features ..............2 III. Battery Installation ..........3 Power ..............4 IV. 1 Power on IV. 2 Power off IV. 3 Idle time First time use ............5 Recording ............. 5 VII. Playback ............... 6 VII.1 Selecting files VII.2 Playback files VII.3 Pause playback... -
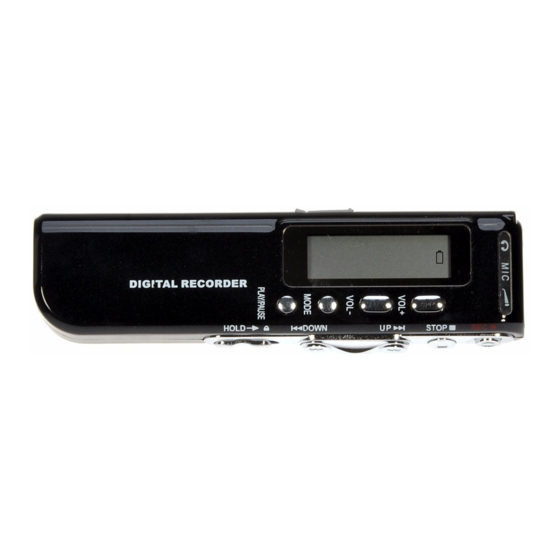
Page 3: Button Description Part Description
Button Description Part Description 1. Record 10. Record indicator 2. Stop/Power off 11. LCD 3. Previous file/rewind 12. Built-in speaker 4. Next file/fast forward 13. USB interface 5. Key lock 14. Battery cover 6. Volume increase 15. Lanyard hole 7. Volume decrease 16. -
Page 4: Battery Installation
A-B Repeat mode Delete function USB interface Built-in speaker Battery indicator Key lock III. Battery Installation III.1 Slide the battery cover open and insert 2 x AAA batteries, follow the correct polarity marked inside the battery holder. -
Page 5: Power
III.4 When the voice recorder reaches low capacity, a ‘Lo’ will flash on the LCD as well. During MP3 playback mode, the volume will decrease to indicate battery is at a low capacity and a battery change will be required. During record mode,... -
Page 6: Idle Time
IV.3 Idle time The voice recorder will automatically power off when idle for 2 minutes. First time use Image to the right will be displayed on the LCD when first powered and is part of the main menu. ‘battery icon’ indicates battery capacity. -
Page 7: Playback
(DVR) will be selected once booted up. 2 recording modes to choose from: ‘SP’ – Short Play ‘LP’ – Long Play To select which recording mode press buttons ‘VOL+’ to scroll up or ‘VOL-‘ to scroll down. Voice activated recording (VOX): 00 –... -
Page 8: Vii.2 Playback Files
MODE button (once pressed, it may take 2 seconds before changing modes). Then press the UP or DOWN button to change the stored files, the file number will change in numeric sequence. VII.2 Play back files When on main menu, press the PLAY/PAUSE button to begin play back. -
Page 9: Playback Settings
shown in the figure VIII. Playback settings Only during play back, the Loop mode setting, EQ setting or A-B repeat setting are accessible. Press the mode button to scroll through each function: - Loop settings - EQ settings - A-B settings VIII.1 Loop settings During playback, press the MODE button to enter... -
Page 10: Viii.3 A-B (Time Frame) Repeat Settings
When EQ is displayed on the LCD, press the UP or DOWN key to select: 00 - Normal 01 - Rock 02 - Pop 03 - Classical 04 - Soft 05 - Jazz 06 - Bass Boost Press the MODE button to confirm the selected EQ setting and to enter the next setting which is for A-B repeat. -
Page 11: Delete Files
Delete files Select a file in DVR or MP3 mode then hold the MODE button for 2 seconds. When ‘deL’ is displayed on the LCD, press the PLAY/PAUSE button to delete the selected file. ‘Er aSE’ will appear on the LCD to confirm the file has been deleted To delete all files, hold the MODE button for 2 seconds again. -
Page 12: Upload Mp3
when ‘USB’ appears on the LCD. The voice recorder will come up as a Removable Disk or a Mass Storage Device on My Computer. Access the voice recorder then open the Record folder then the DVR folder. The DVR folder contains recorded files which you can save on your computers hard drive.
Need help?
Do you have a question about the XC-0381 and is the answer not in the manual?
Questions and answers