Table of Contents
Advertisement
Quick Links
Advertisement
Table of Contents

Summary of Contents for Qu-Bit Electronix Surface
- Page 1 Surface...
-
Page 2: Table Of Contents
Contents Description ........Specs ........Marked Diagram . -
Page 3: Description
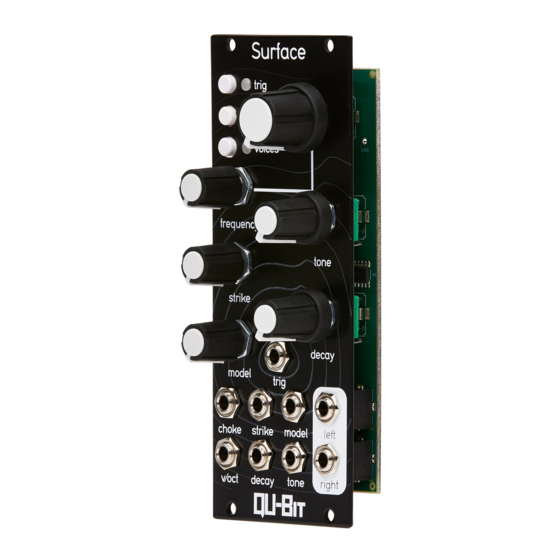
8 voices of polyphony. Creating a sense of space is easy with the true stereo outputs and their configurable spatialization modes. Surface provides a unique take on physical modeling which blurs the line between emulation and synthesis to create entirely new worlds of sound. -
Page 4: Marked Diagram
Marked Diagram... -
Page 5: General Overview
General Overview 1. T rig T riggers a new voice, depending on the number of active voices and the Voices setting this will take over the oldest voice. The LED for this will be indicated by the color of the active model. 2. -
Page 6: Model
4. Model Selects the model to be used for the next triggered voice. The following models are mapped evenly across the knob from left to right: • Pluck • Bell • E. Piano 1 • E. Piano 2 • Kick •... - Page 7 Bell Modal Bar Model • Tone: Controls ratios of the Bar to be struck. Morphs between Vibraphones and T ablas. • Strike: Mallet Weight and Material • LED Color: Blue • Split Model Output Routing: Left Bell Types (in order across the T one knob): •...
-
Page 8: Strike
• Strike: Attack time and Pitch Envelope amount (Slight audible attack time when all the way down) • LED Color: Yellow • Split Model Output Routing: Right Snare Snare Drum Model • Tone: Noise Amount • Strike: Pitch Envelope Amount •... - Page 9 Generally in the range of 500 microseconds to 5 or 10 seconds (Pluck and Kick are on the longer side). CV responds to +/-5V .
-
Page 10: Voices
8. Voices Sets the number of voices that can be active at a time. Pressing the button will advance through each setting with the LED indicating the current selection. Number of Voices Color Blue Cyan Green Purple 9. Outputs Stereo Outputs. See Stereo Settings below for details on how these can be configured. Average 10Vpp depending on settings. -
Page 11: Stereo Output Modes
Stereo Output Modes T apping the Choke button while in the Extra Settings Mode will switch between output modes, and display the corresponding color on the Choke LED. Mode Color Description Mono Blue Left/Right outputs are identical Split Models Green All voices of a given model will output on a specific output Split Voices... -
Page 12: Example Patches
A basic patch to get your Surface singing! Modules: Surface, Step Sequencer (Qu-Bit Bloom) Patch Bloom’s OUT 1 to V/OCT on Surface. Then, patch the CLOCK out or GATE 1 from Bloom to Surface’s TRIG CV input. Make sure to send LEFT and RIGHT audio outputs to a stereo mixer to hear Surface’s unique spatialization modes. -
Page 13: Strummed Guitar
• Branches: 0 • Path: 0 • Rate: ~40% Sequence your “chord” using the first 3 to 6 notes of your Channel one sequence. Leave the rest of the sequence empty. The Surface should now be strumming a single chord! - Page 14 T o add variety, use Branches and paths to add additional plucking, strumming, and guitar- like flair. Patching CV into TONE, DECA Y , and CHOKE can help emulate palm mutes and varying picking styles. T o play a fixed chord progression, patch OUT 2 to the ROOT CV . On Channel 2 (Green), sequence your root notes for as many steps as you like.
-
Page 15: Keyboard T Racking
Patch your sequence out to a buffered multiplier. Send out your multed CV signal to the V/OCT as well as the TONE CV input on the Surface. Your sequence will now “keyboard track” across the tone knob, applying higher CV levels in proportion to higher V/Oct notes in your sequence. -
Page 16: Calibration
Calibration 1. With no jacks plugged into the CVs of the module, Hold the CHOKE button while you turn the module on. The Voices LED will begin to blink blue. 2. Insert 1V from a reliable source and tap voices again. The LED will begin blinking purple. -
Page 17: Updating Firmware
Updating Firmware Download the latest firmware from the internet. Go to the Electro-smith Web Programmer for the Daisy and follow the instructions to con- nect the Daisy to your computer. (You can leave it mounted on the module throughout this process).


Need help?
Do you have a question about the Surface and is the answer not in the manual?
Questions and answers