Table of Contents
Advertisement
Quick Links
Advertisement
Table of Contents

Related Manuals for NexTraq HT-4212


Summary of Contents for NexTraq HT-4212
- Page 1 HT-4212/TT-4212 Installation Guide Version 1.0 NexTraq Confidential...
- Page 2 CKNOWLEDGEMENT its terms and conditions. You also agree that: (1) No oral or written information or advice given by NexTraq, its dealers, distributors, agents or employees shall in any way increase the scope of this Limited Warranty and you may not rely on any such information or advice;...
-
Page 3: Regulatory Information
20 cm is normally maintained between the transmitter’s antenna and the body of the user or nearby persons. The HT-4212/TT-4212 is not designed for or intended to be used in portable applications (within 20 cm of the body of the user) and such uses are strictly prohibited. -
Page 4: Table Of Contents
Overview ................................ 1 Environmental Specifications ........................2 Primary Connections ............................ 3 Plan The Installation ............................. 4 1.4.1 Size and Placement of HT-4212/TT-4212 DEVICE Unit ..............4 1.4.2 Protection from Excessive Heat ......................4 1.4.3 Visibility of Diagnostic LEDs ....................... 5 1.4.4... -
Page 5: System Overview
These functions, of course, are completely dependent on the capabilities of the NexTraq GPS Fleet Tracking platform. The role of the NexTraq HT-4212/TT-4212 is to deliver the relevant information when it is needed. -
Page 6: Environmental Specifications
3 meter CEP (with SA off) -160 dBm tracking sensitivity RoHS Compliant The HT-4212/TT-4212 will experience reduced battery life and performance operating below -10C and above +50C, and that the battery life will be degraded at storage temps above +50C. NexTraq Proprietary & Confidential... -
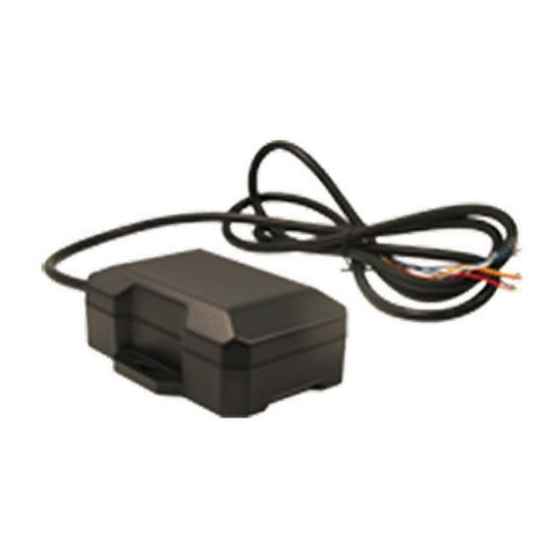
Page 7: Primary Connections
HT-4212/TT-4212 Installation Guide 1.3 Primary Connections The HT-4212/TT-4212 uses 8 22AWG leads for its power and I/O connections. These leads are mapped as follows HT-4212/TT-4212 Tracker Wires Wire Function / Connection Black Ground (required) Power 6-32 volt DC (Input) White... -
Page 8: Plan The Installation
Before drilling any holes or running any wires, decide where each NexTraq device will be located. Be sure that the cables to the NexTraq device are not bent or constricted in any way. Also make sure that the NexTraq device is kept away from direct impact by harmful objects on a frequent basis and is not submerged in water or any other liquid. -
Page 9: Visibility Of Diagnostic Leds
HT-4212/TT-4212 Installation Guide 1.4.3 Visibility of Diagnostic LEDs Status LED lights on the front of the NexTraq device unit can provide valuable information about the operation of the NexTraq device. When feasible, attempt to install the NexTraq device in such a way that these lights can be seen with reasonable ease. -
Page 10: Cable Length
HT-4212/TT-4212 Installation Guide 1.4.5 Cable Length The cables which are provided for connecting to the NexTraq device should be used at the complete length provided. Do not cut cables. Instead, coil any excess cable length, making sure not to crimp or flatten the antenna cable. -
Page 11: Installing The Ht-4212/Tt-4212 Device On An Asset
DO NOT connect the power cable to the NexTraq device at this time. 1.5.2 Placement of the HT-4212/TT-4212 device. The HT-4212/TT-4212 must have a clear view of the sky. Make sure that there are no obstructions close to the antenna that might block sending or receiving signals. -
Page 12: Gps Verification
This may be verified in one of two ways. First, installers may look at the Comm LED (Orange). If this LED is solid, then the NexTraq device has registered to the network and established a data session.
Need help?
Do you have a question about the HT-4212 and is the answer not in the manual?
Questions and answers