Table of Contents
Advertisement
Advertisement
Table of Contents

Related Manuals for KIRLOSKAR HA Series


Summary of Contents for KIRLOSKAR HA Series
- Page 2 INDEX 1. Foreword 1 - 6 2. Engine Description 7 - 22 3. Engine Operation 23 - 34 4. Operating Media 35 - 38 5. Routine Maintenance 39 - 44 6. Service & Maintenance 45 - 68 7. Faults, Causes & Remedies 69 - 72 8.
- Page 4 Kirloskar diesel engines. Please contact series O & M manual. our authorized service dealer / distributors nearest to you The HA series air cooled engines are developed and to avail this facility. supplied for wide range of application meeting your Continuous improvements in the product design are requirements.
- Page 6 STANDARD WARRANTY FOR KOEL HA SERIES ENGINE OPERATING IN INDIA This warranty applies to the HA Series KOEL Diesel from faulty material or workmanship, provide always Engine. that such defective parts are promptly returned carriage paid to our works and provided that Fuel...
- Page 7 This warranty does not apply to 5. Any damage due to use of lubrication oil, fuel 1. To fair wear and tear or to damage due to quality and grade not recommended by Kirloskar negligence or improper handling or incorrect Oil Engines Ltd.
- Page 8 This warranty is the only document given by us warranting the Kirloskar HA series engine. No other document giving any warranty terms conflicting these contents shall be considered and entertained.
- Page 10 2. Engine Description 2.1 Model 2.2 Engine Illustration 2.3 Lube Oil System 2.4 Fuel System 2.5 Engine Cooling System 2.6 Air Inlet System 2.7 Exhaust System...
- Page 12 Sr No. KIRLOSKAR OIL ENGINES LTD INDIA KIRLOSKAR OIL ENGINES LTD. INDIA The engine model and engine serial no. are stamped on nameplate along with engine The nameplate is fixed on engine rating, rpm and referred standard. The nameplate details must be given while ordering crankcase as shown.
- Page 13 2. Engine Description 2.1 Model 2.1.3. Cylinder Numbering. 2.1.4. Direct Injection Cylinder are numbered consecutively, Engines are with direct fuel injection to beginning at the flywheel end. meet high performance and pollution regulations...
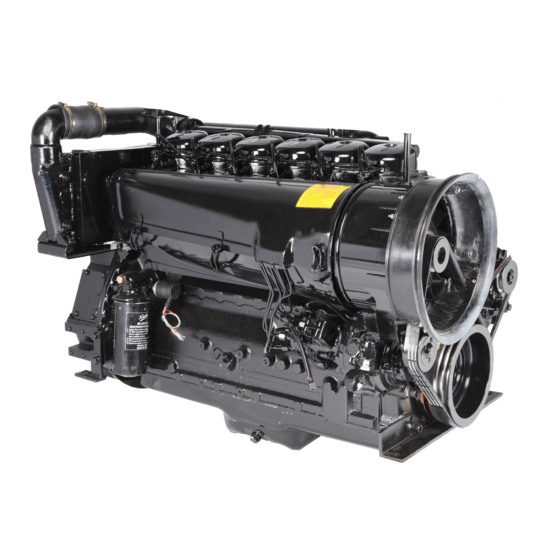
- Page 14 2. Engine Description 2.2 Engine Illustration 2.2.1. Service Side. HA694 NA 1. Cooling Blower 2. Lifting Hook 3. Fuel Injection Pump 4. Flywheel Housing 5. Crank Pulley 6. Belt Tension Unit 7. Oil Filler Neck / Cap 8. Lube Oil Sump 9.
- Page 15 2. Engine Description 2.2 Engine Illustration 2.2.2. Exhaust Side. HA694 NA 15. Charging Alternator 16. Starter 17. Crankcase 18. Crankcase Breather 19. Flywheel 20. Rocker Cover 21. Air Intake Manifold 22. Exhaust Manifold...
- Page 16 2. Engine Description 2.2 Engine Illustration 2.2.3. Service Side. HA694 TC 1. Cooling Blower 2. Lifting Hook 3. Fuel Injection Pump 4. V-Belt 5. Crank Pulley 6. Belt Tension Unit 7. Oil Filler Neck 8. Lube Oil Sump 9. Lube Oil Filter 10.
- Page 17 2. Engine Description 2.2 Engine Illustration 2.2.4. Exhaust Side. HA694 TC 15. Exhaust manifold 16. Charging Alternator 17. Starter 18. Crankcase 19. Crankcase Breather 20. Flywheel Housing 21. Flywheel 22. Turbocharger 23. Air Intake Manifold...
- Page 18 2. Engine Description 2.3 Lube Oil System 2.3.1. HA694 NA Lube Oil Sump Suction Pipe Lube Oil Pump Pressure Relief Valve Delivery Pipe Lube Oil Cooler Lube Oil Filter Relief Valve (not shown) Oil Gallery 10 Main Bearing 11 Large End Bearing 12 Camshaft Bearing 13 Tappet with groove for pulse fed rocker arm lubrication.
- Page 19 2. Engine Description 2.3 Lube Oil System 2.3.1. HA694 NA 14 Push Rod 15 Rocker Arm Bearing 16 Metering Plug 17 Push Rod Cover Tube 18 Restrictor ( for lubrication of gears) 19 Spray Nozzle for Piston Cooling 20 Connection for Pressure Gauge 21 Oil Pressure Gauge 22 Fuel Pump Connected to Lube Oil Circuit...
- Page 20 2. Engine Description 2.3 Lube Oil System 2.3.2. HA694 TC Oil Sump Suction Pipe Oil Pump Pressure Valve Delivery Pipe Pipe to Oil Cooler Oil cooler plate type Lube Oil Filter Safety Valve 10 Oil Gallery 11 Main Bearing 12 Big-End Bearing 13 Camshaft Bearing...
- Page 21 2. Engine Description 2.3 Lube Oil System 2.3.2. HA694 TC 14 Tappet with groove for pulse fed rocker arm lubrication 15 Push Rod 16 Rocker Arm Bearing 17 Metering Plug 18 Push Rod and Cover Tube 19 Restrictor Hole 20 Nozzle for Piston Cooling 21 Oil Pipe to Turbocharger 22 Oil return Pipe 23 Oil Pressure Gauge...
- Page 22 2. Engine Description 2.4 Fuel System 2.4.1. Fuel System 1. Fuel tank 2. Fuel pipe - tank to fuel pump 3. Fuel feed pump 4. Fuel filter 5. Injection pump 6. Fuel injection pipe 7. Fuel Injector 8. Leak-off pipe 9.
- Page 23 2. Engine Description 2.5 Engine Cooling System 2.5.1. Cooling Air Flow Air cooling for the engine is achieved by highly efficient,quite integral, axial blower having sufficient reserve capacity to cope up with high ambient temperatures. The blower is driven by the engine crankshaft pulley through ‘V‘...
- Page 24 Figure above shows the construction of Figure above shows the construction of sufficient quantity of air to burn the fuel oil bath air cleaner used on HA series dry type air cleaner used on HA series and satisfactory performance. engines.
- Page 25 2. Engine Description 2.7 Exhaust System 2.7.1 Exhaust System The Exhaust System is necessary to direct exhaust gases to non confined areas & reduce the noise level to tolerable level. Exhaust system should exhert minimum back pressure on engine. Exhaust back pressure should be restricted to less than 50 mm of Hg.
- Page 26 3. Engine Operation 3.1 Commissioning 3.2 Starting 3.3 Monitoring System 3.4 Stopping 3.5 Operating Conditions...
- Page 28 3. Engine Operation 3.1 Commissioning 3.1.1 Adding Engine Oil 3.1.2 Filling Oil Bath Air 3.1.3 Adding Fuel Cleaner Fill oil bowl of oil bath air cleaner with Use only High speed diesel fuel. For fuel Engines are delivered with first fill oil. engine oil up to the mark.
- Page 29 3. Engine Operation 3.1 Commissioning 3.1.4 Fuel System Ventilation 3.1.5 Other Preparations 3.1.6 Additional Maintenance Work * Check battery and lead connections The following maintenance should be Also check cable connection at the carried out after 50 operating hours; starter and alternator end for tightness. * Change lube oil see 6.1.2 * Remove engine lifting tackle.
- Page 30 3. Engine Operation 3.2 Starting 3.2.1 Electric Starting Starting Without Cold-Start Before starting, make sure that nobody is standing in the immediate vicinity of the engine or driven machine. OFF ON Stopping After repair work; Lever SRART Check that all guards have been replaced Charge Lamp and all tools have been removed from the engine.
- Page 31 3. Engine Operation 3.2 Starting With Cold-Start Aid/Flame With Cold-Start Aid/Flame Glow Plug - 12V Glow Plug - 24V Push button for Push button for cold starting cold starting P .B. P .B. START START Charge Lamp Charge Lamp * Insert key. * Insert key.
- Page 32 3. Engine Operation 3.3 Monitoring System 3.3.1 Engine Lube Oil Pressure 3.3.2 Engine Oil Temperature 3.3.3 Belt Failure Switch For HA394/494/694 & Lube Oil Pressure Gauge Lube Oil Temp. Indicator HA494TC/694TC The pointer indicates the lube oil pressure The lube oil temperature gauge pointer If the V - Belt fails, lever of automatic belt of engine.
- Page 33 3. Engine Operation 3.2 Starting 3.3.4 High cylinder Head 3.3.5 Belt Failure System Temperature Switch Mechanical Shutdown For HA294 Engine Cylinder head temperature switch (Set If the V - Belt fails, lever (1) of automatic point 175 ± 5 C) protects the engine in belt tension operates the lever (2), which case of belt failure.
- Page 34 3. Engine Operation 3.4 Stopping System 3.4.1 Manual Shutdown 3.4.2 Electrical Shutdown Ignition Key Push button for cold starting P .B. START Stop Solenoid Stopping Charge Lamp Lever * Move the accelerating lever to idle * If possible, do not suddenly switch off * Stop solenoid is connected to fuel position (if possible) the engine when under full load.
- Page 35 3. Engine Operation 3.5 Operating Conditions 3.5.1 Winter Operation * Lube Oil Viscosity * Cold- Start Aid - Select the oil viscosity (SAE grade) - At temperatures near or below according ambient freezing point use flame glow plugs temperature when the engine is if necessary, see 3.2.1 started, see 4.1.2 - Increase oil change frequency when...
- Page 36 / equipment supplier whether engine has been derated for power to enhance service life, reliability and exhaust gas quality. Otherwise contact KIRLOSKAR SERVICE. * As altitude ambient temperature rise, the density of air tends to decrease, which affects the...
- Page 38 4. Operating Media 4.1 Lube Oil 4.2 Fuel...
- Page 39 with...
- Page 40 4. Operating Media 4.1 Lube Oil 4.1.1 Quality Grade 4.1.2 Viscosity Lube oil of correct viscosity and Multi-grade oil should be used. detergency grades should be used It is As the viscosity of lube oil is dependent recommended to use ‘K Oil Super’ on temperature.
- Page 41 4. Operating Media 4.1 Lube Oil 4.2.1 Quality Grade 4.2.2 Winter Grade Fuel The commercially available diesel fuel Waxing may occur at low temperatures with sulphur content less than 0.05% be clogging the fuel system and reducing used. If sulphur content is higher, then oil engine efficiency.
- Page 42 5. Routine Maintenance 5.1 Maintenance Schedule 5.2 Maintenance Work Completed...
- Page 44 5. Routine Maintenance 5.1 Maintenance Schedule Operating Hours Refer section Daily 1000 5000 9000 Oil level in engine 6.1.2 Air Cleaner - oil bath Air Cleaner - dry type Battery & lead connections 6.7.1 Cooling system Engine lube oil 6.1.2 Lube oil filter element / cartridge 6.1.3 Fuel strainer...
- Page 45 5. Routine Maintenance 5.2 Maintenance Work Completed Hours Date Remark Signature / Stamp 1000 1250 1500 1750 2000 2250 2500 2750 3000 3250 3500 3750 4000...
- Page 46 5. Routine Maintenance 5.2 Maintenance Work Completed Hours Date Remark Signature / Stamp 4250 4500 4750 5000 5250 5500 5750 6000 6250 6500 6750 7000 7250 7500 7750 8000...
- Page 47 5. Routine Maintenance 5.2 Maintenance Work Completed Hours Date Remark Signature / Stamp 8250 8500 8750 9000...
- Page 48 6. Service & Maintenance 6.1 Lubrication system 6.2 Fuel System 6.3 Cooling System 6.4 Combustion Air System 6.5 Belt Drive 6.6 Adjustments 6.7 Accessories 6.8 Engine Cleaning 6.9 Additional Maintenance...
- Page 50 For use of any recommended change period is applicable in lube oil other than K Oil Super, case of use of K Oil Super in the lube oil change period will be engine, sourced from Kirloskar 250 hours. Service Dealer only.
- Page 51 6. Service & Maintenance 6.1 Lubrication System 6.1.2. Checking Oil Level / 6.1.2. Checking Oil Level / Changing Engine Oil Changing Engine Oil 6.1.2.1 Checking Oil Level 6.1.2.2 Engine Oil Change + 80 + 176 MAX. MIN. * Ensure engine is horizontal. * Place oil tray under the engine.
- Page 52 6. Service & Maintenance 6.1 Lubrication System 6.1.3 Changing Oil Filter Element - Spin On Type * Clean sealing surface of filter carrier * Tighten the oil filter cartridge with * Remove the filter cartridge by rotating rim. another half - turn using commercial it anticlockwise with commercial tool.
- Page 53 6. Service & Maintenance 6.1 Lubrication System 6.1.4 Changing Oil Filter Element - Paper Element Type * Assemble the bowl and tighten centre bolt firmly. * Check oil level. * Check oil pressure. * Unscrew the center bolt of bowl and collect the oil in tray.
- Page 54 6. Service & Maintenance 6.2 Fuel System 6.2.1. Changing Fuel Filter - Spin On Type * Remove the cartridge by rotating in * Clean the sealing surface of filter. * Tighten the fuel filter cartridge with a anticlockwise using commercial tool. final half turn using commercial tool.
- Page 55 6. Service & Maintenance 6.2 Fuel System 6.2.2. Changing Fuel Filter - 6.2.3. Fuel Strainer Element Type * Discard the removed insert. * Check the condition of sealing ring, change if required. * Assemble the bowls and tighten centre bolts firmly. * Bleed the fuel system before starting engine.
- Page 56 6. Service & Maintenance 6.2 Fuel System 6.2.4 Lube Oil Filter & Fuel Filter With Common Filter Header Fuel Filter Lube Oil Filter Lube oil filter & fuel filter (Spin On type) with common filter header can be supplied as an optional feature.
- Page 57 6. Service & Maintenance 6.3 Cooling System 6.3.1. Cleaning Intervals * The amount of contamination in the Inspection and cooling system depends on the Clearing Intervals Engine application engine application. Recommended * Oil or fuel leakages on the engine Operating Hours increase the risk of contamination.
- Page 58 6. Service & Maintenance 6.4 Combustion Air Filter 6.4.1. Cleaning Intervals 6.4.2 Cleaning Cyclone Type Precleaner * Air cleaner servicing is needed when :The red signal is visible and coincides with level indicated on the service indicator. * After completing the service work, reset the signal by pressing the button on the indicator.
- Page 59 6. Service & Maintenance 6.4 Combustion Air Filter 6.4.3 Cleaning Oil Bath Air Cleaner * Stop the engine and wait for about 15 * Lift the filter element and remove it. mins. for oil to drain from filter housing. * Remove the clamp and remove oil bowl.
- Page 60 6. Service & Maintenance 6.4 Combustion Air Filter 6.4.3 Cleaning Oil Bath Air Cleaner * If necessary clean the element by * Remove dirty oil and sludge from oil compressed air, blowing air in bowl. Clean the bowl. opposite direction of air flow. * Clean filter element in diesel fuel and allow it to dip dry.
- Page 61 6. Service & Maintenance 6.4 Combustion Air Filter 6.4.4 Dry Type Air Cleaner Dust Ejector valve. Filter Element Cleaning Filter Element * Empty dust ejector valve by pressing * Loosen the mounting clamp of dust * Clean the element by dry compressed apart lips of discharge slot as cup / top cover assembly.
- Page 62 6. Service & Maintenance 6.4 Combustion Air Filter 6.4.4 Dry Type Air Cleaner Checking Element - Light Test Checking Sealing Ring Inner / Safety Element * Inner / safety element should be replaced after every two changes of outer element. * Repeat same procedure as outer element while...
- Page 63 6. Service & Maintenance 6.5. Belt Drives 6.5.1 Checking V-Belts 6.5.2 Checking Fan V- Belt * Inspect entireV-belt for damage - Push slowly on the black pad 4 at * To replace V-belts, press in tension right angles to belt 2 until the spring unit using a commercial tool and * Replace damaged V-belts.
- Page 64 6. Service & Maintenance 6.4 Combustion Air Filter 6.5.3 Tensioning Alternator 6.5.4 Changing Alternator 6.5.5 Checking Warning Belts Belts System. * Loosen bolts which fix alternator on * Remove fan V-belts as described in * If the V-belts fails, pressure pin of the mounting bracket.
- Page 65 6. Service & Maintenance 6.6 Adjustments 6.6.1 Checking Valve 6.6.2 Adjusting Valve Clearance Clearance VALVE PUSH * Check valve clearance when engine is Feeler gauge of 0.15mm should pass * Loosen lock nut of adjusting screw. at ambient temperature. with slight resistance. Failing this, * Use screw driver to loosen setscrew adjust valve clearance.
- Page 66 6. Service & Maintenance 6.7 Accessories 6.7.1.1 Checking Battery 6.7.1.2 Checking Electrolyte 6.7.1.3 Checking Electrolyte & Cable Connectors Level Density * Keep the battery clean and dry. * Remove cell caps 1. * Check the specific gravity of individual cell with hydrometer. If * Ensure the cable terminals tightly fitted * Top up only with distilled water &...
- Page 67 6. Service & Maintenance 6.7 Accessories Specific Gravity (kg/1) State of Charge Normal Tropics 1.28 1.23 Fully charged 1.20 1.12 Half charged, Recharge 1.12 1.08 Discharged, Charge up immediately. The gases emitted by the battery are explosive! Keep spark and naked flames away from the battery. Do not allow battery acid to come into contact with skin or clothing.
- Page 68 6. Service & Maintenance 6.7 Accessories 6.7.2 Lifting Tackle * Always use proper lifting tackle when transporting and lifting the engine. * After transportation / lifting engine, remove lifting tackle before starting the engine. Use only the correct lifting tackle...
- Page 69 6. Service & Maintenance 6.8 Engine Cleaning 6.8.1 Cleaning the engine With Compressed Air With Cold Cleaning Agent With High Pressure Steam Jet * Stop the engine. * Stop the engine. * Stop the engine. * Release the cowling clamps and * Release the cowling clamps and * Release the cowling clamps and remove cowling.
- Page 70 6. Service & Maintenance 6.9 Additional Maintenance 6.9.1 Checking the 6.9.2 Checking the function mountings of Flame Heater Push button for cold starting P .B. START Charge Lamp Check following components * When functioning correctly, inlet * Move speed adjustment lever and fasteners tightness.
- Page 71 6. Service & Maintenance 6.9 Additional Maintenance 6.9.2 Checking the function of Flame Heater * Use heat resistant sealant when fitting flame glow plug 2. * Refit flame glow plug 2 on fuel line. Keep away from rotating parts. Test stage 2: Test stage 3: * Loosen pipe connection 1.
- Page 72 7. Faults, Causes & Remedies 7.1 Diagnosis Chart...
- Page 74 Dust entry in air inlet system Dirty / clogged air cleaner High exhaust back pressure Derating due to altitude Derating due to temperature No fuel Poor quality of fuel Air in fuel line Choked fuel line External / Internal fuel leakage Choked fuel injector holes Damaged or dribbling nozzle Loose HP .
- Page 75 8. Engine Preservation 8.1 Preservation...
- Page 77 8. Engine Preservation 8.1 Preservation 8.1 Preservation 8.1.1 Preserving Engine If the engine is to remain idle for an * Clean the engine preferably using * External unpainted surfaces to be extended period of time, it is necessary thinner and compresed air. treated with rust preventive oil .
- Page 78 8. Engine Preservation 8.1 Preservation 8.1.2 Commissioning Preserved Engine * Remove plugs, tapes from inlet port, exhaust port and vent * Remove the rust preventive coating from all external surfaces. * Install V- belts.Retension belts after brief operation if required. * Set the engine in operation.
- Page 79 9. Technical Specifications 9.1 Engine Specifications 9.2 Power Output 9.3 Torque Wrench Setting...
- Page 81 9.Technical Specifications 9.1 Engine Specifications 9.1.1 CPCB / CMVR Compliant Sr No. Specification Unit HA294 HA394 HA494 HA694 *HA494TC *HA694TC Number of cylinders Cylinder arrangement Vertical in line Bore Stroke Total displacement 1885 2827 3770 5655 3770 5655 Compression ratio 18:1 18:1 18:1...
- Page 82 9. Technical Specifications 9.1 Engine Specifications 9.1.2 Non Emission Sr No. Specification Unit HA294 HA394 HA494 HA594 HA694 HA494TC HA694TC Number of cylinders Cylinder arrangement Vertical in line Bore Stroke Total displacement 1885 2827 3770 4712 5655 3770 5655 Compression ratio 17:1 17:1 17:1...
- Page 83 9.Technical Specifications 9.2 Power Output 9.2.1 CPCB Compliant ENGINE SPEED Continuous Power as per MODEL ISO 3046 RATING 1500 14.0 19.0 HA294 1500 15.0 20.5 HA394 1500 23.5 32.0 HA494 1500 31.6 43.0 HA694 1500 47.5 65.0 HA494TC 1500 41.0 56.0 HA694TC 1500...
- Page 84 9. Technical Specifications 9.2 Power Output 9.2.2 CMVR Compliant ENGINE SPED AS PER IS : 10002 / ISO 3046 / SEA J 1995 MODEL ISO STD POWER ISO NET BREAK FUEL STOP (CONTINUOUS) POWER (MAX. RATING) HEAVY DUTY LIGHT DUTY RATING TORQUE RATING...
- Page 85 9.Technical Specifications 9.2 Power Output 9.2.3 Non Emmission ENGINE SPED AS PER IS : 10002 / ISO 3046 / SEA J 1995 MODEL ISO STD POWER ISO NET BREAK FUEL STOP (CONTINUOUS) POWER (MAX. RATING) HEAVY DUTY LIGHT DUTY RATING TORQUE RATING TORQUE...
- Page 86 9. Technical Specifications 9.2 Power Output 9.2.3 Non Emmission (Continued) ENGINE SPED AS PER IS : 10002 / ISO 3046 / SEA J 1995 MODEL ISO STD POWER ISO NET BREAK FUEL STOP (CONTINUOUS) POWER (MAX. RATING) HEAVY DUTY LIGHT DUTY RATING TORQUE RATING...
- Page 87 9. Technical Specifications 9.3 Torque Wrench Setting DECRIPTION SIZE INITIAL TIGHTENING ANGLE IN DEGREE TOTAL REMARK TORQUE ANGLE Nm (kgm) STAGE STAGE STAGE STAGE Cylinder Head Bolt M12x1.75x211 (3.1) See foot Note ‘1’ Connecting Rod Bolt M12x1.5x55 (3.1) ---- ---- Bearing Cap Bolt M14x110 (3.1)
Need help?
Do you have a question about the HA Series and is the answer not in the manual?
Questions and answers
Needed half core turbo charger HA694T C
The KIRLOSKAR HA Series model HA694TC (half core turbo charger) is listed with the following power output specifications:
- At 1500 rpm (CPCB Compliant): 61.0 kW (83.0 bhp)
This indicates that the HA694TC model is available and its technical specifications are documented.
This answer is automatically generated
Ha 494 engine max temperature when operating
The maximum operating temperature is not explicitly stated. However, a cylinder head temperature switch is set at 175 ± 5°C, indicating that temperatures above this may trigger engine shutdown to prevent overheating.
This answer is automatically generated
I want kirloskar engine HA 494 torque values table
The torque value for the Kirloskar HA 494 engine is 192 Nm (19.6 Kgm).
This answer is automatically generated