GRE CARRA Instruction Manual
Hide thumbs
Also See for CARRA:
- Instruction manual (74 pages) ,
- Instruction manual (145 pages) ,
- Instruction manual (122 pages)
Table of Contents
Advertisement
Quick Links
www.grepool.com
CA
790205
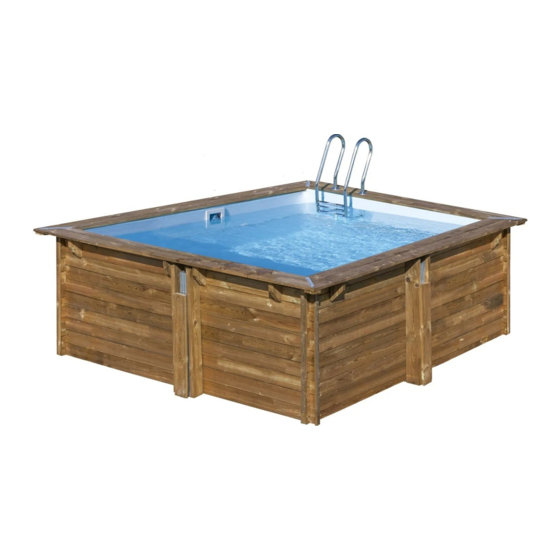
3,05 x3,05 H 1,19m
RRA
RRA
NON-CONTRACTUAL PHOTOS AND PICTURES. FOTOS E IMÁGENES NO CONTRACTUALES. PHOTOS ET IMAGES NON CONTRACTUELLES. PHOTOS UND BILDER SIND NICHT VERTRAGLICH.
LA FOTOGRAFIA O IL DISEGNO È SOLO A SCOPO ILLUSTRATIVO ED INFORMATIVO. FOTO'S EN AFBEELDINGEN HEBBEN GEEN CONTRACTUELE WAARDE. FOTOS E IMAGENS NAO CONTRATADA.
Instruction Manual
EN
Take the reference number of your pool into
account when you do the assembly
Manual de Instrucciones
ES
Tenga en cuenta la referencia y las medidas de
su piscina a la hora de realizar el montaje
Notice de Montage
FR
Considérez la référence et les mesures de
votre piscine avant de procéder au montage
Bedienungsanleitung
DE
Bitte beachten Sie die Referenz und die
Masse Ihres Schwimmbads, wenn Sie die
Montage ausführen
Manuale delle instruzioni
IT
Tener presente il riferimento della piscina al
momento del montaggio
Handleiding met instructies
NL
Op het moment van monteren dient u
rekening te houden met de referentie en de
afmetingen van uw zwembad
Manual de instruções
PT
Tenha em conta a referência da piscina momento
de realizar a montagem
Advertisement
Table of Contents

Related Manuals for GRE CARRA


Summary of Contents for GRE CARRA
- Page 1 Instruction Manual Manuale delle instruzioni Take the reference number of your pool into Tener presente il riferimento della piscina al account when you do the assembly momento del montaggio Manual de Instrucciones Handleiding met instructies Op het moment van monteren dient u Tenga en cuenta la referencia y las medidas de su piscina a la hora de realizar el montaje rekening te houden met de referentie en de...
- Page 2 The diagonal dimensions of the pool SHOULD BE verified. This is necessary to avoid problems later. Revise them several times until obtaining the dimensions indicated on the drawings. Es IMPRESCINDIBLE verificar las medidas de las diagonales de las piscinas. De esta manera se evitarán problemas posteriormente. Revisar esto varias veces hasta obtener las medidas indicadas en los planos.
- Page 3 In the case of breakages and/or deformations of the wood, make a complete inventory of the state of the pieces before requesting them from after-sales. This way, the pieces will all arrive in the same delivery For the assembly, the tongue of the strip should always be facing upwards, (for pools with tongue and groove system). (A) In the first line of strips, (at the base of the pool) it is normal that some strips have a groove at the bottom part and others do not have one, with a flat base (medium width strips).
- Page 4 Before screwing on the edges of the pool, the wood should be presented for its correct localization. If your pool has a double beach, both the internal one and the external one should be presented and you should start screwing the internal perimeter. (D) For your safety, walking, sitting, or standing on the beaches is fully prohibited.
- Page 5 To install the blocks (pieces of wood that support the beaches), pay attention to the pool drawing. It is important that these are screwed in the exact position indicated on the drawing. Do not over-tighten the screws to avoid splintering the wood. It is recommended to sand the areas with splinters to eliminate the risk of cutting.
-
Page 6: Antes Del Montaje
ANTES DEL MONTAJE PRECAUCIONES DE ALMACENAMIENTO elemento de protección normalizado, como: Mientras la piscina se encuentra desmontada, es sensible a - Barrera de protección las variaciones de temperatura y de humedad. Por lo tanto, es - Alarma de piscina necesario tomar ciertas precauciones de almacenamiento. - Cubierta de piscina Cuando reciba los paquetes, guarde las piezas de madera en - Refugio de piscina... - Page 7 GARANTIA Para qualquer reclamação ou serviço pós-venda, conserve o seu manual com o número de série, juntamente com o comprovativo de compra (ticket de caixa). Qualquer reclamação de garantia deverá ser objeto de uma por completo). declaração online, no site www.grepool.com/post-venta, É...
- Page 8 LEARN ABOUT THE WOOD WOOD: A LIVING MATERIAL CONOZCA LA MADERA Wood is a natural product, the fissures visible on the edges of the wood are completely normal and do not modify the MIEUX CONNÎATRE LE BOIS resistance characteristics of the same. Wood is always a malleable material (from 3% to 4% of dimensional variations) with humidity and temperature DAS HOLZ BESSER KENNENLERNEN...
- Page 9 Cracks/Grietas/Fente/Risse/ Resin/Resina/Résine/Harz/ Nerves and long knots Retention of sterilization products Differences in shades of colour Crepe/ Barsten/Fendas Resina/ Hars/Resinas Nervios y nudos alargados Retención de productos de esterilización Diferencias de tonalidad Nervures et noeuds longs Rétention de produits détuve Différences de teinte Geäder und lange knoten Rückstände von Sterilisationsprodukten Unterschiede im Farbton...
- Page 10 Ref. 790205 INSTALLATION DRAWING PLANO DE INSTALACIÓN PLAN D´IMPLANTATION Dimensions in mm Cotas en mm AUFSTELLPLAN Cotations en mm Höhenangaben in mm Livello in mm PIANO DI INSTALLAZIONE Afmetingen in mm Cotas em mm TIPS VOOR DE VEILIGHEID PLANO DE INSTALAÇÃO 3049 REF/RÉF DENOMINATION/DENOMINACIÓN...
- Page 11 Ref. 790205 Dimensions in mm Cotas en mm Cotations en mm Höhenangaben in mm Livello in mm Afmetingen in mm Cotas em mm 3000 2726 2818 You should respect all these dimensions Per sistemare alla perfezione il liner e to perfectly adjust the liner and the i bordi è...
- Page 12 PREVISIONS PREVISIONES 3,50 m min. A PRÉVOIR VORAUSPLANUNG FILTER GROUP GRUPO DE FILTRACIÓN GROUPE DE FILTRATION FILTRATIONSAGGREGAT The filter group and especially El grupo defiltración y en groupe filtration Das Filtrationsaggregat und electric pump should especial la bomba eléctrica notamment pompe besonders elektrische...
- Page 13 PRECAUZIONI PRECAUZIONI REKENING HOUDEN MET REKENING HOUDEN MET 3,50 m min. PREVISÕES PREVISÕES SISTEMA DI FILTRAZIONE FILTERGROEP GRUPO DE FILTRAÇÃO Il sistema di filtrazione e in filtergroep O grupo de filtração, e em particolare la pompa elettrica bijzonder de elektrische pomp especial a bomba elétrica della piscina devono essere van het zwembad moeten...
-
Page 14: Montage
INSTALLATION INSTALACIÓN First level Fig. 1 IMPLANTACIÓN Nivel de filtración Abb. 1 Niveau de la filtration Filtrationshöhe MONTAGE Above ground Semi in-ground In-ground Sobre el suelo Semienterrada Enterrada Hors-sol Semi-enterrée Enterrée An der oberfläche zur Hälfte eingelassen Ganz eingelassen This is a determining stage in the construction of your pool. Certain works performed in situ, like the preparation of the land, the concrete slab, the draining... - Page 15 Take the reference number of your pool into account when you do the assembly Tenga en cuenta la referencia de su piscina a la hora de realizar el montaje Considérez la référence et les mesures de votre piscine avant de procéder au montage Bitte beachten Sie die Referenz und die Masse Ihres Schwimmbads, wenn Sie die Montage ausführen Tener presente il codice di riferimento della piscina al momento del montaggio Op het moment van monteren dient u rekening et houden met de referentie en de afmetingen van uw...
- Page 16 GROUND LAYOUT - TRAZADO EN EL TERRENO - TRACÉ AU SOL 3726 mm Surrounding area Zona periférica Zone périphérique 50cm Concrete slab 50cm Losa de hormigón Dalle béton 2726 mm 90° CONCRETE SLAB: INTERIOR DIMENSIONS: Mark the shape of your pool on the ground using the previous dimensions. The marking can be done by using a cord. If your pool is fully or partially in-ground, proved the excavation for an area of 50 cm additional to the perimeter to facilitate your movements during assembly.
-
Page 17: Preparación Del Terreno
PREPARACIÓN DEL TERRENO Las recomendaciones sobre la construcción para las piscinas total o parcialmente enterradas son efectivas en el contexto de una instalación en un terreno que no sea húmedo. Es conveniente que se adapten las instrucciones básicas para evitar las restricciones relativas al tipo de terreno (arcilla por ejemplo) o a la presencia excesiva de agua en el suelo (fuentes, escorrentías...). - Page 18 BOARDS TABLAS Identification of the boards / Identificación de las tablas / Repérage des madriers / Kennzeichnung der holzbohlen / Identificazione della tavole / MADRIERS Identificatie van de planken / Identificação das tábuas HOLZBRETTER TAVOLE PLANKEN TÁBUAS IDENTIFICATION/ IDENTIFICACIÓN/ CTD/QTÉ/ REPÉRE/KENNZEICH- DENOMINATION/DENOMINACIÓN/DÉSIGNATION/BEZEICHNUNG/ DENOMINAZIONE/ REF/RÉF/...
- Page 19 PROTECTIVE GROUND BLANKET MANTA PROTECTORA DE FONDO FEUTRE DE FOND BODENSCHUTZVLIES COPERTURA DI PROTEZIONE DEL FONDO BESCHERMDEKEN BODEM MANTA PROTETORA DE FUNDO After having done the installation and preparation of the ground you can start with assembling the pool. Start by laying the protective blanket, which should be cut from the roll included, on the floor. •...
- Page 20 ABOVE GROUND INSTALLATION•COLOCACIÓN EN EL SUELO ASSEMBLY OF THE STRUCTURE •ENCOMBREMENT AU SOL•POSITIONIERUNG AUF DEM MONTAJE DE LA ESTRUCTURA BODEN•POSIZIONAMENTO NEL TERRENO•CONSTRUCTIE OP GRON•COLOÇÃO NO SOLO ASSEMBLAGE DE LA STRUCTURE ZUSAMMENBAU DES TRAGWERKS 3000 MONTAGGIO DELLA STRUTTURA MONTAGE VAN DE CONSTRUCTIE MONTAGEM DA ESTRUTURA Prepare the boards «as trial»...
- Page 21 After having installed the first layer, you should check the inside dimensions of the pool. For a perfect assembly, the diagonals should be equal, and in conformity with the assembly drawing at the end of this manual. Take special care when installing this first layer of boards. The precision of this assembly decides the final quality of your pool.
- Page 22 IMPORTANT: It is very important that the boards are correctly installed, above all the bottom ones, (where the water pressure is greater). There is a possibility of some boards coming loose. This is completely normal because wood is a living material. Even loose, the board may be installed. Follow these steps: • Position and fit one of the two sides of the boards.
- Page 23 DISPOSISIZIONE DEI SOSTEGNI: Posizionare i sostegni al centro della fiancata della piscina, appoggiandoli contro le tavole (figura 4). •Perforare bene verticalmente la copertura con l’aiuto di un trapano dotato di una punta per calcestruzzo ø10mm utilizzando il sostengno come campione. La profondità della perforazione deve essere dia almeno 100mm per garantire un buen fissaggio.
- Page 24 3rd LAYER OF BOARDS: Install the third layer of boards as shown in figure 5. The position of the refilling fitting with the key and the skimmer should be defined at the start of the assembly (read the specific paragraphs). 4th AND FOLLOWING LAYERS OF BOARDS: Place the boards and the following layers repeating the alternations of the second and of the third layer.
- Page 25 Skimmer: •Place the specific boards of the skimmer facing the prevailing winds. Boards (C14) and (D14) will always be placed over a panel starting by board (B13) (figure 6).•The skimmer will not be stable until the pool is filled. The skimmer (with its flap) is fitted as the same time as the finishing board. Skimmer: •Coloque las tablas específicas para el skimmer de cara a los vientos dominantes.
- Page 26 WOODEN BLOCKS, REINFORCEMENTS AND TRIMMINGS TACOS, REFUERZOS Y EMBELLECEDORES CONSOLES, RENFORTS ET CACHES KONSOLEN, VERSTÄRKUNGEN UND ZIERLEISTEN TASSELLI, RINFORTZI E COPERTURE CONSOLE, VERSTEVIGINGEN EN SIERLIJSTEN BLOCOS DE MADEIRA, REFORÇOS E EMBELEZADORES NO OK CAREFULLY READ THE COMPLETE SECTION BEFORE SCREWING ANY PART TO YOUR POOL Assemble the wooden stepladder and use it as a template to define the separation of the wooden blocks that support it.
- Page 27 Install the reinforcements with 1 screw board Check the verticality of the reinforcements Instale el refuerzo mediante 1 tornillo por tabla Compruebe la verticalidad de los refuerzos Assemblez le renfort en mettant 1 vis par madrier Contrôlez l’aplomb des renforts Bringen Sie die Verstärkung mittels einer Schraube pro Brett an Prüfen Sie die vertikale Ausrichtung der Verstärkungen Installare il rinforzo con 1 vita per tavola...
- Page 28 METAL FRAME TRIMS ( 4x60) The trims are complementary reinforcements that allow you to hide the visible sections of the metal parts. They are attached to the pool like the rest of the rein- forcements and have a cross member (figure 9) that hides the outside face of the frame. Two reinforcements must be installed to cover the metallic wedge, as shown in the diagram.
- Page 29 WOODEN STEPLADDER ESCALERA DE MADERA ECHELLE BOIS HOLZTREPPE SCALA DI LEGNO HOUTEN TRAP ESCADA DE MADEIRA Check the drawings ( 4x40) (See page 41-42). The wooden stepladder is included for access to the pool. Do not use for anything else. Set up the wooden ladder and use it as a frame of reference to determine the spacing of fixation points.
- Page 30 Consultare i disegni ( 4x40) (Vedere a pagina 41-42). La scala di legno per accedere alla piscina è inclusa. Non utilizzarla per scopi diversi. Montare la scaletta in legno e utilizzarla come strumento per determinare la separazione di fissaggio. (Vedere a pagina 70) Fissare i supporti sui montanti della scaletta con viti 4x40.
- Page 31 Dans le cas ou votre bassin est partiellement enterré, une recoupe de l’échelle est nécessaire pour adapter celle-ci à votre bassin. Pour des raisons de sécurité, si l’espace entre le sol et le premier échelon est compris entre 89 et 230 mm (cote A), fermez cet espace en fixant la marche de l’échelle non utilisée, de telle sorte que la cote B soit inférieure à...
- Page 32 Screw 5x70 m Admitted maximum weight = 150 kgs. Its is COMPULSORY •Tornillo 5x70 mm to remove the stepladder after using the pool. •Vis 5x70 mm Peso máximo admitido = 150 kg. Retire •Schraube 5x70 mm OBLIGATORIAMENTE la escalera después de cada uso •Vite 5x70 mm de la piscina.
- Page 33 PROTECTIVE WALL BLANKET MANTA PROTECTORA DE PARED FEUTRE DE PAROI SCHUTZDECKE FÜE DIE WAND COPERTURA DI PROTEZIONE DELLA PARTE BESCHERMDEKEN MUUR MANTA PROTETORA DE PAREDE Fig. 10/Abb. 10/Afb. 10 Fig. 11/Abb. 11/Afb. 11 Fig. 12/Abb. 12/Afb. 12 There are two possibilities to install the wall protecting blanket TWO FACED ADHESIVE TAPE (NOT INCLUDED) •...
- Page 34 Fig. 10/Abb. 10/Afb. 10 Fig. 11/Abb. 11/Afb. 11 Fig. 12/Abb. 12/Afb. 12 Zwei Möglichkeiten zum Anbringen der Wandschutzdecke. DOPPELSEITIGES KLEBEBAND (NICHT IM LIEFERUMFANG ENTHALTEN) • Kleben Sie das doppelseitige Klebeband, Paneel nach Paneel, auf, indem Sie es am oberen Teil der oberen Bretter ausrichten (Abb. 10). Wenn das Holz ein wenig feucht oder staubig ist, können Sie es mit Sandpapier glätten, um das Anhaften zu erleichtern.
- Page 35 FIXING OF THE SKIMMER JOINT FIJACIÓN DE LA JUNTA DEL SKIMMER FIXATION DU JOINT DE SKIMMER BEFESTIGUNG DER DICHTUNGDES SKIMMER FISSAGGIO DEL GIUNTO DELLO SKIMMER VASTZETTEN VAN DE SKIMMERVERBINDING FIXAÇÃO DA JUNTA DO SKIMMER Fixing of the skimmer joint Fijación de la primera junta del skimmer Fixation du 1er joint de skimmer Befestigung der ersten Dichtung des Skimmers Fissaggio del primo giunto dello skimmer...
-
Page 36: Installation
LOCATION OF THE REFILLING FITTING WITH KEY Wooden structure • Estructura de madera • Structure bois • SITUACIÓN DE LA BOQUILLA DE SALIDA Tragewerk aus Holz • Struttura in legno • Houten constructie • Estrutura de madeira EMPLACEMENT BUSE DE REFOULEMENT Blanket •... - Page 37 INSTALLATION OF THE LINER HOOKING PROFILE COLOCACIÓN DE LOS PERFILES DE ENGANCHE DEL LINER POSITIONNEMENT DES BAGUETTES D’ACCROCHE DE LINER POSITIONIERUNG DER EINHAKPROFILE DES LINERS POSIZIONAMENTO DEI PROFILI DI AGGANCIO DEL LINER PLAATSING VAN DE KLEMPROFIELEN VOOR INHANGEN VAN DE LINER COLOÇÃO DOS PERFIS DE ENGATE DO LINER ·...
- Page 38 · The piece should be fixed at both ends. · La pieza debe quedar fijada por ambos extremos · La pièce doit être correctement fixée par les deux extrémités. · Das Teil muss später von beiden Seiten fixiert sein. ·...
- Page 39 POSITIONIERUNG DER EINHAKPROFILE DES LINERS ( 4X40): Halten Sie die Leiste des Liners. Durchbohren Sie die Leiste mithilfe eines kleinen Bohrers mit Ø 4 mm, indem Sie 50 mm vom Rand entfernt beginnen. Schrauben Sie die Leiste auf der Höhe der Kante des oberen Bretts mittels der Schrauben (4 x 40) fest. Verteilen Sie die Schrauben gleichmäßig auf der Leiste.
- Page 40 PREVIOUS CHECK BEFORE INSTALLING THE LINER CONTROL PREVIO A LA COLOCACIÓN DEL LINER CONTRÔLES AVANT LA POSE DU LINER KONTROLLE VOR DER POSITIONIERUNG DES LINERS CONTROLLO PRECEDENTE AL POSIZIONAMENTO DEL LINER CONTROLEER VOORAFGAAND AAN DE PLAATSING VAN DE LINER CONTROLO PRÉVIO À COLOCAÇÃO DO LINER •...
- Page 41 INSTALLATION OF THE LINER COLOCACIÓN DEL LINER MISE EN PLACE DU LINER POSITIONIERUNG DES LINERS POSIZIONAMENTO DEL LINER PLAATSING VAN DE LINER COLOCAÇÃO DO LINER The liner should have been at least 24 hours at a room temperature of at least 20 ºC before being installed. The dimension of the liner are a few centimetres shorter than the inside dimensions of the pool, so the liner is tensely installed.
- Page 42 To move the already installed liner, slide it along the profile. If this is difficult the liner can be removed by lifting it not to damage it. Make sure that the liner is well positioned both on the floor as on the walls, uniformly adjust the tension of the same (with your foot, push the liner by its angles towards the corners of the walls) (figure 17). Fit the pool with about two centimetres of water (figure 18).
- Page 43 LAND-FILLING TERRAPLENADO REMBLAIEMENT ANSCHÜTTUNG In fully or partially in-ground pools, a gravel landfill is necessary to favour perfect draining. The landfill of a TERRAPIENO pool can seem a mere formality, because a first sight there are no special technical difficulties. Nevertheless, it is a more delicate operation than what it seems, for which certain precautions are necessary.
- Page 44 Draining gravel ø 10-30 • Grava drenante ø 10-30 Graviers drainants ø 10-30 • Kies zur Entwässerung ø 10-30 Ghiaia drenante ø 10-30 • Drainagesteenslag ø 10-30 • Grava drenante ø 10-30 Natural ground • Terreno natual Peripheral drainage • Drenaje periférico Terrain naturel •...
- Page 45 POSICIONAMIENTO DE LAS PIEZAS DE SELLADO BOQUILLA DE IMPULSIÓN Empezar a llenar de agua la piscina, deteniendo el llenado a unos 4 cms del borde inferior del orificio de la válvula. Marcar el orificio con un rotulador (4) y hacer un corte en cruz en el centro del orificio (B) con ayuda de un cúter (CUCHILLA) sin rebasar el agujero del troquel.
- Page 46 SKIMMER • Antes de proceder, cerciórese de que la trampilla del skimmer está bien posicionada. • Marque con un rotulador la posición de los tornillos de fijación sobre el liner. • (B) Coloque la segunda junta plana cuadrada (5.1) y después la brida (6) contra el liner, alineando los orificios con las marcas de ubicación de los tornillos.
- Page 47 FILTER FILTRACIÓN FILTRATION FILTRATION FILTRAZIONE FILTERING FILTRAÇÃO ASSEMBLY SUGGESTIONS: • The filter should be located at least 3.50 m from the pool. The following diagrams explain the movement direction of the water. Check the manual that comes with the filter group for the assembly instruc- tions.
- Page 48 All the threaded connections should be assembled with the watertight Teflon tape included , except the connection with O rings. The Teflon should be wound round the thread in a counter clockwise direction. LAND-FILLING: Finish filling the pool The water level should be situated between the upper third part and the second half of the skimmer mouth. Todas las conexiones roscadas deben montarse con la cinta estanca de Teflón incluida , excepto las conexiones con junta tórica.
- Page 49 SAND FILTER FILTRO DE ARENA This is the oldest of filtering systems. The filtered water passes through the sand (calibrated FILTRE À SABLE silicon) that retains all impurities. This type of filter is equipped with a multi-directional flap that allows easy manipulations and cleaning. SANDFILTER DIFFERENT POSITIONS OF THE MULTI-DIRECTIONAL FLAP (4 OR 6)*: When you perform changes the position of the multi-directional flap that pump should always be stopped, without...
- Page 50 2. WASHING POSITION (OR BACKWASH): Sand washing position. Allow the water to circulate in reverse direction in the filter. The water enters through the lower part of the filter elevates the filtering mass and therefore collects all its impurities and because they are lighter than sand, they area evacuated through the upper part of the filter towards the drain.
- Page 51 4. EMPTYING POSITION / DRAIN (OR WASTE): Position to evacuate the water of for emptying the pool. In this case, the water does not pass through the filter, it goes directly to the drain. 4. POSICIÓN VACIADO / DESAGÜE (O WASTE): Posición para evacuar el agua o para vaciar el vaso. En este caso, el agua no pasa por el filtro, sale directamente por el desagüe.
- Page 52 6. RECIRCULATION POSITION / CIRCULATION**: Position used so the water circulates through the hydraulic network without passing through the filter. This possibility is used to move the water if you want to add a product to the pool or if you should perform any operation in the filter, because in this case the filter is isolated and the water coming from the pump is directly expelled.
- Page 53 EDGES Edge•Playa•Margelle •Rand•Bordo PLAYAS •Ränd•Bordo MARGELLES RÄNDER Breakwater•Rompeolas•Brise vague •Wellenbrecher• Frangiflutti•Golfbreker •Quebra-mar BORDI Reinforcement•Refuerzo•Renfort •Verstärkungen•Rinforzi RANDEN Board•Tabla•Madrier•Brett •Verstevigingen•Reforços •Tavola•Plank•Tábua BORDOS EDGES: (It is mandatory to fill the pool with water before placing the edges) ˚ 41-42 . Check the drawings ( 4x60) (See page The ends of the ledge are cut at 90 PREPARATION •Before affixing the ledge, position all of the sheets as a test (without screwing them in).
- Page 54 BORDI: (È imprescindibile riempire la piscina con acqua prima di montare i bordi) 41-42 ˚ Le estremità del bordo vengono tagliate a 90 . Consultare i disegni ( 4x60) (Vedere a pagina PREPARAZIONE • Prima di fissare il bordo posizionare tutte le lamine di prova (senza avvitarle). •...
- Page 56 FIXING OF THE STAINLESS STEEL LADDER FIJACIÓN DE LA ESCALERA INOXIDABLE FIXATION DE L’ECHELLE INOX BEFESTIGUNG TREPPE AUS ROSTFREIEM MATERIAL FISSAGGIO DELLA SCALA DI ACCIAIO INOSSIDABILE BEVESTIGING VAN DE RVS LADDER FIXAÇÃO DA ESCADA INOXIDÁVEL Fig. 20 Fig. 21 • Assemble the upper handrail (1) and lower (7) introducing one into the other (figure 20). Fix the steps (6) into the handrails using the bolts (8), the washers (4) and the nuts (9).
- Page 57 Fig/Abb/Afb 20 Fig/Abb/Afb 21 • Assembler la rampe supérieure (1) et inférieure (7) en les introduisant l’une dans l’autre (figure 20). Fixer les marches (6) aux rampes à l’aide des boulons (8) , des rondelles (4) et des écrous (9). •...
- Page 58 IDENTIFICATION/IDEN- TIFICACIÓN/REPÉRE/ DENOMINATION/DENOMINACIÓN/DÉSIGNATION/BEZEICHNUNG/ CTD/QTÉ/ANZ/ KENNZEICHNUNG/IDEN- DENOMINAZIONE/BENAMING/DENOMINAÇÃO/ AANT/TD TIFICAZIONE/IDENTIFICA- TIE/IDENTIFICAÇÃO Upper handrail•Pasamanos superior•Rampe supérieure•O- beres Geländer•Corrimano superiore•Bovenste trapleu- ning•Corrimão superior Trimming•Embellecedor•Enjoliveur•Zierleiste•Copertura•- Sierlijsten•Embelezador Screw Ø 8x30 mm•Tornillo Ø 8x30 mm•Vis Ø 8x30 mm•Schraube Ø 8 x 30 mm•Vite Ø 8x30 mm•Schroef Ø 8x30 mm•Parafuso Ø...
-
Page 59: Puesta En Servicio
PUESTA EN SERVICIO Durante el primer uso es obligatorio realizar un lavado del filtro (consulte el mantenimiento del sistema de filtración). La filtración es un tratamiento mecánico que permite limpiar el agua de la piscina mediante la eliminación de las impurezas y de las partículas contaminantes. El conjunto del circuito hidráulico y del grupo de depuración del agua es un elemento esencial para el buen funcionamiento del sistema de filtración. -
Page 60: Consejos De Seguridad
CONSEJOS DE SEGURIDAD Antes de instalar y de utilizar la piscina, lea atentamente la información recogida en el presente manual, asimílela y cúmplala. Los anuncios, las instrucciones y las consignas de seguridad hacen referencia a algunos de los riesgos más habituales relativos al ocio en el agua, pero no cubren la totalidad de riesgos y peligros que se pueden presentar. -
Page 61: Mantenimiento Habitual
MANTENIMIENTO HABITUAL RESPETA EL MEDIO AMBIENTE «NO DESMONTE LA PISCINA SI NO ES ESTRICTAMENTE NECESARIO. EN CASO DE HACERLO, LE ROGAMOS REUTILICE EL AGUA. EL AGUA ES UN BIEN ESCASO». - Durante la temporada de uso de un kit de piscina ponga a funcionar el sistema de filtración una vez al día para asegurar un renovamiento completo del volumen de agua y siempre cuando no se esté... - Page 62 Nunca bañarse hasta que se estabilice el nivel de cloro. Utilizar siempre un Dosificador flotante para la disolución del producto químico (pastillas). La dosificación de los productos químicos se hace en función de: El volumen de agua de su piscina, la frecuencia del baño, las condiciones climáticas, temperatura del agua y ubicación.
-
Page 63: Servicios Técnicos
SERVICIOS TÉCNICOS Los servicios técnicos se encargan de la instalación de piscinas, la venta de repuestos y accesorios y el mantenimiento de las depuradoras. COBERTURA NOMBRE TELÉFONO COBERTURA NOMBRE TELÉFONO LUGO LUCALOR 982/21-90-01 ALAVA URTEAGA QUIMICA, S.L. 945/26-25-17 LUGO HYDRO-GLOBAL 982/41-14-13 ALBACETE HIDRO BELL...
Need help?
Do you have a question about the CARRA and is the answer not in the manual?
Questions and answers