Table of Contents
Advertisement
Quick Links
Advertisement
Table of Contents

Related Manuals for Profoon PDX-2608

Summary of Contents for Profoon PDX-2608
- Page 1 USER’S MANUAL PDX-2608 PDX-2608 DUO...
-
Page 2: Overviews
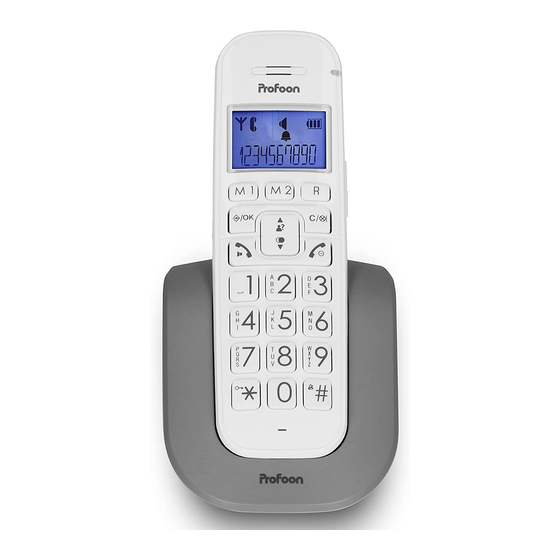
OVERVIEWS indicator; flashes when 1.1 HANDSET: receiving a call, remains lit when the BOOST function is handset speaker enabled button, see the next page display, see the next paragraph buttons, direct memory buttons see the next page telephone function buttons, see the next page keypad, see the next page handset... - Page 3 (PDX-2608 DUO only) during a call, press to switch off the microphone press to answer an incoming call or to start a phone conversation...
-
Page 4: Display
1.2 DISPLAY: handset name (HS) and internal number (1) flashes when the connection between the handset and base is lost remains lit when the handset is within range of the base flashes when receiving an external call remains lit during a call flashes when receiving an internal call remains lit during an intercom call illuminates when the speaker function is enabled... -
Page 5: Base
illuminates when you’ve receiver a voicemail message (only FSK systems) illuminates when the alarm (wake-up) function is enabled illuminates when the ring volume is set to 0 (switched off) 1.3 BASE page button: to page all handsets (hand- set search button), also used for register- ing new handsets. -
Page 6: Installation
INSTALLATION 2.1 BASE STATION: Telephone connection: Plug the small connector at the phone cable into the back of the base (press the connector until you hear a click). Plug the phone station connector into the phone socket. Power supply: Connect the supplied power adaptor to the input at the rear of the base and insert the adaptor into a 230V wall socket. -
Page 7: Handset
ABLE BATTERIES MAY CAUSE DANGEROUS SITUATIONS OR EXPLOSION HAZARD. 2.3 EXTRA HANDSET AND CHARGER: (PDX-2608 DUO) 2 batteries and a charger with adapter will be included for every handset. Plug the adapter of these chargers in a 230 Volt mains socket, insert the batteries into the handset(s) and place the handset(s) on the charger(s) for 15 hours to charge the batteries. -
Page 8: Calling
CALLING 3.1 RECEIVING CALLS: when you receive a call, the display lighting of the handset will switch on and the indicator at the top of the handset starts flashing press the Call button to answer this call • see paragraph 10.2, item [ Auto antw ] answering calls by only from the base station 3.2 CALLING WITH THE PHONE OR USING THE HANDS-FREE FUNCTION: You can make calls holding the handset against your ear or you can use the speaker function allowing other household members to listen in or to... -
Page 9: Dialling Numbers
3.4 DIALLING NUMBERS: Direct dialing: Press the phone-on key and wait for the dial tone. Enter the phone number through the keyboard; this number will be dialed directly. pre-dialling: Enter the phone number through the keyboard. • press and hold the 0 button for at least once second to insert a dialling pause (the display will show -P-) •... - Page 10 dialling from the Caller-ID memory: press the button and use the buttons to select the desired call press the Call button to dial the selected number dialling from the last dialled number memory: press the button and use the buttons to select the desired call press the Call button to dial the selected number dialling speed-dial contacts...
-
Page 11: To Mute The Microphone
3.5 TO MUTE THE MICROPHONE: During a call, you can switch off the microphone allowing you to consult with other household members without having your call partner listening. button to switch off the micro- during a call, press the phone; again to switch the microphone back on press the 3.6 RECEPTION VOLUME:... -
Page 12: Call Duration
3.7 CALL DURATION: during a call, the call duration will be shown in the dis- play; the call duration will disappear from the display as soon as you disconnect 3.8 R/FLASH FUNCTION: R/FLASH means you briefly interrupt the telephone connection. This func- tion allows you to forward calls with certain home or office switchboards or activate telephone services such as ‘Call waiting’. -
Page 13: To Switch Off The Handset
3.10 TO SWITCH OFF THE HANDSET: You can fully switch off the handset to save battery power or when you don’t want to be disturbed: press and hold the End button for 5 seconds; the hand- 5 sec. set will now switch itself off completely press and hold again for 5 seconds to switch the hand- 5 sec. -
Page 14: Re-Dialling
RE-DIALLING 4.1 INTRODUCTION: The handset memorizes the 5 last dialled numbers. You can redial these numbers, save them in the phonebook memories or delete them. 4.2 TO REDIAL: press the button and use the buttons to select the desired last dialled number press the Call button to dial the selected number 4.3 TO SAVE OR DELETE: press the... - Page 15 delete: use this option to only delete the selected call from the memory delete all: use this option to delete the entire last dialled number memory *: when saving a number, you may set a ringtone that’ll sound when that subscriber calls you;...
-
Page 16: Caller Identification
CALLER IDENTIFICATION 5.1 INTRODUCTION: If you have the service Caller Identification at your disposal, the number of the calling party is displayed on the display of your handset(s). You have programmed this number including name and the phone book memory of the handset, the name is also displayed on the display and you can set an individual ringtone for each memory. -
Page 17: Details, Save Or Delete
5.4 DETAILS, SAVE OR DELETE: press the button and use the buttons to select the desired number press the button buttons to choose one of the following use the options: details: choose this option to show the date of the call, now press the # button to display the time of this call (*) save: select this option to add the number to the phonebook... -
Page 18: Additional Information
5.5 ADDITIONAL INFORMATION: The PDX-2608 / PDX-2608 DUO is suitable for both the DTMF sys- • tem, offered by the Dutch PTT and for the FSK system, offered by the Belgian PTT and by cable companies in the Netherlands and Belgium for as far as this service is offered. -
Page 19: Voicemail Indication
VOICEMAIL INDICATION 6.1 INTRODUCTION: Voicemail is a service offered by the telephone service provider, allowing callers to leave a message. You can listen to this message at a later time. (*) 6.2 NEW VOICEMAIL INDICATION: If your service provider supports voicemail, based on the FSK system, you may receive a notification when a new message has been left for you. -
Page 20: Phone Book Memory
PHONE BOOK MEMORY 7.1 INTRODUCTION: Every PDX-2608 / PDX-2608 DUO handset has a phone book memory with a capacity of 20 phone numbers of at most 20 digits. You can pro- gram a name of at most 12 characters with each number. The phone book memory in the handset is connected to the function Caller Identification. -
Page 21: To Add, Edit Or Delete Contacts
7.3 TO ADD, EDIT OR DELETE CONTACTS: to add: press 4x the button use the keypad to enter the name - use the C button to correct any incorrect input - see the next page for all available characters press the button use the keypad to enter the phone number - use the C button to correct any incorrect input... - Page 22 to edit: press 2x the button buttons to select the contact you want use the to edit press the button use the buttons to select the option [ EDIT ] press the button use the C button to delete the old name and use the keypad to enter the new name press the button...
- Page 23 press the button to save this memory press the End button to stop editing and return the handset to standby mode to delete: press 2x the button buttons to select the contact you want to use the delete press the button buttons to select the option [ DELETE ] use the...
-
Page 24: To View Contacts
7.4 TO VIEW CONTACTS: You can check the number and the set ringtone for each contact as fol- lows: press 2x the button use the buttons to select the desired contact press the button use the buttons to select the option [ VIEW ] press the button... -
Page 25: Memory Status
7.5 MEMORY STATUS: You can check the memory status of your handset as follows: press 3x the button use the buttons to select the option [ PB STATUS ] press the button the display will now show how many of the available 50 memories you’re currently using (the example below shows that 23 of the 50 are being used) press 3x the End button to stop viewing and return the... -
Page 26: Link Memories To Dialbuttons
7.7 LINK MEMORIES TO DIALBUTTONS: A contact from the memory can be assigned to each of the 2-9 buttons. Whit the handset in standby mode, you can then press and hold that but- ton for at least 2 seconds to automatically dial the assigned number. to assign a contact: press 3x the button... - Page 27 press the button press 3x the End button to stop assigning and return the handset to standby mode to assign, edit or delete: press 3x the button use the buttons to select the option [ DIRECT MEM. ] press the button buttons to select the desired button (2~9) use the...
- Page 28 7.8 M1 & M2: The direct memory keys M1 and M2 are suitable for numbers you want to dial frequently. These are for numbers only, no name. program the number: press the button buttons to select the option [ DIRECT use the MEM.
-
Page 29: Intercom, Transfer And Conference
INTERCOM, TRANSFER AND CONFERENCE 8.1 INTRODUCTION: You can register up to 5 handsets on the PDX-2608 / PDX-2608 DUO base station. When registering multiple handsets, you can make internal calls free of charge and you may transfer calls. If your telephone was supplied with multiple handsets, you can immediately start using these functions. -
Page 30: Transfer / Conference Call
press the End button to disconnect the intercom call * When receiving an external call during an intercom call, the handset will emit notification tones. Disconnect your intercom call, wait until the usual ringtone sounds and answer the outside call (when using more than 2 handsets, you can also accept the outside line using any free handset). - Page 31 transfer conference call press the End button to press and hold the * (as- terisk) button for at least transfer the call to the other 2 sec handset 2 seconds to start the 3-way call press the End button to disconnect the call.
-
Page 32: Clock & Alarm (Wake-Up) Function
CLOCK & ALARM (WAKE-UP) FUNCTION 9.1 INTRODUCTION: In standby mode, the display of the handset(s) shows the time. Moreover, you can program an alarm or wake-up time (for each handset). 9.2 TIME AND DATE SETUP: press the button buttons to select the option [ DATE & use the TIME ] press the... -
Page 33: To Enable/Disable The Alarm And To Set The Alarm Time
[ SET TIME ] here you can set the time [ SET DATE ] here you can set the date 9.3 TO ENABLE/DISABLE THE ALARM AND TO SET THE ALARM TIME: press the button buttons to select the option [ ALARM ] use the press the button... -
Page 34: Alarm Operation
the display will show the word [ SNOOZE ] press the button now use the buttons to enable or disable the snooze function (see below an explanation of the snooze function) press the button to save your settings and press the End button to return the handset to standby mode 9.4 ALARM OPERATION: symbol appears in the display when the wake-... -
Page 35: Handset Preferences
10 HANDSET PREFERENCES 10.1 INTRODUCTION: You can use the menu [ HS SETTINGS ] to adjust various handset settings to your personal preferences. 10.2 MENU FOR HANDSET PREFERENCES: press the button use the buttons to select the option [ HS SETTINGS ] press the button now use the... - Page 36 [ EQUALIZER ] You can use the equalizer to (extra) amplify the treble or bass levels. This tone control is disabled when set to ‘natural’ [ SELECT BASE ] When the handset is registered to multiple base stations, than use this menu option to link the handset to the prefered base station.
-
Page 37: Base Preferences
11 BASE PREFERENCES 11.1 INTRODUCTION: Via the menu [ BS SETTINGS ] you can, amongst others, deregister other handsets, adjust the FLASH interruption time and change your PIN code. 11.2 MENU FOR BASIS PREFERENCES: press the button use the buttons to select the option [ BS SETTINGS ] press the button... - Page 38 Ask your telephone service provider or the supplier of your home or office switchboard for the most suitable interruption time. The default flash time of 100 mS is used in the Benelux, which is already set upon leaving the factory. [ CHANGE PIN ] A PIN code is required for various settings and for registering and deregis- tering handsets.
-
Page 39: Resetting Preferences
12 RESETTING PREFERENCES 12.1 INTRODUCTION: Via the menu [ DEAFAULT ], you can reset your settings to the standard factory settings. 12.2 MENU FOR RESETTING PREFERENCES: press the button buttons to select the option [ DEFAULT ] use the press the button use the keypad to enter the PIN code press 2x the... -
Page 40: Introduction
13 ADDITIONAL HANDSETS 13.1 INTRODUCTION: You can connect 5 handsets with each base station from the PDX-2608 / PDX-2608 DUO series. This way you can make internal calls free of charge and you can also transfer calls. 13.2 TO REGISTER HANDSETS: Attention, the handset(s) supplied with the basis is (are) already registered to that base. -
Page 41: Tips For Multiple Handsets
13.3 TIPS FOR MULTIPLE HANDSETS: • Instructions for dialling and incoming calls are identical for all handsets of the PDX-2608 / PDX-2608 DUO series. • Intercom calls are free of charge. • When receiving an external call during an intercom call, the handsets will emit a notification tone. -
Page 42: Tips And Warnings
14 TIPS AND WARNINGS 14.1 GENERAL: Read the user manual carefully and follow all instructions. • Never place or use the phone in a wet or moist room or environment. • Take care of proper heat dissipation; never cover the phone and/or the •... -
Page 43: Range
Do not place the phone in the direct vicinity of other phones or other • electronic (medical) devices, TL tubes and other gas discharge lamps; the emitted radio waves of these (and other) wireless phone(s) may disrupt the functioning of the equipment, or the emitted signals of the equipment disrupt the functioning of the phone. -
Page 44: Medical Equipment
14.7 MEDICAL EQUIPMENT: It is possible that enabled DECT phones interfere with sensitive • medical equipment. When the phone is kept in the vicinity of the medical device, interference can occur. Do not place a DECT phone on or near a medical device, not even when it is in standby mode. 14.8 POWER FAILURE: This phone obtains its power supply from the mains power. -
Page 45: Possible Problems And Solutions
15 POSSIBLE PROBLEMS AND SOLUTIONS 15.1 POSSIBLE PROBLEMS AND SOLUTIONS No dialling tone. • The outside line is being used by another unit. Wait until that call − has ended and try again. Check the connection between the base and you telephone −... -
Page 46: Problems During Calling
15.3 PROBLEMS DURING CALLING: Beep tones during an intercom call: • You are called from outside during an intercom call; end this call, − wait until the phone rings normally and answer the call. Beep tones during a call: • The batteries are nearly empty;... -
Page 47: Declaration Of Conformity
Remove the batteries from the handset, and unplug the power • supply adapter and the phone connector from their sockets; connect everything again after several minutes. You can also contact the Profoon service center or the supplier of this • phone. 16 DECLARATION OF CONFORMITY This device complies with the essential requirements and provisions as described in the European Directive 2014/53/EU. -
Page 48: Table Of Contents
17 SPECIFICATIONS Protocol: DECT / GAP, 5 handsets Phone book: 20 names and number Call history: DTMF & FSK, 10 memories Last number memory: 5 numbers Dialling: TONE (DTMF) FLASH : 100, 270 & 600 ms, adjustable. Boost amplification: +8dB Power supply charger: 2x 1.2V NiMH batteries, 500mAh, format AAA Power supply base station: 6 VDC, 300 mA,... - Page 49 CALLING RECEIVING CALLS ..............8 CALLING WITH THE PHONE OR USING THE HANDS-FREE FUNCTION ........8 ENDING CALLS ................8 DIALLING NUMBERS ..............9 TO MUTE THE MICROPHONE ..........11 RECEPTION VOLUME ............... 11 CALL DURATION ................ 12 R/FLASH FUNCTION ..............12 HANDSET SEARCH FUNCTION ..........
- Page 50 TO VIEW CONTACTS ..............24 MEMORY STATUS ..............25 AVAILABLE CHARACTERS ............25 LINK MEMORIES TO DIALBUTTONS ........26 M1 & M2 ..................28 INTERCOM, TRANSFER AND CONFERENCE INTRODUCTION ................. 29 INTERCOM ................. 29 TRANSFER / CONFERENCE CALL ........... 30 CLOCK &...
- Page 51 ADDITIONAL HANDSETS 13.1 INTRODUCTION ................. 40 13.2 TO REGISTER HANDSETS ............40 13.3 TIPS FOR MULTIPLE HANDSETS ..........41 13.4 DE-REGISTERING HANDSETS ..........41 TIPS AND WARNINGS 14.1 PLACEMENT ................42 14.2 RANGE..................43 14.3 POWER SUPPLY HANDSET ............43 14.4 HEARING AIDS ................
-
Page 52: Warranty
19 WARRANTY For the Profoon PDX-2808 / PDX-2808 DUO DECT you have a warranty of 24 months from the date of purchase. During this period, we guarantee the free repair of defects caused by material and workmanship errors. All this subjected to the final assessment of the importer.
Need help?
Do you have a question about the PDX-2608 and is the answer not in the manual?
Questions and answers